9 5 Electric LED GROW LIGHT INSTALLATION INSTRUCTIONS WARN I NG: These products may represent a possible shack or fire hazard if improperly installed or attached in any way. Products should be installed in accordance with the owners manual, current electrical codes and/or the current National Electric Code (NECK. PARTS INCLUDED 48in, Mounting 6 in. hanging Cable dips Candlepower thinkable zing.
6 in. Hanging Cable Installation (single unit grow light) 1 ENSURE THE FORFEITURE 1S NOT PLUGGED 1N TO THE ELECTRICAL POWER. 5 Hang the hanging cables onto the hanging hooks. 2 Attach two hanging hooks £ the selling. The spacing between the hanging hooks should be £5.75 In, Piggy in the power cord to the subset and plug the other end to the 3 install the cable clips into the slotted holes on the end caps of the future. future, Make sure to switch the fix um on.
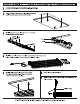
12 in. Brackets and Screws Installation (2 grow lights or more) 1 ENSURE THE FIXTURE IS NOT PLUGGED 1N T0 THE ELECTRICAL POWER. 2 install the 12 in. brackets on to the fixture end caps. The mile and female ends should be alternated, Use the above assembly 36 2 template, Pace against the selling and mark mounting holes, Counting hole 4 At the marked locations, drill holes forth screw of rancher 25 appropriate. Attach the assembly to the selling using ‘ four (4) mounting sowers.
12 in. Brackets and 6 in. Hanging Cable Installation (2 grow lights or more) 1 ENSURE THE FIXTURE 1S B0 PLUGGED Il 0 THE ELECTRICAL POWER. AT e 2 Attach four hanging hols (net Included) to the selling. The spading between the hanging hooks should be 45.75 n.x7.1in. 3 Inst ail the 12 in. brackets on to the fixture end caps. The fame and formidable ends should be alternated.