ITEM # LEDR4XTIRGBWICA/AG IMPORTANT SAFETY Thank you for your purchase. skeletons, comments INSTRUCTIONS AND Vor fl come ramp INSTALLATION GUIDE READ BEFORE INSTALLATION SAVE THESE INSTRUCTIONS Please read and understand this entire manual before attempting to assemble, operate or Install this product. This product must be Installed In accordance with any applicable installation code(s) by a qualified electrician or person familiar with the construction and operation of the product and the hazards involved.
PACKAGE CONTENTS Before beginning installation of this product, make sure all parts are present. Compare parts with package contents list and diagram. If any part is missing or damaged, do not attempt to assemble, install or operate this product.
PER-INSTALLATION REVIEW = Turn the power OFF from the breaker panel before starting installation. * Locate a suitable location for the fixture and cut the correctly sized hole in the drywall or ceiling tile (for a suspended T-Bar type ceiling) — refer to Hole Cut Out Template for appropriate size. = Know the location of your joist before making any cuts. * Run electrical wire from the switch (power supply) through the mounting hole; use NM cable or Flexible Metal Conduit Cable.
INSTALLATION INSTRUCTIONS (CONTINUED) Reconnect the tethered connector before restoring B Restore the power at the breaker panel. the power at the breaker panel. To ensure proper connection, the arrows on the cable adapters must be facing each other. Screw on the fastener to secure connection. Hold the spring clips against the fixture and gently guide into the ceiling until the clips snap into place. The fixture should be flush with the ceiling. FA nor Gelling thickness must be 1/21n.
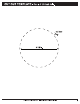
CUT OUT TEMPLATE For a 4 1/8 inch hole. > N cut here 41/8in. FAT ELECTRIC COMPANY | PIC RIVERA, CA | www felt.
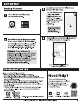
APP SETUP 3 . Launch and use the Fe it Electric app Getting Started: ~~ to complete the set up Tap Add Device or the oe Download the Fe it Electric app + sign, then select a on your smart device. Lighting Device and Fiat Electric app confirm. You will be prompted to enter your WI-Fi network and password. Be sure fo connect GHz WI-Fi network that covers your installation location After hard wiring to the power supply, turn on your Smart WI-Fi Downright. The downright must be blinking rapidly to connect.