3-Axis Stabilized Handheld Gimbal for Camera Instructions EN V 1.
Catalogue 1. Overview www.feiyu-tech.com 2. Start to Use 3. Gimbal Balance Balance Adjustment of the Tilt Axis Balance Adjustment of the Roll Axis Balance Adjustment of the Pan Axis 4.
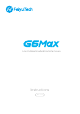
1. Catalogue Sliding Arm Thumb Screw Tilt Axis Position Lock Roll Axis Knob Ring Roll Axis Pan Axis Knob Ring Display Multifunction Knob Shutter Button Roll Axis Position Lock Pan Axis Joystick Function Button 1/4-20 inch Thread Hole www.feiyu-tech.
Tilt Axis Knob Ring Tilt Axis Fixed Plate Quick Release Plate Cross Arm Anti-drop Column Safety Lock Vertical Arm Pan Axis Position Lock 1/4-20 inch Thread Hole Type C Port Power Button Camera Mode Button Trigger Button Handle Accessories USB 2.0 to TypeC X1 Tripod X1 Long Thumb Screw X1 Type-C to Micro (A03)×1 Panasonic Shutter Cable X1 Sony Shutter Cable X1 Type-C to TRS 2.5 (T02)×1 Type-C to Type-C (C02)×1 Smartphone holder X1 Gopro adapter (1/4 Thumb Screw) X1 www.feiyu-tech.
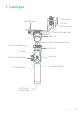
2. Start to Use 1 Charging TIPS Please fully charge the battery before powering on the gimbal at the first time. Charging with Type C USB cable, as the figure below shows: Note: DO NOT charge the gimbal via the Type C port on the fixed plate. Otherwise, the circuit board may be burnt.
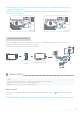
*Pull the safety lock to left to unlock, and pull it to right to lock it when the safety lock is locking as the figure 4. Pull the safety lock to left to lock it, and pull it to right to unlock when the safety lock is unlocked as the figure 5. Lock Locking Unlock Figure 4 Unlocked Lock Unlock Figure 5 Smartphone Installation Mount smartphone into the smartphone holder, and tighten the thumb screw to fix the smartphone holder on the quick release plate. The width of smartphone should be 54-88mm.
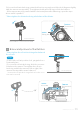
4 Position Lock Each of the three rotating axis has one position lock, take the pan axis lock for example. 3 axes position lock 3. Gimbal Balance TIPS Unlock Unlock Lock Lock Lock status Unlock status ( Before powering on ) If the gimbal is not well balanced, it will decrease the performance of stabilization or even cannot balance the camera. *Before balancing the gimbal, please lock the gimbal at the balanced lock status, and unlock the position lock in stages for convenient balancing.
(3) Loosen the tilt axis knob ring, rotate the tilt axis to any angle, and slide the sliding arm slightly, until the camera can stay stable. Then tighten the tilt axis knob ring to finish the balance. (If the camera cannot be parallel with the horizontal plane after balancing, repeat the steps above until it is parallel.) * Please tighten the tilt axis knob ring after balanced the tilt axis.
Loosen move Roll Axis Knob Ring Cross Arm (3) If the camera cannot be parallel with the horizontal plane after balancing, please unlock the safety lock, and slide the quick release plate until the camera is parallel with the horizontal plane, then lock the safety lock. * Please lock the safety lock after balanced the roll axis. 3 move Unlock Quick Release Plate Lock Balance Adjustment of the Pan Axis * Please tighten the pan axis knob ring after balanced the pan axis.
4. Function & Operation Working mode Pan Mode (Default mode) The roll and tilt direction are fixed, and the lens moves according to the left-right movements of the user's hand. Follow Mode The roll direction is fixed, and the lens moves according to the left-right movements, up-down movements of the user's hand. All Follow Mode The lens moves according to the user's hand. Lock Mode The orientation of the lens is fixed. Reset Return to pan mode, three axis return to default position.
Touch Screen Display icon Mode / Status HF Pan Mode TF Follow Mode AF Display icon All Follow Mode LK Mode / Status Photo mode Video mode Battery Level Tilt axis enabled Lock Mode Pan axis enabled Bluetooth is connected Roll axis enabled Bluetooth is not connected Zoom WiFi is connected WiFi is not connected Follow focus Timelapse mode Joystick Upward (1) Camera lens upward (2) Select the option above Move to left (1) Camera lens move to left (2) Select the option on the left (3)
Function Button Operation After connecting to Feiyu ON APP, users can customize the function button operations of lock/pan/follow/all follow mode. Single tap Pan/Lock mode Default Double tap Follow mode Default Triple tap All Follow Mode Default Single tap in pan mode to switch to lock mode. Single tap in lock mode to switch to pan mode. Single tap in follow mode to switch to pan mode.
Trigger Button Operation Users can customize the trigger button operations of lock/fast follow/ follow mode via Feiyu ON APP. Press and hold Fast follow Default Double tap Reset Triple tap Press and hold trigger button in pan/ follow mode to enter fast follow mode, release it to return to previous mode. Return to pan mode, three axis return to default position.
Download and connect App Feiyu ON Photo/Video Timer photography Zooming Track time-lapse Object tracking Face tracking Light tracking photography Ultra-wide angle panorama Slow motion Filter Video editing Landscape and portrait switching Beauty Firmware upgrade Overlapping images ...... Please download Feiyu ON at your smartphone app store or scan the QR code below. * Requires iOS 9.0 or later, Android 6.0 or later. iOS Version Android Version Connect the App (1) Turn on the gimbal.
Timelapse mode It is convenient to make gimbal move at a constant speed through timelapse mode. It can be used to record normal video or timelapse photography. Set time parameters on Feiyu ON App Enter the Feiyu ON App to set the timelapse mode parameters. Enter the parameter setting interface to select the timelapse mode for setting.
Inception mode Select "Inception" on screen, the camera lens will rotate to upward. Holding the gimbal horizontally, and set rotation direction/speed, rotates one circle or continuous rotating. The camera will automatically rotate 360 degree to take inception footage with pre-set speed and direction after setup. Inception Portrait Timelapse Turn Right Turn Left Continue R Continue L Set Speed Portrait mode Hold the gimbal horizontally, select "Portrait" on screen to enter portrait shooting.
Firmware Upgrade Firmware Upgrade Upgrade the firmware through the Feiyu ON App. (1) Click the icon (2) Select upgrade type. (3) Follow the prompts to upgrade the firmware. Upgrade type introductions: Gimbal update: Repair / update or newly add gimbal control / function / parameter and etc.
Connect Camera with Wi-Fi (1) Power on the gimbal. (2) Turn on Bluetooth and Feiyu ON App, APP automatically connects to gimbal with the strongest signal of Bluetooth. The Bluetooth icon on display will be lighted after successfully connected. (3) How to Obtain camera’s Wi-Fi name and password.
Camera :SONY a6300,A7S II, A7 etc. Gain Wi-Fi name and password at "smart remote embedded" in the Application list. Application 1 Application List PlayMemories Camera Apps Introduction SmartRemoteEmbedded Application Management Smart Remote Embedded Wi-Fi Operate smartphone to connect to this divice via Wi-Fi SSID: XXXXXX-XXXX: XXXX-XXXX Password: 12345678 Device Name: ILCE-XXXX MENU 1 2 Select Enter MENU MENU 3 ExitApp.
(4) Switch on Feiyu ON App , select the camera connection icon in the virtual joystick interface, select corresponding camera brand and camera you used, choose right camera Wi-Fi name and input password. Remote Control FY_G6Max_xx Connect Camera Waiting for 5~10 seconds, After the connection is successful, the camera interface will display corresponding tips and changes.
Gimbal Initialization You can initialize your gimbal when (1)When camera is not balance. (2)If not use for a long period of time. (3)In case of extreme temperature variations. STEPS (1) Select Calibration on the display by joystick to enter the gimbal initialization. Motor Setup Knob Setup Cam Setup Initialize Language (2) Place the gimbal on the table, and the gimbal automatically initializes.
6. Specifications 114.03mm 143.6mm 299.41mm Specifications Max. Tilt Range 280° Max. Pan Range 360° Max. Roll Range Theoretical Battery Life Net weight Payload Capability Compatible Cameras for Reference 330° 9 Hours 665g ( not including camera、lens and other accessories ) 1200g (After balancing ) Sony RX100 / Sony a6300 (16-50 or 28-70mm) / Sony a6500 (16-50 or 28-70mm) / Canon M50, ect.
Compatible Cameras for Reference Brand Canon Model Canon EOS M50 Canon EOS RP Canon G7X MarkIII Canon 200D Sony RX0 Sony RX100Ⅳ Sony RX100 V Sony RX100 VI Sony a6300+16-50 Sony a6500+28-70 Sony a6000 Sony a5100 Sony sony AS50 SONY X3000 sony QX1 sony RX1RⅡ Sony a6400+24-70 Sony DSC-HX90 SonyDSC-WX500 Sony RX100M5A Sony HDR-AS50R Sony FDR-X3000R Sony SJ cam Sony RICCA www.feiyu-tech.
Brand Sony Model Sony α7sII/7SM2 Sony α7RII Sony α9 Panasonic DC-GF9KGK Panasonic ZS70 Panasonic ZS220 Panasonic GX9K+12-32 Panasonic GF10K+12-32 Panasonic Panasonic DMC-ZS110 Panasonic GH3 Panasonic GH4 Panasonic GF9X Panasonic LX10 Panasonic LX100 Panasonic DMC-GX85 SJcam SJcam SJ6 LEGEND RICCA RICCA GoPro gopro 5/6/7 YI YI 4K *Tips: The camera needs to be close to the tilting motor. www.feiyu-tech.
Disclaimer Thanks for using Feiyu Gimbal. The information in this document affects your safety and your legal rights and responsibilities. Read the entire document carefully to ensure proper configuration before use, Failure to read and follow instructions and warnings in this document may result in serious injury to yourself or others, or damage to your products or damage to other objects in the vicinity.
Guilin Feiyu Technology Incorporated Company For more information, please visit our official website www.feiyu-tech.com E-mail: service@feiyu-tech.com Tel: +86 773 2320865 Due to software and hardware improvements, your actual product might differ from the descriptions and pictures in this user manual. You can get the latest user manual from the official website.