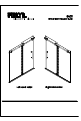
PART LIST Check all parts according to the list before assembly . Feel free to contact with us if you need assistance .
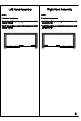
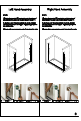
Left Hand Assembly Right Hand Assembly STEP 1 STEP 1 1.Installation Measurements 1.
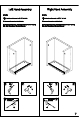
Left Hand Assembly STEP 2 1. Have the higher edge of door bottom guide(11) towards outside, level it with level and mark the hole position with pencil. 2. Take away door bottom guide(11) and drill holes on the markings. 3. Hammer wall anchors(1) into holes. 4. Secure door bottom guide(11) with self-tapping screws 4X20(9). Right Hand Assembly STEP 2 1. Have the higher edge of door bottom guide(11) towards outside, level it with level and mark the hole position with pencil. 2.
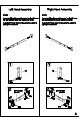
Left Hand Assembly STEP 3 1.Measure the distance between walls where the Top Rail (13) will be installed. The Top Rail(13) are match 48" or 60" shower door. If the shower area less 48" or cut the Top the side of without hole) For example:If the shower door of you buy is you shower area just 46", so you need cut 2". @ Right Hand Assembly STEP 3 1.Measure the distance between walls where the Top Rail (13) will be installed. The Top Rail(13) are match 48" or 60" shower door.
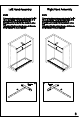
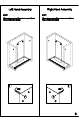
Left Hand Assembly STEP 4 1.Position the template(20) against the wall, the bottom of the template should be over the Door Bottom Guide(11) . 2.Use the level to make the template is vertically straight. Mark the hole position with a pencil. Repeat the process on the opposite side. 3.Please refer to pictures at the end of instructions for clarity. Insert template to bottom door guide. Level the template. Use pencil to mark the hole. Right Hand Assembly STEP 4 1.
Left Hand Assembly Right Hand Assembly STEP § STEP 5 1.Drill a hole on the mark with 1/4" drill bit. 1.Drill a hole on the mark with 1/4" drill bit. 2.Hammer the anchor into the hole. 2.Hammer the anchor into the hole. 3.Use one of the 1 1/4" self tapping screws(16) to secure 3.Use one of the 1 1/4" self tapping screws(16) to secure Rail Wall Connector) onto the wall. Rail Wall Connector) onto the wall.
Left Hand Assembly STEP 6 1.Install the 2 Door Bumpers(15) onto the Top Rail Wall Brackishness) on both sides of the Top Rail. 2.Use the 3mm Allen Wrench to secure them by tightening the screws on the bottom. 2) Don't exceed the hole Right Hand Assembly STEP 6 1.Install the 2 Door Bumpers(15) onto the Top Rail Wall Brackishness) on both sides of the Top Rail. 2.Use the 3mm Allen Wrench to secure them by tightening the screws on the bottom.
Left Hand Assembly STEP 8 1.Insert the assembled Top rail(13) on the Rail wall loosen the screws on Ra ill wall racketeer. Second, push the Ra ill wall bracket) on both side to the Rail wall connectable. Third, secure the screws use 3mm Allen wrench. Right Hand Assembly STEP 8 1.Insert the assembled Top rail(13) on the Rail wall loosen the screws on Ra ill wall racketeer. Second, push the Ra ill wall bracket) on both side to the Rail wall connectable. Third, secure the screws use 3mm Allen wrench.
Left Hand Assembly STEP 9 1.Install Fixed Fixed panel(17) on Door bottom push the Fixed panel(17) to the panel(17) is one the outside, the Top rail(13) is on the inside) 2.Dismantle Fixed panel fastener(14) use 4mm Allen wrench. 3.Assemble Fixed panel(17) and Top rail(13) together with Fixed panel fastener(14). Then secure the screw use 4mm Allen wrench. A A The Fix Panel should placed as close to the wall. n Right Hand Assembly STEP 9 1.
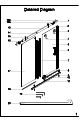
Left Hand Assembly STEP 10 1.Position the Door Guide (10) against the Door Bottom Guide (11) at the end of the Fix Panel. (see Diagram) 2.Use pencil to mark the drill holes of Door Guide (10). 3.Drill the hole on the ground. 4 Use a hammer to guide the Anchor(1) inside of holes. 5.Use 4 x 20 self-tapping screws (9) to secure the Door Guide . ~~ ~~ side view 75 side view Right Hand Assembly STEP 10 1.Position the Door Guide (10) against the Door Bottom Guide (11) at the end of the Fix Panel. (see Diagram) 2.
Left Hand Assembly STEP 11 1.Make sure the bottom of the Roller Door(5) inserts onto the Door Guide(10). 2.Hang the Roller Door(5) onto the Top Rail(13). Right Hand Assembly STEP 11 1.Make sure the bottom of the Roller Door(5) inserts onto the Door Guide(10). 2.Hang the Roller Door(5) onto the Top Rail(13).
Left Hand Assembly STEP 12 1.Adjust the Adjustable Roller by use 4 mm and 3mm Allen Wrench on the same time. The Roller door could be adjusted higher or lower by use the Adjustable Roller. on Right Hand Assembly STEP 12 1.Adjust the Adjustable Roller by use 4 mm and 3mm Allen Wrench on the same time. The Roller door could be adjusted higher or lower by use the Adjustable Roller.
Left Hand Assembly STEP 13 1.Install the Anti-Jumper (4). 2.The distance between the Anti-Jumper and the Top Rail should be 1/16". — 1/16" Right Hand Assembly STEP 13 1.Install the Anti-Jumper (4). 2.The distance between the Anti-Jumper and the Top Rail should be 1/16".
Left Hand Assembly STEP 14 1.Cut the Threshold (8) to correct size of opening,varies per space. 2.Install the Threshold (8) on top of Door Bottom Guide (11). Right Hand Assembly STEP 14 1.Cut the Threshold (8) to correct size of opening,varies per space. 2.Install the Threshold (8) on top of Door Bottom Guide (11).
Left Hand Assembly STEP 15 1.Put on the Bumper Strip (2) and Water Retainer Gasket(7) on the side of Roller Door (5). 2.Install Water Retainer Gasket(7) on the side of Fixed panel(17). Right Hand Assembly STEP 15 1.Put on the Bumper Strip (2) and Water Retainer Gasket(7) on the side of Roller Door (5). 2.Install Water Retainer Gasket(7) on the side of Fixed panel(17).
Left Hand Assembly STEP 16 1.Install the Handle (6) onto the Roller Door(5) by unscrewing the screws that are attached to the door handle and reinserting through the panel back into the handle. Tighten with the 2mm Allen Wrench. Right Hand Assembly STEP 16 1.Install the Handle (6) onto the Roller Door(5) by unscrewing the screws that are attached to the door handle and reinserting through the panel back into the handle. Tighten with the 2mm Allen Wrench.
Left Hand Assembly STEPPE 1.Avoid the Roller door(5) bumping into the Wall by moving the Door Bumper(15) to a desired position. 2.Do the same on the other side of Door Bumper(15). 3.The Roller Door(5) should be stopped 1 1/2" before the Wall. Right Hand Assembly STEPPE 1.Avoid the Roller door(5) bumping into the Wall by moving the Door Bumper(15) to a desired position. 2.Do the same on the other side of Door Bumper(15). 3.The Roller Door(5) should be stopped 1 1/2" before the Wall.
STEPPE 1.Use Clear Silicone on the both sides of shower door and the Left Hand Assembly Door Bottom Guild. Let dry for 24 hour. STEPPE Right Hand Assembly 1.Use Clear Silicone on the both sides of shower door and the Door Bottom Guild. Let dry for 24 hour.