Slim Progressive Scan DVD Player SKU 319618 User’ s Guide Important notice: Please read this manual carefully
WARNING - TO PREVENT FIRE OR SHOCK HAZARD. DO NOT USE THIS PLUG WITH AN EXTENSION CORD. RECEPTACLE OR OTHER OUTLET UNLESS THE BLADES CAN BE FULLY INSERTED TO PREVENT BLADE EXPOSURE. - TO REDUCE THE RISK OF FIRE OR ELECTRIC SHOCK, DO NOT EXPOSE THIS APPLIANCE TO RAIN OR MOISTURE.
FCC RADIATION NORM FCC This equipment has been tested and found to comply with limits for Class B digital device pursuant to Part 15 of Federal Communications Commission (FCC) rules. FCC Compliance Statement These limits are designed to provide reasonable protection against frequency interference in residential installation.
Important Safeguards and Precautions Power Cord Protection To avoid the unit from malfunctioning, and to protect against electric shock, fire or personal injury, please observe the following: • Hold the plug firmly when connecting or disconnecting the AC power cord. • Keep the AC power cord away from any heating appliances. • Never put any heavy objects on the AC power cord. • Do not attempt to repair or reconstruct the AC power cord in any way.
Table of Contents General Information Features ....................................................................................................................................................................................... DVD Region Code ......................................................................................................................................................................... Glossary of Disc Terms ........................................................................
General Information Features Glossary of Disc Terms • • • Title (DVD) The longest sections of a picture or a music piece on a DVD; a movie, etc., for a picture piece on a video software; or an album, etc., for a music piece on an audio software. Each title is assigned a title number enabling you to locate the title you want. • Chapter (DVD) Sections of a picture or a music piece that are smaller than titles. A title is composed of several chapters.
General Information(continued) Notes on Using Discs Accessories Disc handling precautions • To keep the disc clean, handle the disc by its edge. Do not touch the surface. • Do not stick paper or tape on the disc. If there is glue (or a similar substance) on the disc, remove the glue completely before using the disc.
Remote Control Remote Control 1 5. FAST REVERSE: Press to fast reverse through the currently playing disc and/or track. 15 16 6. STOP: Press to stop playback. 2 17 7. TITLE/PBC: In DVD mode press to return to the menu. In VCD mode press to switch the PBC on/off. 3 18 8. DIRECTION BUTTONS: Press to select the item you want. 4 5 6 19 7 20 8 21 12. ANGLE: Press to access various camera angles on the DVD. 9 22 13.
Function Overview 6 Front Panel 1 2 3 4 5 1. ON/STANDBY Button : Press to switch between power on and standby mode 2. EJECT Button : Press to open or close the disc tray 3. BACK 9 Button : Press to skip to the previous track (only during playback) 4. STOP < Button : Press to stop playback 5. FWD : Button : Press to skip to the next track (only during playback) 6. PLAY/PAUSE ; Button : Press to start or pause disc playback Back Panel 1 2 4 3 5 1.
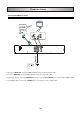
Connections Connections Connecting Your DVD Player to Your TV AUDIO IN VIDEO IN * Connect the S-VIDEO OUT jack to the S-Video input jack on the TV using an S-Video cable. * Connect the VIDEO OUT jack to the Video input jack on the TV using a video cable. * Use the audio cables to connect the AUDIO OUT jacks to the corresponding AUDIO IN jacks on your TV, CD or TAPE recorder. * Use the Digital cables to connect the COAXIAL jack to correspond to receive a digital signal.
Basic Setup TV SYSTEM In the top menu select the Setup Menu to enter in order to make any You can setup the color system of this unit to match your connected TV set. If the color system of this unit is different from that of the TV set, the images will not be displayed normally on the setup changes. In the Setup Menu, select the Setup Menu option to make changes to the setup. For purposes of this manual the setup options are described from top to bottom order, beginning with the SYSTEM screen.
Basic Setup(continued) 16:9 If you have a widescreen TV set, use this setting (you must DEFAULT If you select this function, all of the functions will restore to the also set your widescreen TV to Full size). original settings, except the rating. SCREEN SAVER The default setting for the SCREEN SAVER is ON. the screen saver image appears when you leave the system in stop mode for about 5 minutes. LANGUAGE SETUP 1. Press SETUP on the remote control. 2. Use / / / to select item you want. 3.
Basic Setup(continued) OSD LANGUAGE AUDIO SETUP • ENGLISH • SPANISH 1. Press SETUP on the remote control. 2. Use / / / to select the item you want. 3. Press ENTER to confirm the selection. 4. To exit the setup, press SETUP again. This section includes: •DIGITAL OUT •DOWN SAMPLE •DOWNMIX OSD LANGUAGE AUDIO LANG SUBTITLE LANG MENU LANG DRM REG CODE EXIT SETUP DIGITAL OUT The default setting is RAW. The default setting for the OSD LANGUAGE is ENGLISH.
Basic Setup(continued) DOWN MIX BRIGHTNESS, CONTRAST, HUE, SATURATION To play a DVD disc recorded with surround multi-channel audio correctly. Select the appropriate setting according to your audio system. • The BRIGHTNESS, CONTRAST, and SATURATION are the same User Interface. The default setting for the BRIGHTNESS and the CONTRAST is 6; the default setting for the HUE and the SATURATION is 0. LT/RT When the disc you played has PRO LOGIC stereo function, you can select this.
Playing Discs General operation 1 After all the connections are properly completed, plug the AC power cord of the player to an appropriate wall outlet. 2 Press ON/STANDBY to turn ON the main power. 3 Press OPEN/CLOSE to open the disc tray, press again to close the disc tray. 4 Press MUTE to shut off the sound. To restore the volume, press MUTE again. Basic playback If you select OK, it will appear as below. Start playback • Press /ll to start playback, to pause playback, press /ll again.
Playing Discs(continued) Repeat 1. For DVD discs Press REPEAT repeatedly to select the following: Playing MP3, DIVX, or JPEG picture discs 1. Load an MP3, DIVX, or JPEG disc. REP : [ OFF ] 2. Playback should start automatically, if it does not, then press the /ll button to start playback. REP : [ CHAPTER ] 3. Press l / l to select the previous or next track. REP: [ TITLE ] 4. While in stop mode , press the / / / button to select a desired album title , then press the /ll button to start playback.
Playing Discs(continued) Using the Menu for DVD 1 2 3 When playing back a CD 1 Press DISPLAY repeatedly to show the following (for reference only): Press MENU/RETURN while playing a DVD disc. The TITLE MENU will appear on the TV screen. The contents of the menu vary from disc to disc. Use the / / / buttons to select the title (or chapter) you want to play. Depending on the disc, you can use the number buttons (0~9,+10 ) to select the title (or chapter). Press ENTER to start playback.
Playing Discs(continued) Program play You can play the contents of the disc in a specific order by programming the order of the tracks to be played. 1 While playback is stopped, select or press PROGRAM to enter the program mode. 2 Use the number buttons (0 ~ 9,+10) to input the track numbers in the order you want. 3 Repeat step 2 to store other tracks. 4 To start program play, press 5 To stop playback, press 6 To cancel the program, press /ll. once. again.
Special Function Picture Zooming Angle selection This function allows you to enlarge the picture on the TV screen and to pan through the enlarged image. 1 Some DVD discs contain scenes which have been shot simultaneously from a number of different angles. For these discs, the same scenes can viewed from each of the different angles. Press ZOOM repeatedly to select a zoom factor as below: ZOOM 2 ZOOM 3 1 Press the ANGLE button to change the scenes from one angle to other angle(s).
Troubleshooting External noise is heard • Check that the connecting cords are away from a transformer or motor. • Move your TV away from the audio components. • The plugs and jacks may be dirty. Wipe them with a cloth slightly dampened with alcohol. • Clean the disc. If you experience any of the following difficulties while using the system, use this troubleshooting guide to help you remedy the problem. Should any problem persist, please call tech support listed on the warranty.
Specifications DVD section Laser type ............................................................................. Signal system ....................................................................... Video output level ................................................................. Video Y output level .............................................................. Video C output level .............................................................
One Year Limited Warranty This product is warranted to be free from defects in material and workmanship for a period of one year. Warranty obligations are limited to the replacement or repair of defective parts and components, at the option of the manufacturer. The warranty of this product is null and void if the product is subjected to negligence, abuse, modification, misuse, accident or if the customer uses the product for a function it was not intended for.
Garantía Limitada Por Un Ano Garantizamos que este producto estarálibre de defectos de material y de fabricación por un ano. Las obligaciones de esta garantía se limitan al reemplazo o reparación de las piezas y componentes defectuosos, a elección del fabricante. La garantía de este producto seráanulada si el producto sufre negligencia, abuso, modificación, uso incorrecto, un accidente, o si el cliente utiliza el producto para una función para la que no fue disenado.