
accessories PRECISIO Owner's manual

9
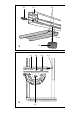
The stop plate (5.3) must be fastened to the ad-
justable stop with the screw (5.4) through the bore
hole (5.2).
Make sure that the nut (5.7) with washer is always
on the side opposite the stop plate.
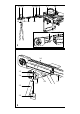
4 Fitting on right side
When you purchase the unit, the trimming attach-
ment is assembled so that it can be fi tted on the
left side of your CS 70 EB.
If you wish to fi t it on the right side, it can be
dismantled by releasing the screw (1.11) and re-
moving the rotary knob (1.9) for laterally inverted
installation.
There are bore holes for the screw (1.10) and ro-
tary knob (1.9) on both ends of the adjustable stop
(1.4) and end piece (1.3) for this purpose.
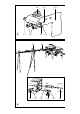
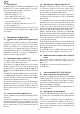
5 Extension (Fig. 6)
The cutting range of the trimming attachment can
be extended to 4000 mm using the extension piece
(Order No. 488 557), available as an accessory.
5.1 Assembly
Insert the rotary knob (6.1) with washer (6.2)
through the lateral bore hole of the adjustable stop
and screw into the threaded hole A of the feather
key (6.3) by approx. 2 rotations. Push the rod (6.6)
of the extension approx. 10 cm into the profi le rail
and tighten the rotary knob (6.1)
Fasten the stop plate (6.8) to the extension as
described in section 2.4.
Assemble the base support (6.7) in the manner
described in section 2.2. Fasten the base support
to the lower groove of the stop ruler with the rotary
knob (6.4) and feather key (6.5).