
User's Manual


16 Carvex PS420 Series
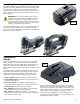
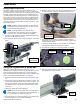
Using the Trammel to Cut Circles
The optional circle cutter (trammel) permits the jigsaw to
cut circular holes in a workpiece from the minimum and
maximum sizes shown in the table below.
Min
Inch
Max
Inch
Min
mm
Max
mm
Radius
1 59 46 1500
Diameter
3⅝ 118 92 3000
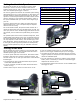
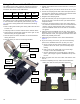
The optional circle cutting trammel attachment mounts
to the underside of the optional guide rail base (see page
10). The circle cutting attachment contains the following
features:
► Built-in tape guide showing the cutting radius from 46 mm
to 1500 mm.
► Clamping knob to lock the trammel at the desired radius.
► Index pointers and trammel points for either right- or left-
hand mounting to the jigsaw base.
► Trammel points for either clockwise or counterclockwise
cutting directions.
► Trammel point pin with on-tool storage location.
Clockwise
Trammel Point
Guide Rail
Base
Index
Pointers
Counterclockwise
Trammel Point
Trammel Point
Pin Storage
Clamping
Knob
Cutting
Indicator
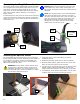
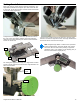
1. Identify the location of the center of the arc or circle you
wish to cut.
2. Drill a 4mm (5/32") hole at the center of the arc or circle.
3. Loosen the clamping knob and extend the tape measure
until the index pointers are pointing to the desired radius.
The radius is 1/2 the diameter of a circle.
4. Retighten the clamping knob.
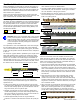
5. Insert the trammel point pin through the trammel point
of the circle cutter, and into the hole you drilled into the
workpiece above.
► There are 2 trammel points on the circle cutter. One is
for clockwise rotation and the other for counterclockwise
rotation. Use the trammel point that is directly across
from the sawblade when the circle cutter is mounted to
the jigsaw.
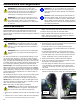
6. Install the desired sawblade into the saw. If the radius/
diameter of the cut is small, use a scrolling sawblade. For
larger diameter circles, the high side set teeth of the FSG
blades will probably work best.
7. Install the guide rail base on the saw as described on
page 10.
8. If you are cutting a full circle, you will need a starting
point for the sawblade that lines up with your circle.
a. Using a pencil and the cutting indicator, trace out a
portion of the circle where you will manually begin
cutting.
b. Drill a hole on the waste-side of your circle large
enough to insert the sawblade into.
c. Use this starting hole to manually begin cutting the
circle—just enough to get the sawblade lined up with
the cut.
9. Place the jigsaw onto the circle cutter and continue with
the cut.
10. Before completing the cut, make sure that both the
waste piece and the saved piece are supported.
Underside
of Jigsaw