
User's Manual


18 Carvex PS420 Series
Maintenance and Adjustment
WARNING! Any maintenance or repair work
that requires opening of the motor or gear hous-
ing should be carried out only by an authorized
Customer Service Center (see your dealer for
information on locating a service center).
WARNING! To reduce the risk of electrocution or
other personal injury, always unplug the tool from
the power supply outlet or remove the battery
before performing any maintenance or repair work
on the tool.
NOTICE: Do not use compressed air to clean the
motor housing of the tool, as you could inject for-
eign objects into the motor through the ventilation
openings.
NOTICE: Certain cleaning agents and solvents are
harmful to plastic parts. Some of these include, but
are not limited to: Gasoline, Acetone, Methyl Ethyl
Ketone (MEK), Carbonyl Chloride, cleaning solutions
containing Chlorine, Ammonia, and household clean-
ers containing Ammonia.
Routine Maintenance
Keep the Saw Clean
Dust and debris from some materials can be extremely
abrasive and cause components within the saw to wear
prematurely. It is important to keep moving parts cleared of
abrasive dusts.
► As a general rule, keep the saw clean of all dust and
debris. Even soft-wood dust can be abrasive over time.
► Examine all moving parts for dust and debris.
► Keep the blade area and dust extraction port clean of
debris. Debris can cause wear and reduce the effective-
ness of the dust extraction system.
Adjustments
Programming the LED light Function
WARNING! The stroboscopic function of the LED
light may make it difcult to determine the blade
position, or give the appearance that the blade is
not moving.
WARNING! Never look directly into the LED lights.
The lights are very bright and may damage your
vision.
The LED work lights have 3 programmable settings. These
are stroboscopic, steady-on, and off. To reduce the likeli-
hood of the bright LED lights from shining in the operator’s
eyes, the lights will automatically turn off any time the saw
is rotated slightly past vertical toward the upside down posi-
tion. These three operating modes are described below:
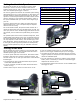
Stroboscopic: The stroboscopic function means that the
LEDs will operate in unison with the speed of the sawblade
stroke. This synchronous operation will make the sawblade
appear stationary, instead of a blur of motion. The purpose
of this stopped-motion appearance is to make it easier to
follow a pencil line.
The stroboscopic effect is active only when the blade speed
is above approximately 2100 strokes per minute. This
means the frequency range of the light is 35 to 63 Hertz.
Steady-On: In the steady-on mode, the LED lights will be
active and steady-on anytime the saw is operating, except
when the saw is turned upside down.
Off: In this mode, the LED lights are disabled.
WARNING! Do not perform this adjustment with a
sawblade installed in the jigsaw. This adjustment
may result in the saw starting unexpectedly.
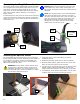
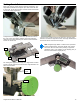
1. Remove the sawblade from the saw as described on page
8.
2. Hold the saw in such a manner that when the LED lights
turn on, they will not shine directly into your eyes.
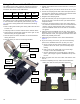
3. Simultaneously press and hold both left and right barrel
power switches until the saw beeps.
► If the saw turns on, turn it back off and try again.
The saw may turn on if both switches are not pressed
simultaneously.
► It will take approximately 10 seconds for the saw to
beep from the time you rst pressed the two switches.
► The LED lights may or may not come on after the saw
beeps, depending on the previous program mode.
4. When the saw beeps, release both power switches.
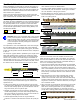
5. Press and release the right-hand power switch to cycle
through the 3 programming options.
► The LED lights will indicate the current program mode.
They will ash if in stroboscopic mode. They will be
steady-on for steady-on mode. They will be off for the
off-mode.
6. When the desired program mode is selected, Pres and
release the left-hand power switch to exit program-mode.
Right Power
Switch
Left Power
Switch