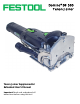
Domino® DF 500 Tenon Joiner Tenon Joiner Supplemental Extended User’s Manual Important: Read and understand all instructions before using this tool.
Warranty Conditions of 1+2 Warranty You are entitled to a free extended warranty (1 year + 2 years = 3 years) for your Festool® power tool. Festool shall be responsible for all shipping costs during the first year of the warranty. During the second and third year of the warranty the customer is responsible for shipping the tool to Festool. Festool will pay for return shipping to the customer using UPS Ground Service.
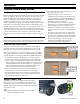
Contents Warranty ..............................................................................2 Conditions of 1+2 Warranty .........................................2 Festool Limited Warranty .............................................2 Liability Statement .........................................................2 Proprietary Notice..........................................................2 General Safety Rules.........................................................4 Work Area Safety ...................
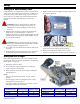
General Safety Rules !WARNING: Read and understand all instructions listed below. Failure to heed instructions may result in personal injury, electrocution, or fire hazard. Save These Instructions Work Area Safety ► ► Keep your work area clean and well lit. Cluttered benches and dark areas invite accidents. Do not operate power tools in explosive atmospheres, such as in the presence of flammable liquids, gases, or dust. Power tools create sparks which may ignite the dust or fumes.
► ► particular type of power tool, taking into account the working conditions and the work to be performed. Use of the power tool for operations different from those intended can be hazardous. Use only accessories that are recommended by the manufacturer for your model. Accessories that may be suitable for one tool may become hazardous when used on another tool. Use the power tool, accessories and tool bits etc.
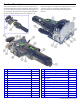
Functional Description The Domino DF 500 Tenon Joiner is used to cut mortises in wood for floating tenon joinery. Mortise and tenon joinery is one of the oldest and strongest methods of joining pieces of wood together. The Domino tenon joiner greatly simplifies the task of cutting mating mortises in workpieces to be connected together. A rotating and oscillating cutter sweeps across the workpiece to quickly and effortlessly cut a uniform mortise, in which a Domino floating tenon is inserted.
Setup Setting Up a New Domino Joiner Congratulations on your purchase of a new Festool Domino Tenon Joiner. The Domino joiner is the finest portable loose tenon joiner in the world. Before using your new Domino joiner, make sure you fully read and understand all of the precautions and safety information presented in this manual. 4. Make sure that the fence height and angle locking levers are properly tightened.
Setting the Fence Height The height of the fence needs to be adjusted depending on the type of joint being made and the thickness of the material being joined. Refer to the Applications section beginning on page 13 for more information about the optimal fence height for the specific application. There are two features available for setting the fence height; the height gauge and the board thickness gauge. 3.
Setting the Mortise Depth The mortising depth determines how deep into the workpiece the mortising bit penetrates. This needs to be adjusted for different sized tenons. In most cases, the tenon should be centered across the joint, and the depth of the mortise should be ½ the length of the tenon. However, in some cases you may want to have more of the tenon in one piece than the other (lower Domino tenon pictured below). In this case, the sum of the two depths must equal the length of the tenon.
Operation Overview, General Notes, and Tips Getting Started Because the look and feel of the Domino joiner may already be familiar to you, or similar to other tools you may have used in the past, you might be tempted to forego a basic introduction to using the tool. However, unlike other tools of similar look and feel, the Domino machine is extremely precise in its operation.
Turning On the Joiner WARNING: Never turn the tool on when the Fence Body is removed, as this exposes the spinning cutter. Before turning the tool on, make sure all adjustment handles are locked and the tool is safe to turn on. The power switch for the Domino joiner locks into the On position when activated. When working with the tool for the first time, it is recommended that you become familiar with the operation of the switch before you plug the tool in to a power outlet.
Using the Base Support Bracket The base support bracket stabilizes the joiner when mortising on the face of a narrow board as shown to the right. The base support bracket mounts to the underside of the joiner with two thumbscrews. Before tightening the thumbscrews, check to make sure the face of the support bracket is flush with the face of the joiner. Using the Optional Outrigger Guides The optional outrigger guides extend the position of the locating pins for wider tenon spacing.
Using the Optional Narrow Frame Fence The optional narrow frame fence is used to securely hold small workpieces for cutting mortises. Installing the Narrow Frame Fence 1. With the fence tilted to 90 degrees, slide the narrow frame fence over the fence face of the Domino joiner as shown. Make sure the narrow frame fence is fully seated onto the joiner’s fence. 2. Slide the two latch tabs inward. 3. Tighten the two thumbscrews. Setting the Fence Width 1.
Making Butt Box Joints Butt box joints are typically used in general box construction or for drawer construction. The Domino tenons strengthen the joint without the need for additional fasteners. The example below highlights drawer construction, but the same techniques are used on other types of box construction. Construction Tips ► ► ► 4. Clamp the Captive boards flat to your workbench. 5. Align the tenon position using the locating pins (refer to the picture on page 11). 6.
Making Miter Box Joints Generally miter box joints are fairly weak because the joint is predominately endgrain to endgrain. Tenons significantly increase the strength of the joint and make it easier to assemble and clamp the pieces. Construction Tips ► ► ► For thinner materials, keep the mortise close to the inside corner. This minimizes the chances for boring all the way through the workpiece. For very thin materials, it may be necessary to shorten the Domino tenon length as described on page 19.
Making Frame Joints Domino tenons can be used to quickly fabricate reinforced frames of all types. Mitered Frames Butt Joint Frames When making mitered frames, position the tenon closer to the inside corner. This reduces the likelihood of cutting the mortise all the way through the workpiece. When making butt joint frames, such as cabinet faceframes, use pencil lines to lay out the position of the tenons.
Making Carcase Butt Joints Using tenoned butt joints is an effective method for constructing a cabinet carcase. The tenons provide a strong support for each of the horizontal partitions of the cabinet. The simplicity of this method is that you use the carcase components for aligning the joiner. the position shown in the photographs below. For greater shelf-strength, keep the tenons closer to the bottom-side of the shelf: ► If the shelf is thick (greater than 20mm), tip it down with the top-side facing up.
Making Three-Way Lock Miter Joints Three-way miter joints have been around for ages as a way of creating a corner joint without having any endgrain visible. Using the Domino Tenon Joiner, you can create easy to construct, locking, three-way miters. The key to these joints is that they require floating tenons at 45 degrees to the main body of the wood. Unlike non-locking joints, no single piece can be removed from the joint without separating all three pieces.
Shortening a Domino Tenon’s Length There may be times when you need a large Domino tenon, but the length of the tenon does not fit your application. It is important to firmly and safely hold the tenon while you cut it to length. shortened tenon out of the mortise slot after it has been cut to length. WARNING: Never attempt to cut a Domino tenon’s length without using a mechanical holder. Holding the tenon with your hand poses an extremely serious risk of personal injury.
Maintenance Any maintenance or repair work that requires opening of the motor or gear housing should be carried out only by an authorized Customer Service Center (see your dealer for information on locating a service center). Maintenance or repair work carried out by an unauthorized person can lead to improper connection of electrical wires, misadjustment, or damage to components, which can result in injury.
Calibrating the Locating Pins It is important that the two locating pins are perfectly spaced from the center of the mortise hole for properly aligned mortises. The factory default setting is in the neutral position. 1. Using the procedure described in “Using the Locating Pins” on page 11, plunge a left-hand and right-hand mortise into two blocks of scrap wood. Make sure the mortise width dial (see page 8) is set to the smallest setting.
Accessories Mortising Bits: Carbide Tipped. Sold separately or in a set of all four. Sizes ► 5 mm ► 6 mm ► 8 mm ► 10 mm Domino Tenons: Sold separately or in an assortment.
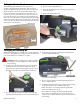
Systainer (System Container) Each Festool product is shipped in its own unique system container, called a "Systainer." This provides protection and storage for the tool and accessories. All Systainers are stackable and can be interlocked together, including stacking and locking atop Festool dust extractors. Parts of the Systainer ► ► ► ► Carrying Handle. The carrying handle folds flat when not in use. Cover Latches. The two green latches on the front of the Systainer secure the cover.
Troubleshooting Symptom Motor does not start Possible Causes 1. Check that the cord is properly plugged into an outlet. 2. Make sure the outlet has power. Check the circuit breaker or try another outlet. 3. If used with a Festool dust extractor, make sure the selector switch is pointing to "Auto". The auxiliary outlet on the dust extractor has power only when the selector is at Auto. 4. Inspect the power cord (including extension cords) for damage or missing prongs. 5.