Domino® XL DF 700 Tenon Joiner Tenon Joiner Supplemental User’s Manual WARNING To reduce the risk of serious injury, read and understand all safety precautions and instructions in this manual before using this tool.
Limited Warranty 30 Day Money Back Guarantee We are so confident that you will thoroughly enjoy our tools, that we offer a 30 day money back guarantee. If you are not completely satisfied, your full purchase price will be refunded, excluding all freight charges. 1+2 Limited Warranty Festool USA offers a 3-year limited warranty, one of the longest in the industry. This warranty is valid on the pre-condition that the tool is used and operated in compliance with the Festool operating instructions.
Contents About This Manual............................................ 3 Tool Symbols.................................................... 3 General Power Tool Safety Warnings............... 4 Work Area Safety........................................... 4 Electrical Safety............................................. 4 Personal Safety.............................................. 4 Power Tool Use and Care................................. 4 Service.........................................................
General Power Tool Safety Warnings WARNING! Read all safety warnings and instructions. Failure to follow the warnings and instructions may result in electric shock, fire, and/or serious injury. Save all warnings and instructions for future reference. Work Area Safety ►► Keep your work area clean and well lit. Cluttered or dark work areas invite accidents. ►► Do not operate power tools in explosive atmospheres, such as in the presence of flammable liquids, gases, or dust.
dance with these instructions, taking into account the working conditions and the work to be performed. Use of the power tool for operations different from those intended could result in a hazardous situation. poorly maintained power tools. ►► Keep cutting tools sharp and clean. Properly maintained tools with sharp cutting edges are less likely to bind and are easier to control. ►► Use the power tool, accessories, and tool bits etc.
Functional Description The Domino DF 700 Tenon Joiner is used to cut mortises in wood for floating tenon joinery. Mortise and tenon joinery is one of the oldest and strongest methods of joining pieces of wood together. The Domino tenon joiner greatly simpli- P fies the task of cutting mating mortises in workpieces to be connected together. A rotating and oscillating cutter sweeps across the workpiece to quickly and effortlessly cut a uniform mortise, in which a Domino floating tenon is inserted.
Setup Setting Up a New Domino Joiner Congratulations on your purchase of a new Festool Domino Tenon Joiner. The Domino joiner is the finest portable loose tenon joiner in the world. Before using your new Domino joiner, make sure you fully read and understand all of the precautions and safety information presented in this manual. 4. Make sure that the fence height and angle locking levers are properly tightened.
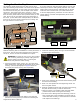
Setting the Fence Height The height of the fence needs to be adjusted depending on the type of joint being made and the thickness of the material being joined. Refer to the ”Applications” section beginning on page 13 for more information about the optimal fence height for the specific application. There are two features available for setting the fence height; the height gauge and the height stop. Note: It is not necessary to set the mortise height to be exactly in the center of a board.
Setting the Mortise Depth The mortising depth determines how deep into the workpiece the mortising bit penetrates. This needs to be adjusted for different sized tenons. In most cases, the tenon should be centered across the joint, and the depth of the mortise should be ½ the length of the tenon. However, in some cases you may want to have more of the tenon in one piece than the other (lower Domino tenon pictured below). In this case, the sum of the two depths must equal the length of the tenon.
Operation Overview, General Notes, and Tips Because the look and feel of the Domino joiner may already be familiar to you, or similar to other tools you may have used in the past, you might be tempted to forego a basic introduction to using the tool. However, unlike other tools of similar look and feel, the Domino machine is extremely precise in its operation.
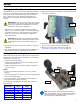
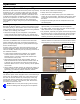
Using Dust Extraction The Domino joiner is intended to be used with a dust extraction system. Using the machine without dust extraction will cause it to clog with wood chips. Vacuum Hose Dust Port When installing a Festool dust extraction hose onto the dust port of the machine, it is easiest to insert the hose at an angle and then push it on the rest of the way as shown to the right.
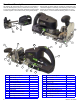
Using the Optional Cross Stops The optional Cross Stops extend the position of the locating pins for wider tenon spacing. These are also adjustable so the spacing can be tailored to the needs of the specific application. DF 500 versus DF 700 Setup Setup Calibration The new model Cross Stop is compatible with both DF 500 and DF 700 joiners by inverting the stop pin assembly. This changes the height of the stop pins to line up with existing Note: The two Cross Stops are specific for right and mortises.
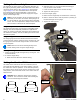
Using the Optional Trim Stop The optional Trim Stop is used to securely hold small workpieces for cutting mortises. Installing the Trim Stop Locked Position Thumbscrew 1. With the fence tilted to 90 degrees, slide the Trim Stop over the fence face of the Domino joiner as shown. Make sure the Trim Stop is fully seated onto the joiner’s fence. 2. Slide the two latch tabs inward. 3. Tighten the two thumbscrews. Latch Setting the Stop Width 1.
Applications Edge Joining Boards Edge joining boards is a common method for creating wide boards from a series of narrower boards. The Domino tenons add strength to the joint and also assist in aligning the boards to be flush. For edge joining boards, a series of tenons are placed down the length of the joint. The first tenon is used to register the two boards horizontally, so it is milled at standard width. The remaining tenons align the boards flush and may be milled with an oversize width.
Making Butt Box Joints Butt box joints are typically used in general box construction 7. Grasp the Domino joiner by the auxiliary handle, hold or for drawer construction. The Domino tenons strengthen it firmly down to the workpiece, and slowly plunge the the joint without the need for additional fasteners. The cutter into the edge of the workpiece. example below highlights drawer construction, but the same techniques are used on other types of box construction.
Making Frame Joints Butt Joint Frames For larger frame stock, you may be able to use the stop pins for setting the mortise position. When making butt joint frames, such as cabinet faceframes, use pencil lines to lay out the position of the tenons. Use the Make sure to securely clamp the workpiece to the bench sight gauge on the joiner’s fence to position the joiner over when mortising a mitered joint. the pencil line.
Making Carcase Butt Joints Using tenoned butt joints is an effective method for constructing a cabinet carcase. The tenons provide a strong support for each of the horizontal partitions of the cabinet. The simplicity of this method is that you use the carcase components for aligning the joiner. Because the mortises are registered from the base of the Domino (fixed 15 mm distance), the direction that you tip the shelf (either toward the top or toward the bottom) depends on how thick the shelf is.
Making Lock Tenon Joints A locked tenon joint is any type of joint with two or more tenons at opposing angles. Once the opposing tenon(s) are inserted, the joint cannot be disassembled. At least one of the tenons must be exposed so it can be inserted after the joint is assembled. This is referred to as the Locking Tenon. There are many variations of a locked tenon joint, but the simplest involve a mitered corner in a box or flat frame. The miter angle provides an easy reference for the two tenon angles.
Maintenance WARNING! Any maintenance or repair work that requires opening of the motor or gear housing should be carried out only by an authorized Customer Service Center (see your dealer for information on locating a service center). WARNING! To reduce the risk of electrocution or other personal injury, always unplug the tool from the power supply outlet before performing any maintenance or repair work on the tool.
Calibrating the Sight Gauge The horizontal position gauge (also called the sight gauge) is used for aligning Domino tenons to a pencil mark on the workpiece. If the gauge is not perfectly centered over the mortising slot, the two workpieces will not be aligned when the joint is assembled. Calibration Procedure 1. Take two pieces of scrap wood, and draw a thin line on each piece where a tenon is to be placed. You do not need to be concerned with how the edges line up. 4.
Troubleshooting Symptom Possible Causes Motor does not start ►► Make Plunging action is not smooth ►► Clean Domino tenons are too loose ►► Make Domino tenons are too tight ►► The Workpiece joints are misaligned horizontally ►► Make Workpiece joints are misaligned vertically ►► Take Tilted or misaligned mortise slots ►► Make Workpiece joint won’t close (gaps between pieces) ►► Make Tearout or rough mortise slots ►► Plunging Tapered mortise slot.