
Installation Guide

www.fhiaba.com · www.thevettagroup.com · Info Line 1-855-4-FHIABA (1-855-434-4222) www.fhiaba.com · www.thevettagroup.com · Info Line 1-855-4-FHIABA (1-855-434-4222)
26
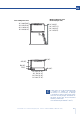
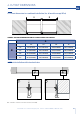
5.1 Overlay door panel layout
The dimensions of the panels are indicated in the
table and drawings on subsequent pages.
Nevertheless, according to the requirements for
aligning with other kitchen structures, the door
panel can be higher than the upper edge of the
refrigerator door.
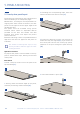
The panels must be mounted using special
brackets which attach to adjustable devices
provided on the door and drawer and with
brackets that anchor and adjust the panel’s
vertical direction.
Brackets and fixing screws are provided with the
appliance and must be applied to the panel as
indicated.
For shaker or framed panel styles, it may
not be possible to affix the upper or lower
leveling brackets
Operate as follows:
To prepare the panels to be mounted on the ap-
pliance, follow these steps, working on the back
of the panel.
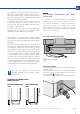
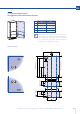
Door Panel
> Draw a vertical center line on the panel from
top to bottom [ 1 ].
> Starting from the bottom edge of the panel,
mark the positioning of the brackets [ 2 ].
5. PANELS MOUNTING
2
1
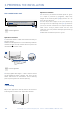
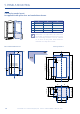
> Following the corresponding table, mark the
external and then the internal hole [ 3 ].
> Position the brackets on each set of marks to
make sure they are aligned [ 4 ], if you choose to
drill small pilot holes for the screws pay special
attention to not pass through the panel entirely.
[ 5 ].
> Screw the brackets in place [ 6 ].
6
4
3
5