
Installation


18
2
3
1
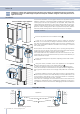
B
A
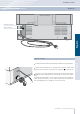
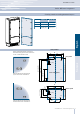
6,5 (¼”) 6,5 (¼”)
20 (¾”)
20 (¾”)
22 (7⁄8”)
22 (7⁄8”)
22 (7⁄8”) 22 (7⁄8”)
Series: All
www.fhiaba.com · www.thevettagroup.com
Installation
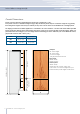
For a built-in installation, to close gaps between the appliance and the
adjacent cabinets, special side proles (installed) and aluminum trim
covers (taped to back of appliance) are provided. Side proles are
used for xing the appliance to the niche cabinet and can be shim-
med from the side of the appliance in order to match the niche width.
(Remove screws holding trim to side of appliance and place washers
between prole and appliance and replace screws for example)
Operate as follows:
Push the appliance into the installation niche
1
.
If the unit is to be installed inside a niche or within an enclosed
structure, it is not necessary to design a ventilation shaft at the back of
the niche as North American models come with a top ventilation cap
which accommodates sufcient ventilation even though it is behind
the overlay panel.
Ensure panels are mounted (BI Series) prior to pushing the appliance
all the way into the niche as the panel mounting procedure requires
additional height clearance than the niche provides.
If for some reason the top ventilation cap has been removed - a mini-
mum 5mm gap must be provided at the top / back of the cabinetry to
allow warm air to escape.
Check the levelling of the appliance, adjusting its feet and wheels
to correct it.
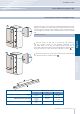
Using the screws provided, secure the appliance to the adjacent
cabinets through the holes on the prole side trims
2
.
To make this operation easier keep the door and the drawer open.
It may be necessary to hold the door at an approximate 70 degree an-
gle to get the easiest access on the hinge side prole with a screwdri-
ver.
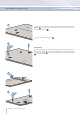
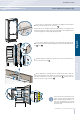
Install the prole trim covers: mate with the face of the appliance
and the top of the niche then slide laterally over the prole trims. It will
be necessary to press rmly or use a block and mallet to completely
lock the trims into place until a ‘click’ is heard.
Take care not to damage the soft aluminum trims. Ensure that the full
installation is satisfactory prior to installing the prole trim covers as it is
very difcult to remove them without damaging them after installation
3
.
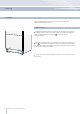
Built-in installation single appliance
Appliance Wall
or
furniture
Wall
or
furniture
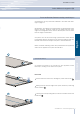
A Connecting element B Alluminium frame
Side proles mounting
Installation in cabinet of this height requires that the back of the cabinet de ventilated through the top. Otherwise,
an additional 2 inches of cabinet height is required for adequate ventilation. Height of custom side panel can be
higher as necessary.