
Installation Guide

www.fhiaba.com · www.thevettagroup.com · Info Line 1-855-4-FHIABA (1-855-434-4222) www.fhiaba.com · www.thevettagroup.com · Info Line 1-855-4-FHIABA (1-855-434-4222)
39
EN
6. INSTALLATION: BOTTOM COMPRESSOR MODELS
IMPORTANT: The following instruction for installation apply to all Fhiaba models.
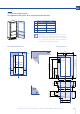
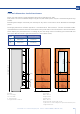
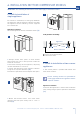
6.1 Built-in installation of
single appliance
For a built-in installation, to cover gaps between
the appliance and the adjacent cabinets and affix
the appliance to the cabinetry, use the supplied
10 x bracket kit.
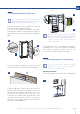
Operate as follows:
> Push the appliance into the installation cutout [ 1 ].
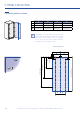
> Always mount front panel on door before
pushing the unit into its final position inside the
cutout or structure.
> Check the levelling of the appliance, adjusting
its feet and wheels to correct it.
> Secure the appliance to the adjacent cabinets
using the 10 x spacer brackets. [ 2 ].
To make this operation easier keep the door open.
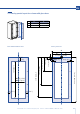
> Mount the bracket covers: first insert them
laterally and then push firmly until a “click” is
heard [ 3 ].
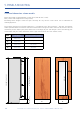
Side profiles mounting:
A Plastic connecting brackets
B Profile trim cover
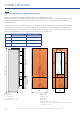
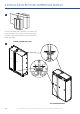
6.2 Built-in installation of two or more
appliances
> The central profile is provide with freezer and
wine cellar columns.
Plastic covering frames are provided for
closing gaps between the appliance and the
adjacent cabinets.
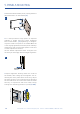
Operate as follows:
> Position the appliances in front of the installation
area, leaving enugh space to operate at their back
[ 1 ].
Appliance
Wall or furniture
A
B
B
Click!
Click!
3
1
2