
Installation Guide

www.fhiaba.com · www.thevettagroup.com · Info Line 1-855-4-FHIABA (1-855-434-4222) www.fhiaba.com · www.thevettagroup.com · Info Line 1-855-4-FHIABA (1-855-434-4222)
45
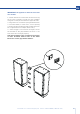
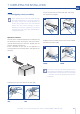
7.1 Anti-tipping safety assembly
If the appliance(s) is not connected through
the side profile trims to secured cabinetry
you must install the anti-tip brackets to
ensure the product does not fall forward
during use and cause damage or injury.
Failing to secure the appliance(s) securely
will void any warranty claim attributable to
a tipping situation.
Operate as follows:
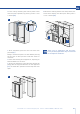
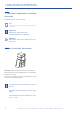
> The brackets should be applied as illustrated using
the provided screws If using the anti-tip brackets,
lag into wood framing or concrete - drywall will not
hold the weight of appliance.
Place a bracket on the top of the appliance in
correspondence to the fixing holes and against the
wall [ 1 ].
> Mark up the holes position on the wall [ 2 ].
7. COMPLETING THE INSTALLATION
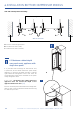
> Drill the wall with an 8 mm (3/8”) bit and insert
the expansion plug [ 3 ].
> Reposition the bracket and fix it first to the cabinet
and then to the wall [ 4 ].
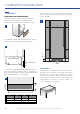
In order to use the anti-tip brackets on the
top compressor models, it will be necessary
to temporarily remove the top, metal ceiling
/ shield to access the bolting points for the
brackets.
EN
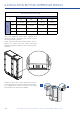
BOTTOM COMPRESSORS
UNIT
BOTTOM COMPRESSORS
MODEL
TOP COMPRESSORS
UNIT
TOP COMPRESSORS
MODEL
2 x
6 x
152 (6”)
59 (
2
3⁄8
”)
45 (1
5⁄8
”)
1
2 x
6 x
152 (6”)
59 (
2
3⁄8
”)
45 (1
5⁄8
”)
1
2
3
4