
Installation Guide


1
3
3
4
5
6
7
8
8
9
10
13
14
16
17
18
19
20
21
22
23
25
26
28
30
31
32
33
34
Installation Guide
www.fhiaba.com · www.thevettagroup.com
EnglishFrançais
Index
Page
Important Instructions
Important safety instructions
Children safety
Technical requirements
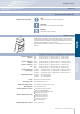
Appliance features and installation requirements
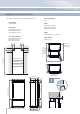
Integrated installation niche features
StandPlus installation niche features
X-Pro installation niche features
Preparing to install
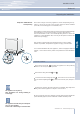
Transport to installation site and unpacking
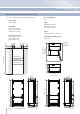
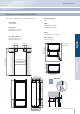
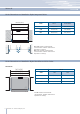
Niche Dimensions and Installation Styles: Integrated Series
Niche Dimensions and Installation Styles: StandPlus and X-Pro Series
Installation types
Electrical and Water connection
Levelling
Panels mounting
Decorative door and Bottom-Drawer panels layout
Decorative panels layout for Fridge with one Bottom-Drawer
Decorative panels layout for Fridge with two Bottom-Drawers
Decorative panels layout for Fridge with Glass door and one Bottom-Drawer
Decorative panels layout for Fridge with Glass door and two Bottom-Drawers
Panels Dimensions One Bottom - Drawer
Panels Dimensions Two Bottom - Drawers
Mounting the handles on Integrated units
Mounting panels to the door and the drawer of Integrated units
Installation
Built-in installation of single appliance
Built-in installation of two or more appliances
Completing the installation
Anti-tipping safety assembly
Mounting handles on stainless front
Air circulation
Ventilation
Post installation control
Start Up