The 802.
Table of Contents Chapter 1 Introduction ...................................................................................3 About This Manual ............................................................................................4 Product Overview ..............................................................................................5 802.11g Wireless LAN Card Features...............................................................6 System Requirements ........................................
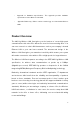
Chapter 1 Introduction Congratulations on your decision to use wireless networking. The 802.11g Wireless LAN Card is a high performance, IEEE Standard 802.11g compatible, wireless networking card that installs into your PC’s slot to support wireless LAN communications at speeds up to 54Mbps with other PC’s located hundreds of feet apart. Figure 1 Typical Wireless LAN Network The 802.
Data access from work, streaming audio MP3’s from a notebook to a stereo, downloading Internet content wirelessly from a broadband connection, watching TV on a notebook, are all possibilities with the 802.11g Wireless LAN Card. About This Manual This manual provides you with all the information necessary to successfully install and use your new 802.11g Wireless LAN Card. The manual is divided into six chapters and two appendices as follows: • Chapter 1- Introduction.
• Appendix A- Hardware Specifications. This appendix provides hardware specifications for the Wireless LAN Card. • Appendix B-Glossary. Defines various terminology associated with Wireless LANs. Product Overview The 802.11g Wireless LAN Card gives you the freedom of secure high-speed communications with other PCs without the need for interconnecting wires. You can even connect in to other LAN infrastructures such as your company’s internal Ethernet LAN or your own home network.
802.11g Wireless LAN Card Features • Up to 54Mbps data transfer rates for high-speed access to data • Compatible with 802.11g Wi-Fi CERTIFIED equipment (2.
Wireless LAN Card for your particular operating system (these procedures are detailed in Chapter 3-Installation). 2. Plug the Wireless LAN Card into your PC’s Slot. 3. Set up your wireless LAN using the instructions in Chapter 4. Record your security codes (WEP keys), etc. for later reference. Repeat steps 1 through 3 for each PC that will be connected to your wireless LAN. Your wireless LAN should now be fully functional. 4.
Wireless LANs (WLAN) allow users to roam freely about a network taking their computers with them while still maintaining a networking connection. In essence, WLANs are an extension of wired LAN networks, where the critical need is data access and mobility. The tradeoffs are slower speeds (although quite satisfactory for Internet and email access) and limited roaming distance, as dictated by the environment.
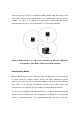
need for an Access Point to a hard-wired LAN network. Only PCs that use the same radio channel and network name can communicate over the Ad-Hoc network. This type of a network is a peer-to-peer relationship where each computer talks directly to one another with no one PC being dominant. Figure 2 Ad-Hoc Mode: Two or More PCs with 802.
extends the range of the WLAN, double over that of client only networks because the access point is able to forward data within its BSS. Infrastructure mode enables the network clients to freely roam, once an ESS (Extended Service Set) is established. With all clients using the same radio channel and ESS ID (sometimes referred to as SSID which is a given name to the network), users are fully mobile within the range of the access point signal.
Planning Your New Wireless Network First, determine what components (WLAN cards, access points) and what kind of network will be created (Ad-Hoc, Infrastructure mode). Then select your network name (SSID), WEP key (security password) and channel number (1 through 11 in US, 1 through 13 in Europe and 1 through 14 in Japan). All members of the wireless LAN will have to configure their PCs to the same SSID, WEP and Channel number to talk to each other.
the country where the network is being set up, you may have a choice of up to 14 channels available. In the US, channels 1 through 11 are defined for use in the 2.4GHz spectrum used by 802.11g. In Europe, channels 12 and 13 are added, while Japan can have up to 14 channels. Channels 1, 6 and 11 are the most commonly used channels in the US. For your network, choose a channel that offers little interference and configure all users of this network to the same channel.
Note: Every key has an added 24-bit provided by the card, which are set by the manufacturer and not user modifiable. This manual uses the terms 40-bit and 104-bit to represent 64-bit and 128-bit keys respectively. This is the most commonly used terminology in the industry. The WEP key for your wireless LAN network is another form of password.
Chapter 3 Installation 1. Insert the installation CD into your CD-ROM drive. The setup program will start automatically. 2. Click Next to begin the setup. 3. Select the destination folder. To install to the default folder as shown below, click Next to continue.
4. The necessary Driver and Utility files will be copied to your system directory. 5. Select No and then click Finish to complete the installation (Windows 98 SE and ME users must select Yes).
6. The shortcut will appear on your desktop. By click this icon, you can run the Utility program. Note: After installing a new network adapter, Windows automatically configures the TCP/IP protocol to automatically obtain an IP address from a DHCP server. Depending on your setup, you may want to consider specifying a fixed IP address for your new wireless adapter. Chapter 4 Configuration & Operation Once the driver is installed, the 802.11g Wireless LAN Card will be up and running.
Wireless LAN Configuration for Windows 98 SE / ME / 2000 If your PC uses Windows 98 SE, Windows ME, or Windows 2000, use the following configuration procedure. NOTE: If your PC uses Windows XP, skip this procedure and refer to the paragraph titled, “Wireless LAN Configuration for Windows XP” located further in this chapter. Utility Startup Configuration Details The Wireless LAN Card has its own management software. Users can control all functions provided by the application named WLAN Utility.
The WLAN Management Utility (Windows 98 SE / ME / 2000) The WLAN Utility contains the following four major functions. Each function is described in detail below: • Status: provide the information of the current wireless connection. • Profile: allow users easily configure different settings for each profile. • Survey: support site-survey tool to list the active access points that are within the range of your computer.
Profile Name The name of profile currently in use. Connection Status SSID The name of the SSID (Service Set Identification) associated with the profile. State This field is used to display the current state of the driver.
Associated - Normal flow of operation between stations in Ad-Hoc mode and Infrastructure mode. Not Associated - means the node cannot detect any Ad-Hoc station or access point within the range. Scanning - Searching for available access point or active node. Mode The mode can be either access point or peer-to-peer. Access Point (Infrastructure Mode) – This mode of operation requires the presence of an access point.
Power Saving Mode Indicate the power saving mode is being enabled or disabled. Power saving mode can reduce the power usage by temporarily disconnecting wireless connections when the connection is idle. Figure Status Indication Area There are two modes in the status indication area. One is Access Point and the other is Peer-to-Peer. At the same time, each mode allows users to enable or disable WEP.
Access Point / WEP disabled The receiver is receiving excellent signals. Encryption is disabled. The receiver can not receive the AP’s signal. Encryption is disabled. Peer-to-Peer / WEP enabled The receiver is receiving excellent signals. Encryption is enabled and matched. The receiver can not receive the PC’s signal or user authentication failed. Peer-to-Peer / WEP disabled The receiver is receiving excellent signals. Encryption is disabled. The receiver can not receive the PC’s signal.
Profile Tab The Profile tab is used to configure the various profiles available to you for wireless connections. The Profile tab contains some of the same fields as the Status tab, but unlike the Status tab, all of the fields in the Profile tab are alterable. Figure 2 shows the screen layout of the profile tab. Figure 2 Profile Tab Profile Name Allow to give a name to the profile. Any user can add 9 different profiles at most if he wishes.
below it, you then can press Apply to save the profile. Click “Apply” or “OK” to activate the options that you have set. Network Name The identification of BSS (Basic Service Set) is associated with the current profile. The default value is “ANY”. This allows your wireless client to automatically associate to any access point in the vicinity of your wireless client. TIP: SSID is the name of the Wireless LAN network to connect to. If some are detected, these will be displayed on screen.
Transmission Rate The transmission rate is the rate at which the data packets are transmitted by the client. The default value is “54Mb” and cannot change. Channel Changing the channel is only effective in Ad-Hoc networks. Networking operating infrastructure mode can automatically scans for a channel. Be aware that when the peer-to-peer mode is selected, be sure to set your wireless stations with the same channel. Power Save Enable The field allows you to set enable or disable the power saving mode.
Advanced Button Figure 3 Profile Advance Settings RTS Threshold The field allows you to set enable or disable. When the field is set to Enabled, you can adjust the value between 0 to 2432. RTS threshold is a mechanism implemented to prevent the “Hidden Node” problem. “Hidden Node” is a situation in which two stations are within range of the same access point, but are not within range of each other. Thus, it provides a solution to prevent data collisions.
Encryption Button The Encryption button is used to equip an additional measure of security on your wireless network, which can be achieved by using WEP (Wired Equivalent Privacy) encryption. To prevent unauthorized wireless stations from accessing data transmitted over the network, WEP can support high secure data encryption. WEP encrypts each frame transmitted through the radio by using one of the Keys entered from this panel.
Encryption [WEP security] The field allows you to select Disabling, 64-bit and 128-bit. When setting 64bit, or 128 bits, it means WEP security is used. WEP Key For 64-bit encryption: • Alphanumeric: 5 characters (case sensitive) ranging from “a-z”, ”A-Z” and “0-9”. (e.g. My*#Key) • Hexadecimal: 10 hexadecimal digits in the range of “a-f”, "A-F" and "0-9". (e.g. 11AA22BB33). For 128-bit encryption: • Alphanumeric: 13 characters (case sensitive) ranging from “a-z”, ”A-Z” and “09”. (e.g.MyKey12345678).
encrypt and decrypt data packets, and any computer on a WEP network must have the same key, otherwise it will not be allowed on that network. It is recommended that you select WEP encryption to reduce security risks and unauthorized users from using the wireless LAN network and access to important data. Create Keys with Pass-phrase WEP keys may be created using a Pass-phrase to randomly generate the four keys. This saves considerable time when entering all four keys into each node on the wireless network.
Use WEP key This field updates the driver with the four keys displayed in Key1 through Key4. These keys are also written to the registry for permanent storage. 802.11d Button The 802.11d tab supports Wireless Local Area Networks providing specifications for conformant operation beyond the original six regulatory domains of that standard. These extensions provide a mechanism for an IEEE Std 802.11 access point to deliver the required radio transmitter parameters to an IEEE Std 802.
Figure 5 802.
None You can choose the county in the Countries/Domains field which corresponds to your location. Strict Your adapter will only communicate with AP which provides 802.11d support. Flexible Your adapter can communicate with any AP it find. Restore Defaults Button Pressing this button restores each field in the panel to its default value. Remove Profile Button Pressing this button move the setting value of each field in the panel.
chosen by users and simultaneously modify the Default profile automatically. If users want to update the survey result, they can press Rescan button again. Each row of the information contains the following columns: Figure 6 Survey Tab Number of Discoveries The total number of wireless LAN devices discovered by this Site-Survey.
SSID The ESS ID stands for Extended Service Set Identification, and it presents the SSID of the access point. In the peer-to-peer device discovered, all clients should share the same SSID for communication. BSSID The BSSID stands for Basic Service Set Identification. During infrastructure mode, it represents the MAC address of the access point. Mode The discovered device is an access point (AP) or a peer-to-peer (P2P) device. WEP The discoverable device is encryption enable or disable in this column.
Channel This field shows the current channel used by the discovered device. About Tab The About tab is used to show Wireless Client Management Utility version, Serial Number and MAC Address of this Network Interface Card, Network Interface Card Driver version and Network Interface Card firmware version. Users need to use these version numbers when reporting their problems to technique support.
Utility Version WLAN Management Utility version Driver Version Device Driver version and date Firmware Version Firmware version Network Card Serial Number NIC serial number Network Card MAC Address NIC MAC address Wireless LAN Configuration for Windows XP Use the following procedure if you are configuring a Wireless LAN Card Wireless LAN Card using a PC running the Windows XP operating system. To configure your card for use with a network: 1.
2. A list of available network SSIDs will be provided, if any are detected or available. If a network is chosen and requires a WEP key, the key should be entered in the Network Key field. TIP: SSID is the name of the Wireless LAN network to connect to. If some are detected, these will be displayed on screen. Otherwise, enter a name to use. The SSID is casesensitive. Always use the same spelling and case when adding computers to the network. NOTE: Record your SSID below and refer to it when necessary.
(minimal security) or 104-bit (more secure). Additionally a WEP key is needed to encrypt and decrypt data packets, and any computer on a WEP network must have the same key, otherwise it will not be allowed on that network. It is recommended that you select WEP encryption to reduce security risks and unauthorized users from using the wireless LAN network and access to important data. A 40-bit key is 5 characters (such as “AbCdE”) while a 104-bit key is 13 characters in length.
2. Select the SSID of the network to log on, and click Configure. This will open up the Wireless Networks Properties window.
3. Ensure the WEP key is correct. If the Wireless LAN Card is used with an access point, the checkbox This is a computer-to-computer (ad hoc) network… should not be checked. What is Ad-Hoc? A network mode that selects communications & data access between wireless computers only. The alternative is Infrastructure mode (data access between wireless computers, access points and/or a wired LAN network). 4. Select OK.
• Authentication • Advanced General Tab The General Tab is provided by Windows XP. Screen options include • Connect Using – shows the Wireless LAN Card • Configure – (new window) shows typical connection protocols used (e.g. Client for Microsoft Networks, Internet Protocol (TCP/IP) settings) • Install- installs a new service. • Uninstall-uninstalls a selected service.
Show icon in notification area when connected - A check here will display the connection status of the Wireless LAN Card in the System Tray area of the Windows desktop. Wireless Networks window The Wireless Networks tab displays a list of detected Access Points by name (SSID) as well as the user’s preferred networks to connect to, using the Wireless LAN Card.
The Available Networks box displays detected, available networks in the area of the Wireless LAN Card. The SSID of the access points in those networks are displayed. TIP: SSID is the name of the Wireless LAN network to connect to. If some are detected, these will be displayed on screen. Otherwise, enter a name to use. SSID is case- sensitive. Always use the same spelling and case when adding computers to the network.
• Advanced – Allows selection of all or a subset of all the networks in the Preferred Network list. No entries are removed from the list, but some networks may not be displayed if they are not selected. Clicking Advanced displays a new window with three choices. • Any available network (access point preferred) - The Wireless LAN Card will connect with networks using access points first, but all networks including AdHoc will be displayed.
Based on the selection, all or a subset of all the networks in the Preferred Network list are enabled and displayed. The remainders of the networks in the list are disabled. This selection also decides which type of networks to configure or add. If the Automatically connect to non-preferred networks check box is selected, then the Wireless LAN Card will try to connect any non-preferred networks after it has tried all the networks in Preferred Network list without any success.
Network name (SSID) - The current network access point or the name of the network being configured. Data Encryption (WEP enabled) – A check here enables data encryption via WEP. A WEP key is required beforehand. TIP: WEP is a protocol defined in 802.11i to provide encryption capabilities for wireless LAN communications. Because data travels through air, there is a likelihood of unintended receivers listening in on your data conversation.
WEP network must have the same key, otherwise it will not be allowed on that network. It is recommended that you select WEP encryption to reduce security risks and unauthorized users from using the wireless LAN network and access to important data. Network Authentication (Shared mode) – This check box should be set if you want to use WEP encryption for Network Authentication. NOTE: If either of the above check boxes are checked, a new check box opens up requesting the application providing the WEP key.
The key is provided for me automatically. This feature is only available for devices that support 802.1x authentication. The Wireless LAN Card does not support this form of authentication. This is a computer-to-computer (Ad-Hoc) network; wireless access points are not used – Selects Infrastructure or Ad-Hoc mode for this network. Select OK to store these network settings in the Preferred Network list database. Clicking OK will not connect the Wireless LAN Card to the network yet.
Enable network access control using IEEE 802.1X – A check box here will enable 802.1X advanced authentication and will request the user to choose the EAP type from the selected list. Authenticate as computer when computer information is available – This checkbox will automatically login as a computer if the information is available. If no information is available, checking the box Authenticate as guest when user of computer information is unavailable will accomplish login.
− Connect only if server name ends with appears if a specific server is requested − Trusted root certificate authority list of options appears to choose a specific host certificate. • Use a different user name for the connection – check this box to specify a user name for this connection. Advanced tab The advanced tab is provided by Windows XP. Choices include • Internet Connection Firewall – This checkbox will request Windows XP to enable its firewall function for access to the Internet.
Chapter 5 Uninstall Uninstall the WLAN Utility 1. To uninstall the 11g WLAN management Utility and Driver, choose Start then Programs then 11g WLAN Management Utility, and click Uninstall. 2. You will be asked if you want to uninstall the WLAN Utility and all of its components.
3. Click Remove option and Next button. 4. Click OK to remove or click Cancel to exit.
Chapter 6 Troubleshooting Common Installation Problems The 802.11g Wireless LAN Card does not work 1. Ensure you are connected to a Wireless network. You may have wandered out of range. 2. Your Wireless LAN Card is a basically a radio transmitter. Ensure that you aren’t blocking transmissions by placing the card next to a metal shield or other material that could interfere with communications. 3.
5. Make sure the Wireless LAN Card is inserted and installed with the proper driver. 6. If the Wireless LAN Card does not function after attempting the above steps, uninstall the driver software, remove the card, reboot your system, and repeat the hardware and software installation as described in Chapters 3 and 4 of this manual. The 802.11g Wireless LAN Card does not communicate with other wireless devices. 1. Ensure the SSID and WEP key parameters match those of the devices you are communicating with.
For an infrastructure configuration (with an Access Point and several wireless clients), physical placement of the Access Point will be key as it determines the range of the wireless LAN network and it’s connection to the wired LAN network (if present). Wireless LAN networks have the best range in open areas or environments with few obstacles. For every wall, door, ceiling the signals have to travel through, the range is reduced. Thicker obstacles or metal environments reduce the range even further.
• Click on the Wireless LAN Card Connections icon in the Status Tray bar to view connection status and details, or • From the Start menu, select System Settings / Config and choose Network Connections to view the Wireless PC Card connection status. If the Wireless LAN Card is not connected, clicking on the Status Tray icon will bring up the Connect to Wireless Network window (See Chapter 4, Configuration & Operation). How do I Access a Different Wireless Network? 1.
How Do I Change the SSID Name, WEP Key, and Channel of the Wireless PC Card? Consult the Configuration section for your operating system in Chapter 4, Installation. Also, follow the steps above in How do I access a different wireless network. Appendix A Hardware Specifications Product Model Description Standard Compliance Chip Transmission Rate Security Voltage LED Power Software Support IEEE802.11g 2.4 GHz 54Mbps Mini-PCI Wireless Network Interface Card, backward compatible with IEEE802.11b.
Modulation Sensitivity OFDM with BPSK, QPSK, 16QAM, 64QAM (11g) DBPSK, DQPSK, CCK (11b) 11g; PER < 10% 11b; PER < 8% 54 Mbps -69 dBm 11 Mbps -84 dBm 48 Mbps -68 dBm 5.5 Mbps -88 dBm 36 Mbps -74 dBm 2 Mbps -89 dBm 24 Mbps -79 dBm 1 Mbps -93 dBm 18 Mbps -82 dBm 12 Mbps -84 dBm 9 Mbps -87 dBm 6 Mbps -88 dBm Temperature 0 ~ 60℃(Operating), -20 ~ 65℃(Storing) Humidity 20 - 80% (non-condensing) Warranty 1 year Size and Weight 118.0mmL*54.1mmW*5.
Ad-Hoc This is a wireless LAN network comprised solely of clients (no access points), which can communicate with each other only when they are in range of each other’s Signal and configured to the same channel and SSID. BSS – Basic Service Set This denotes the availability of access points and clients, all in communication with each other. An Ad-Hoc LAN (clients only) may also have a BSS ID; all machines must use the same BSS ID.
Infrastructure As opposed to Ad-Hoc, this network mode allows connection to access points and to wired LAN networks or Internet access device such as a cable or ADSL modem. LAN – Local Area Network A network of clients/users typically based on the IEEE Ethernet protocol and using TCP/IP (Internet Protocol). Roaming Clients can freely move about the wireless LAN network (ESS). WEP – Wired Equivalent Privacy A shared-key encryption protocol used to provide security for wireless data.
This device is intended only for OEM integrators under the following conditions: 1) The antenna must be installed such that 20 cm is maintained between the antenna and users, and 2) The transmitter module may not be co-located with any other transmitter or antenna. As long as 2 conditions above are met, further transmitter test will not be required.