500 UM GB SISTEMA:500 UM ITA 2-07-2010 11:17 Pagina 1 F I A T 5 0 0 ENGLISH The data contained in this publication is intended merely as a guide. FIAT reserves the right to modify the models and versions described in this booklet at any time for technical and commercial reasons. If you have any further questions please consult your FIAT dealer. Printed in recycled paper without chlorine.
Dear customer, . Thank you for choosing Fiat and congratulations on your choice of a Fiat We have written this handbook to help you get to know all the features of your car and use it in the best possible way. You are recommended to read it right through before taking to the road for the first time. You will find information, tips 's technological and important warnings regarding driving your vehicle to help you get the most from your Fiat features.
VERY IMPORTANT REFUELLING Petrol engines: only refuel with unleaded petrol with octane rating (RON) not less than 95 in compliance with the European Standard EN228. The use of petrol that does not conform to the above-mentioned specification will cause the EOBD warning light to come on and the irregular operation of the engine. Diesel engines: refuel only with diesel fuel conforming to the European specification EN590.
GETTING TO KNOW YOUR CAR GETTING TO KNOW YOUR CAR DASHBOARD The presence and position of the controls, instruments and indicators may vary according to the different versions. SAFETY STARTING AND DRIVING WARNING LIGHTS AND MESSAGES IN AN EMERGENCY SERVICING AND MAINTENANCE fig. 1 F0S0365 1. Side air vent – 2. Left stalk: external light control – 3. Instrument panel and warning lights – 4. Right stalk: windscreen wiper controls, rear window wiper, trip computer – 5. Centre air vents – 6.
GETTING TO KNOW YOUR CAR SAFETY STARTING AND DRIVING WARNING LIGHTS AND MESSAGES IN AN EMERGENCY SERVICING AND MAINTENANCE TECHNICAL SPECIFICATIONS INDEX 4 SYMBOLS THE FIAT CODE SYSTEM Special coloured labels have been attached near or actually on some of the components of your car. These labels bear symbols that remind you of the precautions to be taken as regards that particular component. The inner surface of the engine bonnet includes a label with the different symbols used.
THE KEYS CODE CARD (for versions/markets, where provided) The car is delivered with two copies of the ignition key and with the CODE card which bears the following: A fig. 2 the electronic code; B fig. 2 the mechanical key code to be given to the Fiat Dealership when ordering duplicate keys. You should have the electronic code A with you at all times. IMPORTANT All the keys and the CODE card must be handed over to the new owner when selling the car.
GETTING TO KNOW YOUR CAR SAFETY STARTING AND DRIVING WARNING LIGHTS AND MESSAGES KEY WITH REMOTE CONTROL (for versions/markets, where provided) Locking the doors and the tailgate The metal insert A fig. 4 operates: ❒ the ignition switch; ❒ the door locks; ❒ the locking/unlocking of the fuel cap. Press button B fig. 4 to open/close the metal insert.
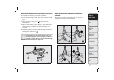
REPLACING REMOTE CONTROL BATTERY To replace the battery, proceed as follows: ❒ press button A fig. 5 and open the metal insert B fig. 5; ❒ turn the screw C fig. 5 to using a fine bit screwdriver; ❒ take out the battery case D fig. 5 and replace the battery E fig. 5 making sure that polarities are correct; ❒ refit the battery case D inside the key and lock it turning the screw C to . REPLACING THE REMOTE CONTROL COVER Proceed as shown in the figure fig. 6 e fig. 7 to replace the remove control cover.
GETTING TO KNOW YOUR CAR SAFETY STARTING AND DRIVING WARNING LIGHTS AND MESSAGES IGNITION DEVICE Disengagement: move the steering wheel slightly as you turn the ignition key to MAR. The key can be turned to 3 different positions fig. 8: ❒ STOP: engine off, key can be removed, steering column locked. Some electrical devices (e.g. sound system, central door locking system, etc.) can operate; ❒ MAR: driving position. All electrical devices are enabled; ❒ AVV: engine start-up.
CONTROL PANEL AND INSTRUMENTS GETTING TO KNOW YOUR CAR Instrument background colour and type may vary according to the version. The warning lights The warning light and are only present on Diesel versions. is available only on versions with Dualogic gearbox (see “Dualogic” supplement). Panel version with light background SAFETY STARTING AND DRIVING WARNING LIGHTS AND MESSAGES IN AN EMERGENCY SERVICING AND MAINTENANCE TECHNICAL SPECIFICATIONS fig. 9 F0S0361 A. Speedometer (speed indicator) B.
Panel version with dark background GETTING TO KNOW YOUR CAR SAFETY STARTING AND DRIVING WARNING LIGHTS AND MESSAGES IN AN EMERGENCY SERVICING AND MAINTENANCE TECHNICAL SPECIFICATIONS INDEX 10 fig. 10 F0S0362 A. Speedometer (speed indicator) B. Rev counter C. Multifunction display with digital fuel level indicator and digital indicator of engine coolant temperature.
SPEEDOMETER (SPEED INDICATOR) ENGINE COOLANT TEMPERATURE INDICATOR The indicator A fig. 11 shows the car speed (speedometer). REV COUNTER The indicator B fig. 11 shows the engine rpm. DIGITAL FUEL LEVEL INDICATOR The digital indicator C fig. 11 shows the amount of fuel in the tank. The warning light E fig. 11 switches on to indicate that approximately 5 litres of fuel are left in the tank. Do not travel with the fuel tank almost empty: the gaps in fuel delivery could damage the catalyst.
GETTING TO KNOW YOUR CAR SAFETY STARTING AND DRIVING MULTIFUNCTION DISPLAY The car may be equipped with a multifunction display that, according to previous settings, will show useful driving information.
Note When one of the front doors is opened, the display is activated showing the time and km/mileage (for markets/versions, where provided) for a few seconds. MULTIFUNCTION DISPLAY “STANDARD” SCREEN The standard screen fig. 13-fig. 14 can show the following information: 1 SPORT driving mode indication (versions 1.4 16V) ECO driving mode indication (0.
GETTING TO KNOW YOUR CAR SAFETY STARTING AND DRIVING WARNING LIGHTS AND MESSAGES IN AN EMERGENCY SERVICING AND MAINTENANCE TECHNICAL SPECIFICATIONS INDEX 14 The setup menu can be activated by pressing the MENU ESC button briefly. Single presses on buttons + or – will scroll through the setup menu options. Operating modes are different according to the characteristics of the option selected.
MENU FUNCTIONS Passenger compartment light adjustment The instrument panel with reconfigurable multifunction display is provided with a light sensor capable of detecting environmental light conditions and adjusting the brightness of the instruments accordingly. The brightness of the instrument panel may therefore change while travelling following an event causing a switch from “day” to “night” conditions (or vice versa) in the passenger compartment (e.g.
GETTING TO KNOW YOUR CAR SAFETY STARTING AND DRIVING WARNING LIGHTS AND MESSAGES IN AN EMERGENCY ❒ press button – : (Off) will flash on the display; ❒ press the MENU ESC button briefly to return to the menu screen or give the button a long press to return to the standard screen without storing. Trip B data (Activating Trip B) With this function is possible to turn the Trip B display (trip meter) on and off. For further information see “Trip computer”.
❒ press + or – to set the value; ❒ briefly press MENU ESC: “month” will flash on the display; ❒ press + or – to set the value; ❒ briefly press MENU ESC: “day” will flash on the display; ❒ press + or – to set the value; Note The setting will increase or decrease by one unit each time the button + or – is pressed. Hold down the button to increase/decrease the setting rapidly and automatically. Complete the setting by briefly pressing the button when you approach the required value.
GETTING TO KNOW YOUR CAR SAFETY STARTING AND DRIVING WARNING LIGHTS AND MESSAGES IN AN EMERGENCY SERVICING AND MAINTENANCE TECHNICAL SPECIFICATIONS INDEX 18 Unit of measurement (Setting the unit of measurement) With this function it is possible to set the units through three submenus: "Distances", "Consumption" and "Temperature".
❒ press + or – to set the value; ❒ press the MENU ESC button briefly to return to the menu screen or give the button a long press to return to the standard screen without storing. Button volume (Adjusting the button volume) This function may be used to adjust (over 8 levels) the volume of the noise made when the MENU ESC, + and – buttons are pressed.
GETTING TO KNOW YOUR CAR SAFETY STARTING AND DRIVING WARNING LIGHTS AND MESSAGES Proceed as follows: ❒ press MENU ESC and, after the message Bag pass: Off (to deactivate) or Bag pass: On (to activate) is displayed by pressing buttons + or – , press MENU ESC again; ❒ the confirmation message will appear on the display; ❒ press buttons + or – to select (Yes) (confirming activation/deactivation) or (No) (to abort); ❒ press the MENU ESC button briefly, a message confirming the selection will be displayed and
TRIP COMPUTER Values displayed General information Range The Trip computer is used to display information on car operation when the key is turned to MAR. This function is composed of separate trips, called “Trip A” and “Trip B” which can monitor the entire mission (journey) in a reciprocally independent manner. Both functions can be reset (reset means start of a new journey).
GETTING TO KNOW YOUR CAR SAFETY Average speed New mission This value shows the car's average speed based on the overall time elapsed since the start of the new journey. It begins after a reset: ❒ “manual” resetting by the user, by pressing the relevant button; ❒ “automatic” resetting, when the “Trip distance” reaches 9999.9 km or when the “Travel time” reaches 99:59 (99 hours and 59 minutes); ❒ disconnection/reconnection of the battery. Journey time Time elapsed since the start of the new journey.
FRONT SEATS WARNING WARNING All adjustments must be made with the car stationary. Once you have released the adjustment lever, always check that the seat is locked on the guides by trying to move it back and forth. Failure to lock the seat in place could result in the seat moving suddenly and the driver losing control of the car. GETTING TO KNOW YOUR CAR SAFETY LENGTHWISE DIRECTION ADJUSTMENT Lift the lever A fig.
GETTING TO KNOW YOUR CAR SAFETY STARTING AND DRIVING WARNING LIGHTS AND MESSAGES IN AN EMERGENCY HEIGHT ADJUSTMENT (for versions/markets, where provided) Operate lever C fig. 18 to lift or lower the rear part of the cushion to achieve the most comfortable driving position. IMPORTANT Using lever D fig. 19 before locking the seat in its original position will cause the initial seat position to be lost. In this case the position of the seat must be restored through lengthwise adjustment A fig. 16.
The type of reattachment manoeuvre has been chosen to guarantee the safety of the occupant. If an obstacle is present (e.g. a bag) and the seat cannot be returned to its original position, the mechanism reattaches the seat only positioning the backrest to ensure that the guides are always locked. REAR SEATS GETTING TO KNOW YOUR CAR BACKREST RELEASE For versions with joint seat, lift levers A fig. 20 and B fig. 20 and guide the backrest onto the cushion.
GETTING TO KNOW YOUR CAR SAFETY STARTING AND DRIVING HEAD RESTRAINTS WARNING FRONT Head restraints are height adjustable; to adjust them operate as follows. Upwards adjustment: lift the head restraint until it locks. Downwards adjustment: press the button A fig. 21 and lower the head restraint. WARNING WARNING LIGHTS AND MESSAGES IN AN EMERGENCY All adjustments must be carried out only with the vehicle stationary and engine off.
To lower the head restraint press button B. The particular head restraint shape deliberately interferes with the passenger correctly supporting their back on the backrest in order to force them to lift the head restraint and use it correctly. IMPORTANT If the rear seats are used, always set the head restraints in the "completely raised" position. STEERING WHEEL ADJUSTMENT (for versions/markets, where provided) The steering wheel can be adjusted vertically. To adjust, move lever A fig.
GETTING TO KNOW YOUR CAR SAFETY STARTING AND DRIVING WARNING LIGHTS AND MESSAGES INTERIOR REAR VIEW MIRROR The mirror is fitted with a safety device that causes its release in the event of a violent impact with the passenger. Lever A fig. 24 can be used to move the mirror to two different positions: normal or antiglare. ELECTROCHROMIC INTERIOR MIRROR (for versions/markets, where provided) Some versions have an electrochromic mirror with automatic antiglare function.
FOLDING THE MIRRORS WARNING When required (for example when the mirror causes difficulty in narrow spaces) it is possible to fold the mirrors by moving them from position 1 fig. 26 (open), to position 2 fig. 26 (closed). As door mirrors are curved, they may slightly alter the perception of distance. When driving the mirrors should always be in position 1.
GETTING TO KNOW YOUR CAR TEMPERATURE COMFORT VENTS SAFETY STARTING AND DRIVING WARNING LIGHTS AND MESSAGES IN AN EMERGENCY SERVICING AND MAINTENANCE TECHNICAL SPECIFICATIONS INDEX 30 fig. 27 F0S0021 1. Vents for defrosting or demisting the windscreen – 2. Adjustable centre vents – 3. Adjustable side vents – 4. Fixed diffusers for side windows – 5.
HEATING AND VENTILATION ADDITIONAL HEATER (for versions/markets, where provided) This device speeds up passenger compartment warming when it is very cold. The additional heater turns off automatically after reaching the required comfort conditions. Important The heater only works if the outside temperature and engine coolant temperature are low. The heater will not activate if the battery voltage is too low. CONTROLS A Air temperature knob fig. 28 (red = hot/blue = cold) B Fan speed knob fig.
GETTING TO KNOW YOUR CAR SAFETY STARTING AND DRIVING WARNING LIGHTS AND MESSAGES Fast front window demisting/defrosting MANUAL CLIMATE CONTROL Proceed as follows: ❒ turn knob A to the red section; ❒ turn knob C to ; ❒ turn knob D to ; ❒ turn knob B to 4 (maximum fan speed).
C Air recirculation knob fig. 29 internal air recirculation air intake from outside IMPORTANT It is advisable to switch the air recirculation on whilst queueing or in tunnels to prevent the introduction of polluted air. However, it is better not to use the function for long periods, particularly if there are many people on board, to prevent the windows from misting inside. D Air distribution knob fig.
GETTING TO KNOW YOUR CAR SAFETY STARTING AND DRIVING WARNING LIGHTS AND MESSAGES IN AN EMERGENCY AUTOMATIC CLIMATE CONTROL (for versions/markets, where provided) The additional heater turns on automatically depending on the environmental conditions and with engine started when the temperature of the engine coolant is low. It is turned off also automatically after reaching the required comfort conditions in the passenger compartment and when the engine coolant temperature is hot.
❒ it is not possible to convey air to the passenger compartment with a temperature below the outside temperature (the displayed temperature value will flash when the system cannot guarantee the required comfort conditions); ❒ the fan speed can be manually reset (with compressor enabled, ventilation cannot go below a bar shown on the display). C button fig. 30 OFF - Switching off the system When the OFF button is pressed the system is switched off.
GETTING TO KNOW YOUR CAR SAFETY STARTING AND DRIVING WARNING LIGHTS AND MESSAGES IN AN EMERGENCY SERVICING AND MAINTENANCE TECHNICAL SPECIFICATIONS INDEX 36 G H I buttons fig. 30 of air distribution - Manual selection By pressing the buttons, one of the five possible air flow distribution patterns can be selected: air flow to the windscreen and front side window vents to demist or defrost them. air flow to central and side dashboard vents to ventilate the chest and the face during the hot season.
The system uses R134a refrigerant fluid which does not pollute the environment in the event of accidental leakage. Never use R12 fluid, which is not compatible with the system components. HEATED REAR WINDOW DEMISTING/DEFROSTING Press button to activate this function. Activation is indicated by switching on of warning light on the instrument panel. This function is timed and it will turn off automatically after 20 minutes. Press the button again to switch the function off.
GETTING TO KNOW YOUR CAR SAFETY STARTING AND DRIVING WARNING LIGHTS AND MESSAGES WARNING Daytime running lights cannot replace dipped headlights when driving at night or through tunnels.The use of daytime running lights is governed by the highway code of the country in which you are driving. Comply with legal requirements. DIPPED HEADLAMPS/SIDE LIGHTS With the ignition key turned to MAR-ON, turn the twist switch to fig. 31.
Lane change function If you wish to signal a lane change, put the left stalk in the temporary position for less than half a second. The direction indicator on the selected side flashes three times and then switches off automatically. "FOLLOW ME HOME" DEVICE This allows the space surrounding the car to be lit up for a certain period of time. Activation: with the ignition key on STOP or removed, pull the stalk towards the steering wheel within 2 minutes from when the engine is turned off.
GETTING TO KNOW YOUR CAR SAFETY STARTING AND DRIVING WARNING LIGHTS AND MESSAGES WINDOW CLEANING The right stalk controls windscreen wiper/washer and heated rear window wiper/washer operation. WINDSCREEN WASHER/WIPER This operates only with the ignition key turned to MAR. The stalk has 5 different positions (4 speeds)fig. 33: A. windscreen wiper off. B. intermittent operation. C. continuous slow operation. D. continuous fast operation. E. temporary fast operation (unstable position).
With the windscreen wiper active, rotate the knurled ring to to activate the rear window wiper which, in this case, operates (in the different positions) in synch with the windscreen wiper, but with half its frequency. With the windscreen wiper on, engaging reverse gear will automatically turn the rear window wiper on, in continuous slow operation. Operation stops when reverse is disengaged. "Smart washing" function: push the stalk towards the dashboard (unstable position) to operate the rear window washer.
GETTING TO KNOW YOUR CAR SAFETY STARTING AND DRIVING WARNING LIGHTS AND MESSAGES Three modes are provided for switching off: ❒ when all doors are closed, the 3-minute timer will stop and a 10-second one will start. This timer will stop when the key is turned to MAR; ❒ when doors are locked (either with remote control or with key on driver side door), the roof light turns off.
ECO FUNCTION (for versions/markets, where provided) SPORT FUNCTION (for versions/markets, where provided) To activate the ECO function press button E fig. 35 for at least 5 seconds. When the ECO function is activated, the car is set for city driving, characterised by less effort on the steering wheel (Dualdrive system on) and reduced fuel consumption. When this function is active, the wording ECO on the instrument panel will turn on.
HAZARD WARNING LIGHTS GETTING TO KNOW YOUR CAR SAFETY STARTING AND DRIVING They are turned on by pressing the button B fig. 34, regardless of the position of the ignition key. With the device on, warning lights and light up in the instrument panel. To switch the lights off, press the button B again. IMPORTANT The use of hazard warning lights is governed by the highway code of the country you are driving in: comply with legal requirements.
INTERIOR FITTINGS The passenger side sun visor includes a courtesy mirror, lighted by a specific roof light that can be switched on using the button B fig. 38. The driver and passenger side sun visors include document pockets. CIGAR LIGHTER (for versions/markets, where provided) WARNING The cigar lighter gets very hot. Handle it carefully and make sure that children don't touch it: risk of fire and/or burns. Always check that the cigar lighter is switched off.
COMPARTMENT IN CENTRAL CONSOLE GETTING TO KNOW YOUR CAR SAFETY STARTING AND DRIVING To open the compartment, use the groove B fig. 40 and pull outwards. WARNING Never travel with the compartment open: it could injure the passenger in the event of a crash. WARNING LIGHTS AND MESSAGES STORAGE COMPARTMENT UNDER THE SEAT (for versions/markets, where provided) In some versions, there is a storage compartment fig. 41 under the passenger seat.
POWER SOCKET (for versions/markets, where provided) PORTABLE NAVIGATOR SETUP (for versions/markets, where provided) The power socket is located on the central tunnel and is powered when ignition key is turned to MAR. To use the socket, open the protective lid A fig. 42. Correct operation is ensured only if the connected accessories are provided with approved standard plugs, present on all Lineaccessori Fiat components. The socket for portable navigator connection is located on the dashboard fig. 43.
GETTING TO KNOW YOUR CAR SAFETY STARTING AND DRIVING FIXED GLASS ROOF SUN ROOF (for versions/markets, where provided) (for versions/markets, where provided) The sun roof comprises a wide fixed glass panel and a manually-operated sun blind. The blinds can be used in the "fully closed" or "fully open" positions. To open the blind, grab the handle, press the tooth A fig. 44 and move it to the completely open position.
OPENING Keep the button B fig. 46 pressed: the roof will move to "spoiler" position. To fully open the roof press the button B again and keep it pressed: the roof will stop in the position reached when the button is released. CLOSURE Keep the button A fig. 46 pressed: the roof will move to "spoiler" position. The roof will stop in the position reached when the button is released. Press the button A again and keep it pressed until the roof is completely closed.
INITIALISATION PROCEDURE GETTING TO KNOW YOUR CAR SAFETY STARTING AND DRIVING WARNING LIGHTS AND MESSAGES IN AN EMERGENCY After the battery has been disconnected or a fuse has blown, the operation of the sliding roof must be initialised again. Proceed as follows: ❒ keep the button A fig. 46 pressed so that the roof closes completely in stages ❒ after full closing, wait for the sun roof motor to stop.
DOORS WARNING Before opening a door, ensure that you can do it in conditions of safety. Open the doors only when the car is stationary. OPENING/CLOSING WITH THE KEY To open from outside (driver's side door): rotate the key to 1 fig. 48 and pull the handle. On versions with central locking, when the key is turned, the doors and the tailgate are simultaneously unlocked. To open from outside (passenger's side door): pull the handle.
GETTING TO KNOW YOUR CAR SAFETY STARTING AND DRIVING WARNING LIGHTS AND MESSAGES IN AN EMERGENCY CENTRAL LOCKING (for versions/markets, where provided) The doors and tailgate must be perfectly closed to activate the central locking. To unlock from outside (door and tailgate locks) push button on the key with remote control. To lock from outside (door and tailgate locks) push button .
POWER WINDOWS WARNING POWER WINDOWS (for versions/markets, where provided) These operate when the ignition key is turned to MAR and for about 2 minutes after turning the key to STOP or removing it. The power window control buttons are located beside the gear lever and activate fig. 51: A Opening/closing of the left window. B Opening/closing of the right window. Holding the button pressed for a few seconds, the window raises or lowers automatically (only with key on MAR).
GETTING TO KNOW YOUR CAR SAFETY STARTING AND DRIVING WARNING LIGHTS AND MESSAGES BOOT OPENING THE TAILGATE WITH THE KEY METAL INSERT To release the lock, use the metal insert of the ignition key A fig. 52. Tailgate opening is eased by the action of the side gas struts. On some versions, opening the tailgate will switch the luggage compartment roof light on: the light will go off automatically when the tailgate is closed.
To open it, enable the handle, opening one of the front doors or unlocking the doors with the remote control or using the key without remote control. If the tailgate is not shut properly the instrument panel warning light (where provided) will switch on. TAILGATE CLOSURE To close, lower the tailgate by pressing near the lock until you hear it click. In the inner part of the tailgate a strap B fig. 54 makes it easier to hold and close the tailgate.
EMERGENCY TAILGATE OPENING GETTING TO KNOW YOUR CAR SAFETY STARTING AND DRIVING To open the tailgate from the passenger's compartment if the car battery is flat or the electric tailgate lock is faulty, proceed as follows (see “Extending the boot” in this chapter): ❒ extract the rear head restraints ❒ fold the backrests over ❒ to unlock the tailgate mechanically, working from the inside of the luggage compartment, use lever A fig. 55.
PARTIAL EXTENSION (50/50) (for versions/markets, where provided) Proceed as follows: ❒ lift out rear seat head restraints (where provided) with backrest released and tilted toward the passenger compartment or with the tailgate open ❒ check that the seat belt is fully extended and not twisted ❒ operate lever A fig. 58 or B to release the left hand or right hand part of the backrest respectively and fold it down onto the cushion.
GETTING TO KNOW YOUR CAR SAFETY STARTING AND DRIVING WARNING LIGHTS AND MESSAGES BONNET WARNING OPENING Proceed as follows: ❒ pull lever A fig. 59 in the direction indicated by the arrow; ❒ move the lever B fig. 60 to the right as shown in the figure; ❒ lift the bonnet and, at the same time, release the supporting rod C fig. 61 from its catch D, then insert the end of the rod into housing E in the bonnet (larger hole) and push to safety position (smaller hole), as shown in the figure.
Before opening the bonnet, check that windscreen wiper arm is not lifted from the windscreen. WARNING When the engine is warm, work carefully inside the engine compartment to avoid getting burnt. Do not place your hands close to the fan: it might start working even with the ignition key removed.Wait for the engine to cool. WARNING Pay attention to scarves, ties and other loose-fitting garments.
GETTING TO KNOW YOUR CAR SAFETY STARTING AND DRIVING WARNING LIGHTS AND MESSAGES ROOF RACK/SKI RACK WARNING FASTENERS The fasteners are located in the areas indicated in fig. 62. To use the front fasteners, remove the cap A fig. 62, accessible with the door open. The rear fixing areas B can be found according to measurements shown in fig. 63. Lineaccessori Fiat provides a specific roof rack/ski rack for the tailgate. IMPORTANT Follow the instructions contained in the assembly kit carefully.
HEADLIGHTS HEADLIGHT BEAM AIMING The correct aiming of the headlights is important for the comfort and safety of not only the driver but all other road users. This is also covered by a specific rule of the highway code. The headlights must be correctly aimed to guarantee the best visibility conditions for all drivers while travelling with headlights on. Contact a Fiat Dealership to have the headlights properly adjusted. Check beam aiming every time the load or its distribution changes.
GETTING TO KNOW YOUR CAR SAFETY STARTING AND DRIVING WARNING LIGHTS AND MESSAGES IN AN EMERGENCY SERVICING AND MAINTENANCE TECHNICAL SPECIFICATIONS INDEX 62 ADJUSTING THE HEADLIGHTS WHEN ABROAD Dipped headlights are adjusted to drive in the country where the vehicle was originally purchased.
WARNING When the ABS cuts in and you feel the brake pedal pulsating, do not raise your foot, but keep it pressed; in doing so you will stop in the shortest amount of space possible depending on the current road conditions. WARNING When the Mechanical Brake Assist is activated, noises may be heard from the system.This is normal. Anyway, while braking keep the brake pedal depressed.
GETTING TO KNOW YOUR CAR SAFETY STARTING AND DRIVING WARNING LIGHTS AND MESSAGES IN AN EMERGENCY SERVICING AND MAINTENANCE TECHNICAL SPECIFICATIONS INDEX 64 WARNING If only the warning light on the instrument panel switches on - together with a message in the multifunction display (for versions/markets, where provided) - stop the car immediately and contact the nearest Fiat Dealership.
ESP SYSTEM FAILURE INDICATIONS In the event of a failure, the ESP will be automatically switched off and the warning light will come on permanently on the instrument panel along with a message on the multifunction display (for versions/markets where provided) (see “Warning lights and messages” section). The LED on the ASR OFF button will also switch on. In this case, contact a Fiat Dealership. WARNING Do not take unnecessary risks, even if your vehicle is fitted with an ESP system.
GETTING TO KNOW YOUR CAR SAFETY STARTING AND DRIVING WARNING LIGHTS AND MESSAGES IN AN EMERGENCY SERVICING AND MAINTENANCE TECHNICAL SPECIFICATIONS INDEX 66 HILL HOLDER SYSTEM FAILURE INDICATIONS A possible system failure is indicated by the warning light on the instrument panel - together with the dedicated message in the multifunction display (for versions/markets, where provided) coming on (see "Warning lights and messages" chapter).
When the ASR is switched off whilst driving, the next time the car is started up the ASR is automatically switched on by the system. When travelling on snowy roads with snow chains, it may be helpful to turn the ASR off: in fact, in these conditions, slipping of the drive wheels when moving off makes it possible to obtain better traction. EOBD SYSTEM The EOBD system (European On Board Diagnosis) carries out a continuous diagnosis of the components of the car related to emissions.
GETTING TO KNOW YOUR CAR SAFETY STARTING AND DRIVING WARNING LIGHTS AND MESSAGES IN AN EMERGENCY SERVICING AND MAINTENANCE TECHNICAL SPECIFICATIONS INDEX 68 If, when the ignition key is turned to the MAR position, the warning light either does not come on or, when driving, it comes on permanently or flashes (along with a message in the multifunction display for versions/markets where provided), contact a Fiat Dealership as soon as possible.
WARNING It is absolutely forbidden to carry out any after-market operation involving steering system or steering column modifications (e.g.: installation of anti-theft device) that could badly affect performance and safety, invalidate warranty and also result in non-compliance of the car with type approval requirements.
GETTING TO KNOW YOUR CAR SAFETY PARKING SENSORS (for versions/markets, where provided) Parking sensors are located in the rear bumper fig. 67 and their function is to inform the driver, through an intermittent buzzer, about the presence of obstacles behind the car. ACTIVATION STARTING AND DRIVING WARNING LIGHTS AND MESSAGES IN AN EMERGENCY The sensors are automatically activated when the reverse gear is engaged. As the obstacle behind the vehicle gets closer to the car, the buzzer becomes more frequent.
For correct operation, sensors must always be clean from mud, dirt, snow or ice. Be careful not to scratch or damage the sensors while cleaning them. Avoid using dry, rough or hard cloths.The sensors should be washed using clean water with the addition of car shampoo if necessary. In washing stations, clean sensors quickly keeping the vapour jet/high pressure washing nozzles at 10 cm at least from the sensors.
GETTING TO KNOW YOUR CAR SAFETY STARTING AND DRIVING WARNING LIGHTS AND MESSAGES IN AN EMERGENCY SERVICING AND MAINTENANCE TECHNICAL SPECIFICATIONS START&STOP SYSTEM INTRODUCTION The Start&Stop system automatically stops the engine each time the vehicle is stationary and starts it again when the driver wants to move off. In this way, the vehicle efficiency is increased, by reducing consumption, dangerous gas emissions and sound pollution.
MANUAL ACTIVATION AND DEACTIVATION The system can be activated/deactivated using the button A fig. 69 on the dashboard. When the system is deactivated, the warning light fig. 70 switches on on the instrument panel. In addition, for versions/markets where provided, additional indications concerning the deactivation or activation of Start&Stop system are given on the display.
RESTARTING CONDITIONS GETTING TO KNOW YOUR CAR SAFETY STARTING AND DRIVING WARNING LIGHTS AND MESSAGES IN AN EMERGENCY SERVICING AND MAINTENANCE TECHNICAL SPECIFICATIONS INDEX 74 For reasons of comfort, limiting harmful emissions and safety purposes, the power unit can restart automatically without any action on the part of the driver if certain conditions are met, including: ❒ battery not sufficiently charged ❒ reduced braking system vacuum (e.g.
IRREGULAR OPERATION In the case of malfunctions the Start&Stop system is disabled. The driver is informed of the problem by the general failure warning light A fig. 71 switching on with an information message (where provided) and the system failure symbol B fig. 71 in the instrument panel. Contact a Fiat Dealership. This sensor should never be disconnected from the battery pole except if the battery is replaced. WARNING When replacing the battery, always go to a Fiat Dealership.
EMERGENCY STARTING GETTING TO KNOW YOUR CAR IMPORTANT NOTES When jump starting, never connect the negative lead – fig. 73 of the auxiliary battery to the negative pole A fig. 73 of the car battery, rather to an engine/gearbox earth point. SAFETY STARTING AND DRIVING WARNING LIGHTS AND MESSAGES WARNING Before opening the bonnet, make sure that the vehicle is switched off and the key is in the STOP position. Follow the instructions on the dedicated label on the front crossmember fig. 74.
WARNING For cars with Dualogic gearbox, if the engine is automatically stopped on a slope, the engine should be restarted by moving the gear lever to + or – without releasing the brake pedal. For vehicles with Dualogic transmission, where the Hill Holder function is present, in case of stop downhills the motor does not cut off automatically, so as to make the Hill Holder function - which is active only when the engine is running - available.
GETTING TO KNOW YOUR CAR SAFETY STARTING AND DRIVING WARNING LIGHTS AND MESSAGES IN AN EMERGENCY SERVICING AND MAINTENANCE TECHNICAL SPECIFICATIONS INDEX 78 SETUP (for versions/markets, where provided) In addition to the standard equipment the vehicle also features: ❒ two 165 mm diameter 40 W mid-woofer speakers, each in one of the front doors ❒ two 38 mm diameter 30 W tweeter speakers, in the front pillars ❒ aerial supply cable ❒ front speaker power cables ❒ radio supply cables ❒ roof-mounted aerial.
ACCESSORIES PURCHASED BY THE OWNER If after buying the car, you decide to install electrical accessories that require a permanent electric supply (alarm, satellite antitheft system, etc.
GETTING TO KNOW YOUR CAR AT THE FILLING STATION PETROL ENGINES Use unleaded petrol only, with octane number (R.O.N.) not lower than 95. SAFETY STARTING AND DRIVING WARNING LIGHTS AND MESSAGES IN AN EMERGENCY SERVICING AND MAINTENANCE TECHNICAL SPECIFICATIONS INDEX 80 IMPORTANT An inefficient catalytic converter leads to harmful exhaust emissions, thus contributing to air pollution.
FUEL FILLER CAP FUEL CUT-OFF SYSTEM Cap B fig. 76 is fitted with loss prevention device C which secures it to flap A. Unscrew cap B using the ignition key. The sealing may cause a slight pressure increase in the tank. A little breathing off, while slackening the cap is absolutely normal. When refuelling, fasten the cap to the device inside the flap as shown in fig. 76.
GETTING TO KNOW YOUR CAR ❒ deactivate the left direction indicator ❒ turn the ignition key to the STOP position. WARNING SAFETY STARTING AND DRIVING WARNING LIGHTS AND MESSAGES IN AN EMERGENCY SERVICING AND MAINTENANCE TECHNICAL SPECIFICATIONS INDEX 82 If, after an impact, you smell fuel or notice leaks from the fuel system, do not reactivate the system to avoid the risk of fire.
DIESEL PARTICULATE FILTER (DPF) (Multijet versions with DPF only) The Diesel Particulate Filter is a mechanical filter, integral with the exhaust system, that physically traps particulates present in the exhaust gases of diesel engines. The diesel particulate filter has been adopted to eliminate almost all particulates in compliance with current / future legal regulations. During normal use of the vehicle, the engine control unit records a set of data (e.g.: travel time, type of route, temperatures, etc.
SAFETY GETTING TO KNOW YOUR CAR SEAT BELTS SAFETY STARTING AND DRIVING WARNING LIGHTS AND MESSAGES IN AN EMERGENCY WARNING Never press button C when travelling. USING THE SEAT BELTS The belt should be worn keeping the torso straight and rested against the backrest. To fasten the seat belts, hold the tongue A fig. 77 and insert it into the buckle B fig. 77, until it clicks into place. On removal, if it jams, let it rewind for a short stretch, then pull it out again without jerking.
S.B.R. SYSTEM (for versions/markets, where provided) The car is provided with the SBR (Seat Belt Reminder) system, which warns the driver and the front passenger if their seat belts are not fastened, as follows: ❒ warning light switched on constantly and continuos beep for the first 6 seconds; ❒ warning light flashes and intermittent beep for the next 96 seconds. For permanent deactivation, contact a Fiat Dealership. The SBR system can be reactivated through the display setup menu.
GETTING TO KNOW YOUR CAR SAFETY STARTING AND DRIVING WARNING LIGHTS AND MESSAGES IN AN EMERGENCY WARNING The pretensioner may be used only once. Contact a Fiat Dealership to have it replaced after it has been activated. Pretensioner validity is indicated on the label located on the door contour sheet metal. Pretensioners should be replaced at a Fiat Dealership as this date approaches.
WARNING For maximum safety, keep the backrest upright, lean back into it and make sure the seat belt fits closely across your chest and pelvis. Always fasten the seat belts on both the front and the rear seats! Travelling without wearing seat belts will increase the risk of serious injury and even death in the event of an accident. Removing or otherwise tampering with seat belt and pretensioner components is strictly prohibited.
GETTING TO KNOW YOUR CAR SAFETY STARTING AND DRIVING WARNING If the belt has been sharply pulled, for example as the result of an accident, the seat belt, together with the anchoring devices, the anchoring device fixing screws and the pretensioner must be completely replaced. Even if the belt does not present any exterior signs of wear or damage, it may have lost its restraining properties.
CARRYING CHILDREN SAFELY All vehicle's occupants must be protected, babies and children included! For optimal protection in the event of a collision, all passengers must be seated and wearing adequate restraint systems. This prescription is compulsory in all EC countries according to EC Directive 2003/20/EC. This is even more important for children since their head is larger and heavier than an adult's in proportion to their body, while their muscular and bone structures are not fully developed.
GETTING TO KNOW YOUR CAR SAFETY STARTING AND DRIVING WARNING LIGHTS AND MESSAGES All child restraint devices must bear the certification data, together with the control mark, on a label solidly fixed to the seat which must never be removed. Lineaccessori Fiat offers child restraint systems for each weight group. These devices are recommended, since they are specifically designed and tested for Fiat cars.
GROUP 2 GROUP 3 Children from 15 to 25 kg may use the car seat belts directly fig. 83. The child seat is used only to position the child correctly with respect to the belts so that the diagonal section crosses the child's chest and never the neck, and the lower part is snug on the pelvis not the abdomen. For children from 22 kg up to 36 kg suitable risers are available to position the seat belt correctly. The fig. 84 shows the correct child seat positioning on the rear seat. Children over 1.
PASSENGER SEAT COMPLIANCE FOR USING UNIVERSAL CHILD SEATS GETTING TO KNOW YOUR CAR The Fiat complies with the European Directive 2000/3/EC which governs the arrangement possibilities for child seats on the various seats of the car as shown in the following table: Group SAFETY STARTING AND DRIVING WARNING LIGHTS AND MESSAGES IN AN EMERGENCY SERVICING AND MAINTENANCE TECHNICAL SPECIFICATIONS INDEX 92 Weight groups Front passenger seat Rear passenger seat up to 13 kg U U Group 1 9-18 kg U U Grou
UNIVERSAL ISOFIX CHILD SEAT ASSEMBLY SETUP The car is equipped with ISOFIX anchorages, a new european standard which makes fitting a child seat quick, simple and safe. Traditional child seats can be fitted alongside Universal Isofix child seats. An example of Universal Isofix child seat covering weight group 1 is shown in fig. 85. Specific Isofix child seats cover the other weight groups.
GETTING TO KNOW YOUR CAR SAFETY STARTING AND DRIVING WARNING LIGHTS AND MESSAGES IN AN EMERGENCY After removing the parcel shelf, secure the upper belt (provided with the child's seat) to specific ring B fig. 87 located between the rear backrest and the boot floor. Remember that, in the case of Universal Isofix child seats, you can use all seats bearing the marking ECE R44 (R44/03 or later updates) "Universal Isofix".
PASSENGER SEAT COMPLIANCE FOR USING UNIVERSAL ISOFIX CHILD SEATS The table below shows the different installation possibilities of Universal Isofix restraint systems on the seats fitted with Isofix fasteners, in accordance with European standard ECE 16.
GETTING TO KNOW YOUR CAR SAFETY AIR BAG The car is provided with front airbags for the driver and the passenger, driver's knee bag (for versions/ markets, where provided), front side bags (for versions/markets, where provided) and window bags.
Their volume at the moment of maximum inflation fills most of the space between the steering wheel and the driver, between the lower post guard and the knees on passenger side and between the dashboard and the passenger. The airbags are not deployed in the event of minor frontal collisions (for which the restraining action of the seat belts is sufficient). Safety belts must always be worn. In the event of frontal collisions they guarantee correct positioning of the passenger.
GETTING TO KNOW YOUR CAR SAFETY STARTING AND DRIVING WARNING LIGHTS AND MESSAGES IN AN EMERGENCY WARNING SEVERE DANGER:When an active passager airbag is fitted, do not install backwards-facing child seats on the front seat. Deployment of the airbag following an impact could cause fatal injuries to the child. Always deactivate the passenger airbag if it is needed to place a child seat on the front seat.
IMPORTANT In the event of a side impact, the system provides best protection if the passenger sits on the seat in a correct position, thus allowing correct window bag deployment. SIDE AIR BAGS: Side Bag (for versions/markets, where provided) and Window Bag Side bag (for versions/markets, where provided) These comprise two instantly inflating bags located in the front seat backrests fig.
GETTING TO KNOW YOUR CAR SAFETY STARTING AND DRIVING WARNING LIGHTS AND MESSAGES IN AN EMERGENCY SERVICING AND MAINTENANCE TECHNICAL SPECIFICATIONS INDEX 100 IMPORTANT A small amount of dust will be released when the airbags are deployed. The dust is not harmful and does not indicate the beginning of a fire. Furthermore, the surface of the deployed bag and the interior of the car may be covered by a dusty residue: this may irritate skin and eyes. Wash with mild soap and water in the event of exposure.
WARNING Always drive with your hands on the rim of the steering wheel rim so that the airbag can inflate freely if required. Do not drive with your body bent forward. Keep your back straight against the backrest. WARNING If the car has been stolen or in the case of attempt to steal it, if it has been subjected to vandalism or floods, have the air bag system checked by a Fiat Dealership.
GETTING TO KNOW YOUR CAR SAFETY STARTING AND DRIVING WARNING LIGHTS AND MESSAGES IN AN EMERGENCY SERVICING AND MAINTENANCE TECHNICAL SPECIFICATIONS INDEX 102 WARNING Do not hook rigid objects to the coat hooks and to the support handles. WARNING The air bag does not replace seat belts but increases their efficiency.
STARTING AND DRIVING STARTING THE ENGINE The car is fitted with an electronic engine lock device: if the engine fails to start, see the paragraph “The Fiat CODE system” in the section “Knowing your car”. The engine may be noisier during the first few seconds of operation, especially after a long period of inactivity. This characteristic feature of the hydraulic tappet system does not compromise functionality or reliability: the system chosen for your car was designed to limit maintenance interventions.
GETTING TO KNOW YOUR CAR SAFETY STARTING AND DRIVING If the engine does not start at the first attempt, return the ignition key to STOP before attempting to start again. If, when the ignition key is on MAR, the instrument panel warning light remains on together with warning light , turn the key to STOP and then back to MAR; if the warning light remains on, try the other keys provided with the vehicle. Contact a Fiat Dealership if you still cannot start the engine.
Never jump start the engine by pushing, towing or coasting downhill.This could cause fuel to flow into the catalytic converter and damage it beyond repair. HANDBRAKE The handbrake is located fig. 93 between the two front seats. Pull the lever upwards to operate the handbrake. STOPPING THE ENGINE Turn the ignition key to STOP while the engine is idling.
GETTING TO KNOW YOUR CAR SAFETY STARTING AND DRIVING WARNING LIGHTS AND MESSAGES IN AN EMERGENCY SERVICING AND MAINTENANCE Proceed as follows to release the handbrake: ❒ slightly lift the handbrake and press release button A fig. 93; ❒ keep button A pressed and lower the lever. The warning light in the instrument panel will go out. Press the brake pedal when carrying out this operation to prevent the car from moving accidentally.
IMPORTANT The clutch pedal should be used only for gear changes. Do not drive with your foot resting on the clutch pedal, however lightly. For versions/ markets where provided, the electronic clutch control could cut in, interpreting the incorrect driving style as a fault. WARNING Press the clutch pedal fully to change gears correctly. It is therefore essential that there is nothing under the pedals: make sure the mats are lying flat and do not get in the way of the pedals.
GETTING TO KNOW YOUR CAR SAFETY STARTING AND DRIVING WARNING LIGHTS AND MESSAGES Accessories installed on longitudinal bars DRIVING STYLE Remove accessories like: roof racks, ski racks, luggage container, etc. from the roof if they are no longer used. These accessories lower air penetration and adversely affect consumption levels. When transporting particularly large objects, use a trailer if possible. The main driving styles that affect fuel consumption are listed below.
Acceleration TOWING TRAILERS Accelerating violently will greatly affect consumption and emissions: acceleration should be gradual. IMPORTANT NOTES CONDITIONS OF USE The main usage conditions that negatively affect fuel consumption are listed below. Cold starting Short journeys and frequent cold starts do not allow the engine to reach optimum operating temperature. This results in a significant increase in consumption levels (from +15 to +30% on the urban cycle) and emissions.
GETTING TO KNOW YOUR CAR SAFETY WARNING The ABS with which the car may be equipped will not control the braking system of the trailer. Particular caution is required on slippery roads. WARNING STARTING AND DRIVING WARNING LIGHTS AND MESSAGES IN AN EMERGENCY SERVICING AND MAINTENANCE TECHNICAL SPECIFICATIONS INDEX 110 Never modify the braking system of the car to control the trailer brake.The trailer braking system must be fully independent of the car’s hydraulic system.
WARNING The max. speed for snow tyres with “Q” marking is 160 km/h.The Highway Code speed limits must however be always strictly observed. SNOW CHAINS The use of snow chains should be in compliance with local regulations. Snow chains may be fitted to the tyres of the front wheels (drive wheels) only. Check the tension of the snow chains after the first few metres have been driven. IMPORTANT Snow chains cannot be fitted to the space-saver wheel.
GETTING TO KNOW YOUR CAR SAFETY STARTING AND DRIVING WARNING LIGHTS AND MESSAGES IN AN EMERGENCY SERVICING AND MAINTENANCE TECHNICAL SPECIFICATIONS INDEX 112 CAR INACTIVITY If the car is to be left inactive for longer than a month, the following precautions should be observed: ❒ park the car in covered, dry and if possible well-ventilated premises and slightly open the windows; ❒ engage a gear and disengage the handbrake; ❒ disconnect the negative battery terminal and check charge (see paragraph “Battery
WARNING LIGHTS AND MESSAGES WARNING LIGHTS AND MESSAGES BRAKE FLUID LOW (red) / HANDBRAKE ENGAGED (red) SAFETY GENERAL WARNINGS Warning lights are accompanied by a specific message and/or sound when applicable. These indications are concise and precautionary and, as such, must not be considered as exhaustive and/or an alternative to the information contained in this Owner Handbook, which you are advised to read carefully in all cases.
GETTING TO KNOW YOUR CAR SAFETY STARTING AND DRIVING WARNING LIGHTS AND MESSAGES IN AN EMERGENCY On certain versions, if the car is moving the buzzer will also sound. IMPORTANT If the warning light comes on when the car is in motion, check that the handbrake is not on. AIRBAG FAILURE (red) TECHNICAL SPECIFICATIONS INDEX 114 The failure of the warning light (warning light off) is indicated by the flashing for more than the normal 4 seconds of front passenger air bag deactivated warning light .
HOT ENGINE COOLANT (red) When the key is turned to the MAR-ON position the warning light comes on but should go out after a few seconds. The warning light turns on when the engine is overheated. If the warning light comes on when driving, proceed as follows: ❒ when driving normally: stop the car, switch off the engine and check that the water level in the reservoir is not below the MIN mark.
ABS SYSTEM FAILURE (amber) GETTING TO KNOW YOUR CAR SAFETY STARTING AND DRIVING WARNING LIGHTS AND MESSAGES When the key is turned to the MAR-ON position the warning light comes on but should go out after a few seconds. The warning light will light up when the system is either not working or not available. In this case the braking system maintains its own unaltered efficiency but without the advantage of the ABS system. Drive carefully and contact a Fiat Dealership as soon as possible.
2. Engine oil exhausted (Multijet versions with DPF only) The warning light will turn on flashing together with the message on the display (for versions/markets where provided). Depending on the versions, the warning light flashing modes are as follows: ❒ 1 minute every two hours; ❒ cycles of 3 minutes with intervals with the warning light off for 5 seconds until the oil is changed.
GETTING TO KNOW YOUR CAR SAFETY STARTING AND DRIVING WARNING LIGHTS AND MESSAGES IN AN EMERGENCY To avoid damaging the engine it is advisable to change the engine oil when the warning light flashes. Go to a Fiat Dealership. “DUALDRIVE” ELECTRIC POWER STEERING FAILURE (red) The warning light comes on when the ignition key is turned to MAR-ON, but it should switch off after a few seconds.
Under these conditions, you may continue travelling at moderate speed without demanding excessive effort from the engine. Prolonged use of the car with the warning light on may cause damage. Contact a Fiat Dealership as soon as possible. FOR PETROL ENGINES ONLY If the warning light is flashing, this indicates that the catalytic converter may be damaged.
GETTING TO KNOW YOUR CAR SAFETY STARTING AND DRIVING WARNING LIGHTS AND MESSAGES WARNING The driving speed should always be suitable to traffic conditions, weather conditions and the driver should always comply with the Highway Code.The engine can also be switched off if the DPF warning light is on; nevertheless, repeated interruptions of the regeneration process could cause an early decay of engine oil.
On some versions the display shows the dedicated message. The presence of water in the supply circuit may cause severe damage to the injection system and irregular engine operation. If the warning light switches on (on some versions the warning light is accompanied by the dedicated message on the display), go to a Fiat Dealership as soon as possible to have the system bled.
GETTING TO KNOW YOUR CAR SAFETY FUEL CUT-OFF DEVICE INTERVENTION/ FUEL CUT-OFF NOT AVAILABLE The warning light switches on when the fuel cut-off inertia switch intervenes or when the fuel cut-off system is not available. The display shows the dedicated message. EXTERIOR LIGHTS FAULT STARTING AND DRIVING The warning light switches on when an external light failure is detected.
FRONT FOG LIGHTS (green) The warning light comes on when the front fog lights are turned on. LEFT-HAND DIRECTION INDICATOR (green - intermittent) “DUALDRIVE” ELECTRIC POWER STEERING SYSTEM ACTIVATION The word "CITY" is shown on the multifunction display when the "Dualdrive" electric power steering system is activated by pressing the relevant control button. If the button is pressed again the word CITY goes out.
LIMITED RANGE GETTING TO KNOW YOUR CAR SAFETY STARTING AND DRIVING WARNING LIGHTS AND MESSAGES IN AN EMERGENCY SERVICING AND MAINTENANCE TECHNICAL SPECIFICATIONS INDEX 124 The multifunction display will show the dedicated message to warn the driver that the cruising range is less than 50 km. ASR SYSTEM The ASR system can be turned off by pressing the button ASR OFF.
UNFASTENED SEAT BELTS (red) GETTING TO KNOW YOUR CAR The warning light on the display lights up permanently when the car is not moving and the driver's seat belt is not correctly fastened. The warning light will switch on constantly together with a constant beep of the buzzer for the first 6 seconds and for the next 96 seconds with warning light blinking and intermittent beep when front seatbelts are not correctly fastened and the vehicle is in motion.
IN AN EMERGENCY GETTING TO KNOW YOUR CAR SAFETY In an emergency we recommend that you call the freephone number found in the Warranty Booklet.You can go to our web site at www.fiat500.com to find the Fiat Dealership nearest to you. STARTING THE ENGINE STARTING AND DRIVING Go to a Fiat Dealership immediately if warning light stays on constantly on the instrument panel.
❒ start the engine; ❒ when the engine has been started, remove the leads reversing the order above. If after a few attempts the engine does not start, do not persist but contact a Fiat Dealership. IMPORTANT Do not directly connect the negative terminals of the two batteries: sparks could ignite explosive gas released from the battery. If the auxiliary battery is installed on another car, prevent accidental contact between metallic parts of the two cars.
GETTING TO KNOW YOUR CAR SAFETY STARTING AND DRIVING WARNING LIGHTS AND MESSAGES IN AN EMERGENCY SERVICING AND MAINTENANCE TECHNICAL SPECIFICATIONS INDEX 128 WARNING On the space-saver wheel there is an orange label, summarising the main warnings regarding space-saver wheel usage restrictions. Never remove or cover the label. The following information is provided in four languages on the label: "Important! For temporary use only! 80 km/h max! Replace with standard wheel as soon as possible.
WARNING The jack may be used to replace wheels only on the car that it comes with or other cars of the same model. Never use the jack for other purposes, such as lifting other car models. Never use the jack to carry out repairs under the car. Incorrect positioning of the jack may cause the jacked car to fall. Do not use the jack for loads higher than the one shown on its label. WARNING If the hub cap is not fitted correctly, it may come off when the car is travelling. Never tamper with the inflation valve.
GETTING TO KNOW YOUR CAR SAFETY STARTING AND DRIVING WARNING LIGHTS AND MESSAGES IN AN EMERGENCY ❒ take out the tool box C fig. 97 and place it next to the wheel to be changed; ❒ take the space-saver wheel D fig.
❒ fit the handle H fig. 99 to operate the jack device I fig. 99 and raise the car until the wheel is a few centimetres from the ground. When turning the jack handle make sure that it can turn freely without scraping your hand against the ground. The moving components of the jack (screws and joints) can also cause injuries: avoid touching them.
REFITTING THE STANDARD WHEEL GETTING TO KNOW YOUR CAR Following the procedure described previously, raise the car and remove the space saver spare wheel.
QUICK TYRE REPAIR KIT FIX & GO automatic The Fix&Go automatic quick tyre repair kit is located in the luggage compartment. The kit fig. 102 includes: ❒ bottle A containing sealant and fitted with: ❒ filling pipe B; ❒ sticker C bearing the notice “max. 80 km/h”, to be placed in a position visible to the driver (on the instrument panel) after fixing the tyre; ❒ instruction booklet (see fig.
GETTING TO KNOW YOUR CAR SAFETY WARNING Punctures on the sides of the tire may not be repaired. Do not attempt to use the quick repair kit if the tyre was damaged as a result of being used when underinflated. WARNING STARTING AND DRIVING WARNING LIGHTS AND MESSAGES Repairs are not possible in the case of damage to the wheel rim (bad groove distortion causing air loss). Do not remove foreign bodies (screws or nails) from the tyre.
Check tyre pressure on gauge F with compressor off to obtain a more precise reading; fig. 105 with the compressor off; INFLATING PROCEDURE WARNING Put on the protective gloves provided together with quick tyre repair kit. GETTING TO KNOW YOUR CAR SAFETY ❒ Pull up the handbrake. Unscrew the tyre valve cap, take out the filler hose A fig. 104 and tighten the ring nut B fig. 104 on the tyre valve; ❒ make sure that switch D fig.
GETTING TO KNOW YOUR CAR SAFETY STARTING AND DRIVING WARNING LIGHTS AND MESSAGES ❒ if after 5 minutes it is still impossible to reach at least 1.5 bar, disengage the compressor from the valve and power socket, then move the car forwards by approx. 10 metres in order to distribute the sealant inside the tyre evenly, then repeat the inflation operation; ❒ if after this operation you still cannot reach at least 1.
FOR CHECKING AND RESTORING PRESSURE ONLY CYLINDER REPLACEMENT PROCEDURE The compressor may also be used for restoring pressure only. Release the quick coupling and connect directly to the tyre valve fig. 107; in this way, the bottle will not be connected to the compressor and no sealant will be injected. To replace the bottle, proceed as follows: ❒ disconnect connection A fig.
GETTING TO KNOW YOUR CAR SAFETY STARTING AND DRIVING WARNING LIGHTS AND MESSAGES CHANGING A BULB GENERAL INSTRUCTIONS ❒ Before changing a bulb check the contacts for oxidation; ❒ Burnt bulbs must be replaced by others of the same type and power; ❒ always check the headlight beam direction after changing a bulb; ❒ when a light is not working, check that the corresponding fuse is intact before changing a bulb.
TYPES OF BULBS Various types of bulbs are fitted to your car: GETTING TO KNOW YOUR CAR All-glass bulbs: (type A) press-fitted. Pull to remove. SAFETY Bayonet type bulbs: (type B) to remove them press the bulb and turn it anticlockwise. Tubular bulbs: (type C) release them from their contacts to remove. Halogen bulbs: (type D) to remove the bulb, release the clip holding the bulb in place. Halogen bulbs: (type E) to remove the bulb, release the clip holding the bulb in place.
Bulbs GETTING TO KNOW YOUR CAR SAFETY STARTING AND DRIVING WARNING LIGHTS AND MESSAGES IN AN EMERGENCY SERVICING AND MAINTENANCE TECHNICAL SPECIFICATIONS INDEX 140 Use Type Power Re.
REPLACING EXTERIOR BULBS For the type of bulb and power rating, see “Changing a bulb". To access the bulbs of the side lights/day lights and of the main beams, after fully steering the wheels, open the guard door C fig. 110 on the wheel arch at the level of the lights, then remove the rubber cap D fig. 110. FRONT LIGHT CLUSTERS GETTING TO KNOW YOUR CAR SAFETY The front light clusters contain sidelight, dipped beam, main beam and direction indicator bulbs.
Side DIRECTION INDICATORS GETTING TO KNOW YOUR CAR SAFETY STARTING AND DRIVING WARNING LIGHTS AND MESSAGES Front To change the bulb, proceed as follows: ❒ remove the protective rubber cap mentioned above; ❒ turn the bulb holder A fig. 111 anticlockwise and remove it; ❒ remove the pressure-fitted bulb and replace it; ❒ refit the bulb holder A by turning it clockwise and locking it correctly; ❒ refit the rubber cap.
DIPPED BEAM HEADLIGHTS To change the bulb, proceed as follows: ❒ remove the protective rubber cap mentioned above; ❒ press the fastener A fig. 113 and remove the bulb holder; ❒ remove the pressure-fitted bulb and replace it; ❒ refit the cap locking it correctly; ❒ refit the rubber cap.
GETTING TO KNOW YOUR CAR SAFETY STARTING AND DRIVING WARNING LIGHTS AND MESSAGES ❒ fit the new bulb, making the outline of the metallic part coincide with the grooves on the reflector, then reattach the bulb holding clips; ❒ refit the rubber cap. FOG LIGHTS (for versions/markets, where provided) SIDE LIGHTS/DAY LIGHTS REAR LIGHT CLUSTERS To change the bulb, proceed as follows: ❒ remove the protective rubber cap mentioned above; ❒ turn the bulb holder B fig.
The bulbs are arranged as follows: fig. 116: C Direction indicators D Stop E Side F Reverse (right headlamp) / fog lamp (left headlamp) ❒ close the bulb holder making sure the catch is correctly locked; ❒ screw in the two fastening screws and reinstall the guard caps. GETTING TO KNOW YOUR CAR SAFETY THIRD BRAKE LIGHTS To change the bulb proceed as follows: ❒ remove the two guard caps and unscrew the two fastening screws A fig. 117; ❒ remove the assembly; ❒ disconnect the electrical connector B fig.
GETTING TO KNOW YOUR CAR SAFETY STARTING AND DRIVING NUMBER PLATE LIGHTS CHANGING AN INTERIOR LIGHT To replace the bulbs proceed as follows: ❒ operate in the point shown by the arrow fig. 119 and remove the lens A; ❒ change the bulb releasing it from the side contacts and making sure the new bulb is correctly fastened between the contacts; ❒ refit the lens. For the type of bulb and power rating, see “Changing a bulb".
❒ replace the bulb C fig. 121 releasing the side contacts, insert the new bulb and make sure that it is correctly locked between the contacts; ❒ close the cover and refit the lens. ❒ refit the cover B on the lens; ❒ refit the roof light correctly by pressing one side and then the other until the locking click is heard.
GETTING TO KNOW YOUR CAR SAFETY STARTING AND DRIVING REPLACING FUSES GENERAL INFORMATION Fuses protect the electrical system: they intervene (blow) in the event of a fault or improper action on the system. When a device does not work, check the condition of its fuse: the conductor element A fig. 124 must be intact. If it is not, replace the blown fuse with another with the same amperage (same colour). B fig. 124 intact fuse; C fig. 124 fuse with damaged filament.
WARNING If a general fuse (MEGA-FUSE, MIDI-FUSE, MAXI-FUSE) blows contact a Fiat Dealership. WARNING Before replacing a fuse, make sure that the ignition key has been removed and that all the other services are switched off and/or disengaged. FUSE LOCATION Dashboard fuses GETTING TO KNOW YOUR CAR To access the fuse you must remove the press-fitted cover E. The 5A fuse for door mirror demisting is located in the diagnosis socket area, as shown in fig. 125. The fuse box shown in fig.
Engine compartment fuse box GETTING TO KNOW YOUR CAR A second control unit is located on the right side of the engine compartment, next to the battery; to access it press device I fig. 127, release tabs M and remove cover L. SAFETY The number identifying the electrical component corresponding to each fuse is on the back of the cover fig. 128. If you need to wash the engine compartment, take care not to directly hit the engine compartment fuse box with the water jet.
FUSE SUMMARY TABLE Dashboard fuse box fig.
GETTING TO KNOW YOUR CAR SAFETY STARTING AND DRIVING WARNING LIGHTS AND MESSAGES IN AN EMERGENCY SERVICING AND MAINTENANCE TECHNICAL SPECIFICATIONS INDEX 152 Engine compartment fuse box fig.
BATTERY RECHARGING IMPORTANT The battery recharging procedure is given as information only. You are advised to contact a Fiat Dealership to have this operation performed. Charging should be slow at a low ampere rating for approximately 24 hours. Charging for a longer time may damage the battery. Charge the battery as follows: ❒ disconnect the connector A fig.
GETTING TO KNOW YOUR CAR SAFETY STARTING AND DRIVING WARNING LIGHTS AND MESSAGES IN AN EMERGENCY SERVICING AND MAINTENANCE TECHNICAL SPECIFICATIONS INDEX 154 WARNING Do not attempt to recharge a frozen battery.The battery must first be defrosted, otherwise it may explode.
TOWING THE CAR The tow hook, which is supplied with the vehicle, is housed in the tool box, under the carpet in the luggage compartment. FASTENING THE TOW RING Rear ❒ release the cap A fig. 131 ❒ take the tow ring B fig. 132 from its housing in the tool support; ❒ fully tighten the ring on the threaded pin. Proceed as follows: GETTING TO KNOW YOUR CAR SAFETY WARNING Front ❒ release the cap A fig. 131 ❒ take the tow ring B fig.
GETTING TO KNOW YOUR CAR SAFETY STARTING AND DRIVING WARNING LIGHTS AND MESSAGES IN AN EMERGENCY SERVICING AND MAINTENANCE TECHNICAL SPECIFICATIONS INDEX 156 WARNING Whilst towing, remember that as the assistance of the brake servo and the electric power assisted steering is not available, greater force needs to be exerted on the brake pedal and more effort is required on the steering wheel. Do not use flexible cables when towing and avoid jerky movements.
SERVICING AND MAINTENANCE SCHEDULED SERVICING Correct servicing is essential in guaranteeing a long life for the car under the best conditions. For this reason, Fiat has prepared a series of checks and maintenance operations to be performed every 30,000 km.
GETTING TO KNOW YOUR CAR SAFETY STARTING AND DRIVING WARNING LIGHTS AND MESSAGES IN AN EMERGENCY SERVICING AND MAINTENANCE TECHNICAL SPECIFICATIONS INDEX 158 SCHEDULED SERVICING PLAN Services must be performed every 30,000 km.
Thousands of miles 18 36 54 72 90 108 Thousands of km 30 60 90 120 150 180 Months 24 48 72 96 120 144 Check and adjust handbrake lever stroke ● ● ● ● ● ● ● Check rear disc brake pad condition and wear ● ● ● ● ● ● ● Check and, if necessary, top-up fluid levels (engine coolant, brakes, hydraulic clutch, windscreen washer, battery, etc.
GETTING TO KNOW YOUR CAR SAFETY STARTING AND DRIVING Thousands of miles 18 36 54 72 90 108 Thousands of km 30 60 90 120 150 180 Months 24 48 72 96 120 144 IN AN EMERGENCY SERVICING AND MAINTENANCE TECHNICAL SPECIFICATIONS INDEX 160 ● ● Replace spark plugs (2) (0.9 TwinAir 85 HP, 1.2 8V, 1.
PERIODIC CHECKS HEAVY-DUTY USE OF THE CAR Every 1,000 km or before long journeys, check and, if necessary, restore: ❒ engine coolant level; ❒ brake fluid level; ❒ windscreen washer fluid level; ❒ tyre inflation pressure and condition; ❒ operation of lighting system (headlamps, direction indicators, hazard warning lights, etc.); ❒ operation of screen wash/wipe system and positioning/wear of windscreen/rear window wiper blades. Every 3,000 km check and top up if required: engine oil level.
GETTING TO KNOW YOUR CAR SAFETY STARTING AND DRIVING WARNING LIGHTS AND MESSAGES IN AN EMERGENCY SERVICING AND MAINTENANCE TECHNICAL SPECIFICATIONS INDEX 162 ❒ check and, if necessary, replace the pollen filter; in particular it should be replaced if a decrease in the air flow into the passenger compartment is detected; ❒ check and, if necessary, replace air filter.
0.9 TwinAir 65 HP versions C A GETTING TO KNOW YOUR CAR E F SAFETY STARTING AND DRIVING WARNING LIGHTS AND MESSAGES D IN AN EMERGENCY fig. 133 F0S0341 SERVICING AND MAINTENANCE A. Engine oil plug/filler B. Engine oil dipstick C. Engine coolant fluid D. Windscreen washer fluid E. Brake fluid F.
0.9 TwinAir 85 HP versions GETTING TO KNOW YOUR CAR SAFETY STARTING AND DRIVING WARNING LIGHTS AND MESSAGES IN AN EMERGENCY SERVICING AND MAINTENANCE fig. 134 F0S0359 A. Engine oil plug/filler B. Engine oil dipstick C. Engine coolant fluid D. Windscreen washer fluid E. Brake fluid F.
1.2 8V versions GETTING TO KNOW YOUR CAR SAFETY STARTING AND DRIVING WARNING LIGHTS AND MESSAGES IN AN EMERGENCY fig. 135 F0S0070 SERVICING AND MAINTENANCE A. Engine oil plug/filler B. Engine oil dipstick C. Engine coolant fluid D. Windscreen washer fluid E. Brake fluid F.
1.4 16V versions GETTING TO KNOW YOUR CAR SAFETY STARTING AND DRIVING WARNING LIGHTS AND MESSAGES IN AN EMERGENCY SERVICING AND MAINTENANCE fig. 136 F0S0071 A. Engine oil plug/filler B. Engine oil dipstick C. Engine coolant fluid D. Windscreen washer fluid E. Brake fluid F.
1.3 Multijet 75 HP versions GETTING TO KNOW YOUR CAR SAFETY STARTING AND DRIVING WARNING LIGHTS AND MESSAGES IN AN EMERGENCY fig. 137 F0S0072 SERVICING AND MAINTENANCE A. Engine oil plug/filler B. Engine oil dipstick C. Engine coolant fluid D. Windscreen washer fluid E. Brake fluid F.
1.3 Multijet 95 HP versions GETTING TO KNOW YOUR CAR SAFETY STARTING AND DRIVING WARNING LIGHTS AND MESSAGES IN AN EMERGENCY SERVICING AND MAINTENANCE fig. 138 F0S0335 A. Engine oil plug/filler B. Engine oil dipstick C. Engine coolant fluid D. Windscreen washer fluid E. Brake fluid F.
ENGINE OIL For 0.9 TwinAir 65 HP and 85 HP versions Check the oil level a few minutes (about five) after the engine has stopped, with the vehicle parked on level ground. The engine oil dipstick B is integral with plug A. Loosen the plug, clean the dipstick with a cloth that does not leave traces, reinsert the dipstick and re-tighten the plug. Extract the engine oil dipstick again and check that the level is between the MIN and MAX marks on the dipstick.
GETTING TO KNOW YOUR CAR SAFETY STARTING AND DRIVING WARNING LIGHTS AND MESSAGES IN AN EMERGENCY SERVICING AND MAINTENANCE WARNING When the engine is hot, take care when working inside the engine compartment to avoid burns. Remember that when the engine is hot, the fan may cut in: danger of injury. Scarves, ties and other loose clothing might be pulled by moving parts. Do not add oil with specifications other than that already in the engine.
WINDSCREEN/REAR WINDOW WASHING FLUID To add fluid, remove cap D (see previous pages) by manoeuvring the special tab. Use a mixture of water and TUTELA PROFESSIONAL SC35, in the following concentrations: 30% TUTELA PROFESSIONAL SC 35 and 70% water in summer. 50% TUTELA PROFESSIONAL SC 35 and 50% water in winter. At temperatures below -20°C, use undiluted TUTELA PROFESSIONAL SC35 fluid. Check level through the reservoir. Close cap D by pressing on the central section.
GETTING TO KNOW YOUR CAR SAFETY STARTING AND DRIVING WARNING LIGHTS AND MESSAGES IN AN EMERGENCY SERVICING AND MAINTENANCE TECHNICAL SPECIFICATIONS INDEX 172 WARNING Brake fluid is poisonous and highly corrosive. In the event of accidental contact, immediately wash the affected parts with water and neutral soap.Then rinse thoroughly. Call a doctor immediately if swallowed. WARNING The symbol on the container indicates a synthetic brake fluid, distinguishing it from the mineral kind.
DIESEL FILTER BATTERY CONDENSATION DISCHARGE (Multijet versions) The car has a low-maintenance battery: no top-ups with distilled water are needed in standard conditions of use. The presence of water in the supply circuit may cause severe damage to the injection system and irregular engine operation. If the warning light switches on, contact a Fiat Dealership as soon as possible to have the system bled. If this problem is indicated immediately after refueling, water may have entered the fuel tank.
CHANGING THE BATTERY GETTING TO KNOW YOUR CAR SAFETY STARTING AND DRIVING WARNING LIGHTS AND MESSAGES IN AN EMERGENCY SERVICING AND MAINTENANCE TECHNICAL SPECIFICATIONS INDEX 174 If required, replace the battery with a genuine spare part with the same specifications. If a battery with different specifications is fitted, the service intervals given in the "Scheduled Servicing Plan" in this chapter will no longer be valid. Follow the battery manufacturer's instructions for maintenance.
❒ switch off all lights inside the car: the car is however equipped with a system which switches all internal lights off automatically; ❒ do not keep accessories (e.g. sound system, hazard lights, etc.) switched on for a long time when the engine is not running; ❒ before performing any operation on the electrical system, disconnect the negative battery cable; ❒ Completely tighten the battery terminals.
GETTING TO KNOW YOUR CAR SAFETY STARTING AND DRIVING WARNING LIGHTS AND MESSAGES IN AN EMERGENCY WHEELS AND TYRES Check the pressure of each tyre, including the space-saver wheel, approximately every two weeks and before long journeys: the pressure should be checked with the tyre rested and cold. It is normal for the pressure to increase when the car is used; for the correct tyre inflation pressure, see “Wheels” in the “Technical specifications” section. Incorrect pressure causes abnormal tyre wear fig.
WARNING Remember that the road holding qualities of your car also depend on correct tyre pressures. WARNING If tyre pressure is too low, it may overheat and be severely damaged as a result. WARNING Do not switch tyres from the righthand side of the vehicle to the lefthand side, and vice versa. WARNING Never submit alloy rims to repainting treatments requiring the use of temperatures exceeding 150°C.The mechanical properties of the wheels could be impaired.
GETTING TO KNOW YOUR CAR WINDSCREEN/REAR WINDOW WIPER BLADES SAFETY STARTING AND DRIVING WARNING LIGHTS AND MESSAGES IN AN EMERGENCY SERVICING AND MAINTENANCE TECHNICAL SPECIFICATIONS Periodically clean the rubber part using special products; TUTELA PROFESSIONAL SC 35 is recommended. Replace the blades if the rubber edge is deformed or worn. In any case, it is advisable to replace them approximately once a year.
CHANGING THE REAR WINDOW WIPER BLADE Proceed as follows: ❒ raise the cover A fig. 141 and remove the arm from the car, undoing the nut B fig. 141 that fastens it to the pivot pin; ❒ fit the new arm, positioning it correctly, and fully tighten the nut; ❒ lower the cover. WINDSCREEN JETS (WASHERS) If the jet of fluid is inadequate, firstly check that there is fluid in the reservoir (see "Checking fluid levels" in this chapter).
GETTING TO KNOW YOUR CAR REAR WINDOW JETS (WASHERS) BODYWORK Rear window washer jets are fixed. The nozzle holder is on the rear window fig. 143. PROTECTION FROM ATMOSPHERIC AGENTS The main causes of corrosion are the following: ❒ atmospheric pollution ❒ salty air and humidity (coastal areas, or hot humid climates); ❒ seasonal environmental conditions. The abrasive action of wind-borne atmospheric dust and sand, as well as mud and gravel raised by other vehicles is also not to be underestimated.
BODY AND UNDERBODY WARRANTY Your car is covered by warranty against perforation due to rust of any original element of the structure or body. For the general terms of this warranty, refer to the Warranty Booklet. ADVICE FOR PRESERVING THE BODYWORK Paint Paintwork does not only serve an aesthetic purpose, but also protects the underlying sheet metal. Touch up abrasions and scratches immediately to prevent rust formation.
GETTING TO KNOW YOUR CAR SAFETY STARTING AND DRIVING WARNING LIGHTS AND MESSAGES IN AN EMERGENCY SERVICING AND MAINTENANCE Detergents pollute the environment. Therefore the engine compartment should be washed in areas equipped for collecting and purifying the liquid used in the washing process. Do not use pure windscreen washer fluid for cleaning the windscreen and the rear window: dilute it to at least 50% with water.
IMPORTANT The washing should take place with the engine cold and the ignition key in the STOP position. After the washing operation, make sure that the various protections (e.g. rubber caps and guards) have not been removed or damaged. INTERIORS Regularly check that water is not trapped under the mats (due to water dripping off shoes, umbrellas, etc.), as this could cause oxidation of the sheet metal. Front headlights IMPORTANT Never use aromatic substances (e.g. petrol) or ketenes (e.g.
GETTING TO KNOW YOUR CAR SAFETY STARTING AND DRIVING WARNING LIGHTS AND MESSAGES IN AN EMERGENCY SERVICING AND MAINTENANCE TECHNICAL SPECIFICATIONS INDEX 184 SEATS AND FABRIC PARTS PLASTIC AND COATED PARTS Remove dust with a soft brush or a vacuum cleaner. It is advisable to use a moist brush on velvet upholstery. It is advisable to clean interior parts with a moist cloth and a solution of water and mild neutral soap.
TECHNICAL SPECIFICATIONS IDENTIFICATION DATA We recommend taking note of the identification codes. The following identification codes are printed and shown on the plates: ❒ Model plate. ❒ Chassis marking. ❒ Bodywork paint identification plate. ❒ Engine marking. V.I.N. PLATE The data plate is located on the left side of the boot floor and it bears the following identification data fig. 144: B Type-approval number. C Vehicle type identification code D Chassis serial number.
GETTING TO KNOW YOUR CAR SAFETY STARTING AND DRIVING BODYWORK PAINT IDENTIFICATION PLATE The plate is applied on the external tailgate post (left side) and it bears the following data fig. 145: A Paint manufacturer. B Colour name. C Fiat colour code. D Respray and touch up code. CHASSIS MARKING The plate is located on the right side of the boot floor and it bears the following identification data fig. 146: ❒ type of vehicle; ❒ chassis serial number.
ENGINE CODE - BODYWORK VERSIONS Versions GETTING TO KNOW YOUR CAR Engine type code 0.9 TwinAir 65 HP 312A4000 0.9 TwinAir 85 HP 312A2000 Bodywork version code 312AXH1A 10 (**) 312AXH1A 10C(**) (***) 312AG1A 08 312AXA1A 00C (*) 1.2 8v 69 HP 169A4000 312AXA1A 00D STARTING AND DRIVING 312AXA1A 00E (*) (**) 312AXA1A 00F (**) 312AXC1B 02F (*) 1.4 16v 100 HP 169A3000 1.3 16v Multijet 75 HP 169A1000 312AXB1A 01C (*) 1.
GETTING TO KNOW YOUR CAR SAFETY STARTING AND DRIVING WARNING LIGHTS AND MESSAGES ENGINE Versions 0.9 TwinAir 65 HP 0.9 TwinAir 85 HP 1.2 8V 69 HP 1.4 16V 100 HP Type code 312A4000 312A2000 169A4000 169A3000 Otto Otto Otto Otto Number and arrangement of cylinders 2 in line 2 in line 4 in line 4 in line Piston diameter and travel (mm) 83.5 x 88 80.5 x 86.0 70.8 x 78.
Versions 1.3 16V MultiJet 75 HP 1.3 16V MultiJet 95 HP Type code 169A1000 199B1000 Diesel Diesel Number and arrangement of cylinders 4 in line 4 in line Piston diameter and travel (mm) 69.6 x 82 69.
GETTING TO KNOW YOUR CAR SAFETY FUEL POWER SUPPLY Versions 0.9 TwinAir 65 HP Multipoint sequential timed electronic injection, with knock control and variable intake valve actuation 0.9 TwinAir 85 HP Phased sequential Multipoint electronic injection, with detonation control and intake valve variable actuation 1.2 8v 69 HP STARTING AND DRIVING 1.4 16v 100 HP 1.3 16v Multijet 75 HP 1.
TRANSMISSION Versions Gearbox Clutch Traction Five/six forward speeds plus reverse with synchronisers for selecting forward gears Self-adjusting pedal without idle stroke Front 0.9 TwinAir 65 HP GETTING TO KNOW YOUR CAR 0.9 TwinAir 85 HP 1.2 8v 69 HP 1.4 16v 100 HP 1.3 16v Multijet 75 HP 1.
GETTING TO KNOW YOUR CAR BRAKES Versions Front service brakes Rear service brakes 0.9 TwinAir 65 HP Disc Drum, self-centring shoes with control cylinder for each wheel 0.
SUSPENSIONS Versions Front Rear MacPherson independent wheels with mechanical crossmember, shock absorbers and coil springs; with anti-roll bar for versions with electric power steering Torsion beam with interconnected wheels consisting of a torsion axle and two tubular arms with shock absorbers and coil springs with anti-roll bar (*) 0.9 TwinAir 65 HP 0.9 TwinAir 85 HP 1.2 8v 69 HP 1.4 16v 100 HP 1.3 16V Multijet 75 HP 1.
GETTING TO KNOW YOUR CAR SAFETY STARTING AND DRIVING STEERING Versions 0.9 TwinAir 65 HP 9,3 0.9 TwinAir 85 HP 9,3 1.2 8v 69 HP 9,3 1.4 16V 100 HP 10,8 1.3 16V MultiJet 75 HP 9,3 1.
WHEELS RIMS AND TYRES Pressed steel or alloy rims. Tubeless radial carcass tyres. All approved tyres are listed in the registration document. IMPORTANT If there are any discrepancies between the Owner handbook and the registration document, take the information from the latter. For safe driving, the car must be fitted with tyres of the same make and type on all wheels. IMPORTANT Do not use air chambers with tubeless tires.
GETTING TO KNOW YOUR CAR SAFETY STARTING AND DRIVING WARNING LIGHTS AND MESSAGES IN AN EMERGENCY SERVICING AND MAINTENANCE TECHNICAL SPECIFICATIONS INDEX 196 Maximum speed index for snow tyres QM + S up to 160 km/h TM + S up to 190 km/h HM + S up to 210 km/h Load rating (capacity) 70 = 335 kg 81 = 462 kg 71 = 345 kg 82 = 475 kg 72 = 355 kg 83 = 487 kg 73 = 365 kg 84 = 500 kg 74 = 375 kg 85 = 515 kg 75 = 387 kg 86 = 530 kg 76 = 400 kg 87 = 545 kg 77 = 412 kg 88 = 560 kg 78 = 425 kg 89 = 5
RIMS AND TYRES PROVIDED AS STANDARD Versions Space-saver spare wheel (*) Rims Tyres Snow tyres Rim GETTING TO KNOW YOUR CAR Tyre 0.9 TwinAir 65 HP 0.
GETTING TO KNOW YOUR CAR Versions Space-saver spare wheel (*) Rims IN AN EMERGENCY SERVICING AND MAINTENANCE TECHNICAL SPECIFICATIONS INDEX 198 165/65 R14 79T (****) 165/65 R14 79Q (M+S) (****) 5½Jx14H2-ET35 175/65 R14 82T 175/65 R14 82Q (M+S) 6Jx15H2-ET35 (**) 185/55 R15 82T (***) 185/55 R15 82Q (M+S) 6½Jx16H2-ET35 (**) 195/45 R16 84T (***) 195/45 R16 84Q (M+S) (****) SAFETY WARNING LIGHTS AND MESSAGES Snow tyres Rim Tyre 5½Jx14H2-ET35 STARTING AND DRIVING Tyres 1.
Versions Space-saver spare wheel (*) Rims Tyres Snow tyres Rim Tyre 1.4 16V 100 HP 1.3 16V MultiJet 75 HP 1.
COLD TYRE INFLATION PRESSURE (bar) GETTING TO KNOW YOUR CAR SAFETY Add +0.3 bar to the prescribed pressure when the tyres are warm. Recheck pressure value with cold tyres.
PERFORMANCE RIM PROTECTOR TYRES Max. speed in km/h that can be reached after initial car use. WARNING DO NOT fit wheel hub caps when using integral hub caps fixed (with springs) to the steel rim and after sale tyres provided with Rim Protector (fig. 148). Use of unsuitable tyres and hub caps may cause sudden loss of tyre pressure. Versions GETTING TO KNOW YOUR CAR km/h 0.9 TwinAir 65 HP 160 (in 4th gear) 0.9 TwinAir 85 HP 173 1.2 8v 69 HP 160 1.4 16v 100 HP 182 1.3 16v Multijet 75 HP 165 1.
GETTING TO KNOW YOUR CAR DIMENSIONS Dimensions are expressed in mm fig. 149 and refer to the vehicle equipped with its original tyres. Height is measured with car unladen. Boot capacity: capacity (V.D.A. standards)= 185 litres. SAFETY STARTING AND DRIVING WARNING LIGHTS AND MESSAGES IN AN EMERGENCY fig. 149 Versions SERVICING AND MAINTENANCE TECHNICAL SPECIFICATIONS INDEX 202 F0S0088 A B C D E F G I 0.9 TwinAir 65 HP 3546 703 2300 543 1488(*) 1413 / 1414(**) 1627 1407 / 1048(**) 0.
Versions A B C D E F G I 1.4 16v 100 HP 3546 703 2300 543 1488(*) 1413 / 1414(**) 1627 1408 1.3 MultiJet 75 HP 95 HP 3546 703 2300 543 1488(*) 1413 1627 1407 (*) Measurements may vary according to rim size.
GETTING TO KNOW YOUR CAR SAFETY STARTING AND DRIVING WARNING LIGHTS AND MESSAGES IN AN EMERGENCY SERVICING AND MAINTENANCE TECHNICAL SPECIFICATIONS INDEX 204 WEIGHTS AND LOADS 0.9 TwinAir 65 HP 0.9 TwinAir 85 HP 1.2 8V 69 HP 1.
Versions 1.3 16V MultiJet 75 HP 1.
GETTING TO KNOW YOUR CAR SAFETY STARTING AND DRIVING WARNING LIGHTS AND MESSAGES IN AN EMERGENCY SERVICING AND MAINTENANCE TECHNICAL SPECIFICATIONS INDEX 206 REFUELLING Petrol versions 0.9 TwinAir 65 HP 0.9 TwinAir 85 HP 1.2 8V 69 HP 1.
Diesel versions 1.3 16v Multijet 75 HP 1.
GETTING TO KNOW YOUR CAR FLUIDS AND LUBRICANTS PRODUCT SPECIFICATIONS Use SAFETY Fluid and lubricant features for a correct use of the car Genuine fluids and lubricants Replacement interval Lubricants for 1.2 8V 69 HP and 0.9 TwinAir 85 HP petrol engines SAE 5W-40 ACEA C3 grade totally synthetic lubricant. FIAT Classification 9.55535-S2. SELENIA K P.E. Contractual Technical Reference No. F603.C07 According to Scheduled Servicing Plan WARNING LIGHTS AND MESSAGES Lubricants for 0.
Use Lubricants and greases for drive transmission Brake fluid Fluid and lubricant features for a correct use of the car Genuine fluids and lubricants Applications SAE 75W-85 grade synthetic-base lubricant. FIAT Classification 9.55550-MX3. TUTELA CAR TECHNYX Contractual Technical Reference No. F010.B05 Manual gearbox and differential Molybdenum disulphide grease, for use at high temperatures. FIAT Classification 9.55580. Consistency NL.G.I. 1-2. TUTELA ALL STAR Contractual Technical Reference No.
GETTING TO KNOW YOUR CAR SAFETY STARTING AND DRIVING WARNING LIGHTS AND MESSAGES IN AN EMERGENCY SERVICING AND MAINTENANCE TECHNICAL SPECIFICATIONS INDEX 210 Use Fluid and lubricant features for a correct use of the car Genuine fluids and lubricants Applications Protective agent for radiators Red protective agent with antifreeze action, based on inhibited monoethylene glycol with organic formula. Exceeds CUNA NC 956-16, ASTM D 3306 specifications. FIAT Classification 9.55523.
FUEL CONSUMPTION The fuel consumption figures given in the tables below are determined on the basis of the type-approval tests laid down by specific European Directives.
GETTING TO KNOW YOUR CAR SAFETY STARTING AND DRIVING WARNING LIGHTS AND MESSAGES IN AN EMERGENCY SERVICING AND MAINTENANCE TECHNICAL SPECIFICATIONS INDEX 212 CO2 EMISSIONS The CO2 emission levels given in the following tables refer to combined consumption. Versions CO2 emissions according to the current European directive (g/km) 0.9 TwinAir 65 HP 97 - 95 (*) 0.9 TwinAir 85 HP 92 1.2 8v 69 HP 119 1.2 8V 69 HP Start&Stop 113 1.4 16v 100 HP 140 1.4 16V 100 HP Start&Stop 135 1.
PRESCRIPTIONS FOR HANDLING THE VEHICLE AT THE END OF ITS LIFE Fiat has been committed for many years to safeguarding the environment through the constant improvement of its production processes and manufacturing products that are increasingly compatible with the ecosystem.
® ®
NOTES
GETTING TO KNOW YOUR CAR SAFETY STARTING AND DRIVING WARNING LIGHTS AND MESSAGES IN AN EMERGENCY SERVICING AND MAINTENANCE TECHNICAL SPECIFICATIONS INDEX 220 INDEX ABS (system) .............................. 62 ABS system .................................. Air Bag........................................... – Deactivation of passenger front air bag and side bag ............................ – front ......................................... – side bag.................................... – side ..............
Climatic comfort......................... Clutch........................................... CO2 emissions........................... CODE Card................................. Compartment in central console........................................ Control buttons.......................... Control panel and instruments ................................ Controls........................................ Cup/bottle holders..................... Dashboard ...................................
GETTING TO KNOW YOUR CAR SAFETY STARTING AND DRIVING WARNING LIGHTS AND MESSAGES IN AN EMERGENCY SERVICING AND MAINTENANCE TECHNICAL SPECIFICATIONS INDEX 222 Fluids and lubricants (specifications).......................... 208 Fog lights – bulb replacement.................. 144 – control ..................................... 44 – fog lights .................................. 44 Follow me home (device) ......... 39 Front roof light – control ..................................... 41 Front seats ............
Light clusters Rear window washer On board instruments – front light clusters – multifunction display .......... 9-10 – rear window washer fluid level ......................................... 171 (changing a bulb)................... 141 – On board instruments ......... 9 – rear light clusters – rev counter............................. 11 Rear window wiper .................... 40 (changing a bulb)................... 144 – Speedometer.......................... 11 – blades..............................
GETTING TO KNOW YOUR CAR SAFETY STARTING AND DRIVING WARNING LIGHTS AND MESSAGES IN AN EMERGENCY SERVICING AND MAINTENANCE TECHNICAL SPECIFICATIONS INDEX 224 – carrying children safely......... – "Isofix" child seat (fitting).... – seat belts ................................. Saving fuel .................................... S.B.R. system................................ Scheduled Servicing Plan .......... Seat belts – load limiters............................ – maintenance ...........................
Wheels and tyres – changing a wheel .................. 127 – Fix&Go automatic (kit)....... 133 – spare wheel............................ 195 – tyre inflation pressure......... 200 – Wheels and tyres ................. 176 Window bags............................... 99 Window cleaning ........................ 40 – Windows................................. 40 Windows (cleaning) .................. 182 Windscreen washer – windscreen washer fluid level .........................................
Fiat Group Automobiles S.p.A. - Parts & Services - Technical Services - Service Engineering Largo Senatore G. Agnelli, 3 - 10040 Volvera - Turin (Italy) Print no. 603.99 .
500 UM GB SISTEMA:500 UM ITA 2-07-2010 11:17 Pagina 1 F I A T 5 0 0 ENGLISH The data contained in this publication is intended merely as a guide. FIAT reserves the right to modify the models and versions described in this booklet at any time for technical and commercial reasons. If you have any further questions please consult your FIAT dealer. Printed in recycled paper without chlorine.