
Installation Instructions


ELEMENTS
™
ALUMINUM RAIL INSTALLATION
TOOLS REQUIRED
• Power drill
• 1/8-in drill bit (for optional pilot hole pre-drilling)
• 1/4-in drill bit
• Snips or saw (for cutting plastic spacer clips)
• Tape measure
• Plumb bob or level
• Saw for cutting aluminum
• Screwdriver or power drill for T25 Torx screws (bit included)
• Safety glasses
• Wrench or ratchet (for post fasteners)
• Pencil
• Optional urethane caulk for high salt water content areas
• Optional PVC adhesive for baseplate cover
• Hearing protection (for saw)
KIT CONTENTS
• (1) 6-ft Top Rail
• (1) 6-ft Bottom Rail
• (1) Crush Block
• (15) 5/8-in Balusters
• (18) Spacer Clips
• (12) #10 x 3/4-in Torx Screws (bit included)
• (1) Instruction Sheet
TIPS
The most recent installation instructions can be found on
our website. Please visit www.fiberondecking.com or call
customer service at 800-318-7828.
RAIL INSTALLATION
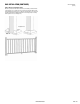
Step 1: Measure the Top Rail and cut as needed
For rail installation, make sure posts are plumb and loosely tightened. Measure the
distance between the posts (for accuracy, take measurement between both posts
near the bottom), subtract 5/8-in from total measurement, and cut top rail (Figure 1).
There should be a 5/16-in space between each end of the cut rail and the upright
post (Figure 2).
NOTE: If posts are 69 1/2-in from end to end, cutting may not be needed.
Step 2: Measure the Bottom Rail and cut as needed
Before cutting the bottom rail, center it along the cut top rail to ensure equal hole
distance from each side to end of top rail (Figure 2 & 3). Mark the top of the bottom
rail at each end in line with the cut top rail. The length of the cut bottom rail will be
the same length as the cut top rail.
AL RL PK 72X36 BL
(3/8/18)
PRIOR TO INSTALLING RAILING:
Please consult local zoning laws in regards to load requirements, overall height requirements, and bottom space requirements for rails. All supporting structures must be in
accordance with applicable building codes. Neighborhood associations and/or historic districts may regulate size, type, placement and type of railing. Apply for permits if required by
local authorities and codes. Ensure compliance prior to installation. Local building code requirements will always supersede any and all suggested procedures and measurements in
the following installation. The following installation instructions are intended as a general guideline based on common building practices used in railing installation.
FIBERONDECKING.COM PAGE 1 OF 3
68 7/8-in
Max 72-in post center to post center
Max 69 1/2-in
Side View
Top View
Same hole spacing as other end
5/16-in space
Figure 1
Figure 2
Figure 3
Step 3: Loosen Post Fasteners
Loosen the posts to allow rail and or stair installation, leaving the post fastener
heads approximately 1-in above the baseplate. (Figure 4).
Figure 4
68 7/8-in
72-in
Top View
Same spacing