
Instructions / Assembly


Symmetry
Railing Installation Instructions - 10-ft. and 12-ft. Stair
12
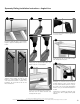
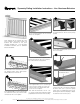
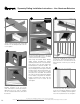
Remove the baluster guide from the railing
box. Place on a flat surface and insert the
balusters into the precut slots.
15
11
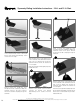
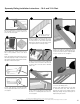
Insert the top stair brackets into the center
cavity in the top H-bar.
Align the end baluster with the predrilled hole
in the bottom rail.
Starting at one end, hold each baluster
securely against the aligning feature and
drive screws parallel with the balusters, not
perpendicular to the bottom rail. Do not over
tighten.
Note: The screws should penetrate fully
through the baluster.
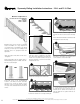
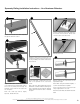
Secure the remaining balusters working to the
other end. Do not over tighten.
Move the baluster guide to the top rail end of
the balusters.
Starting at one end screw the end baluster
using the supplied pan head screw into the
predrilled hole on the side of the aluminum
H-bar.
13
12
Secure the top brackets to the H-bar using
two 5/8-in. self-drilling pan head screws. Do
not over tighten.
16
8
9
10
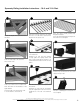
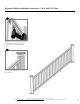
Transfer the length of the cut bottom rail to
the H-bar.
Scribe the stair angle to the side of the
H-bar at both ends.
Scribe a second line 7/32-in. inside the first.
Note: This allows for the thickness of the
upper bracket.
The total length of the H-bar will be 7/16-
in. shorter than the cut bottom rail.
14
The most recent installation instructions can be found on our website.
Please visit https://www.fiberondecking.com/resources/installation-instructions or call Consumer and Technical Support at 800-573-8841.