Symmetry Low Maintenance Composite Railing 6-ft. and 8-ft. INSTALLATION INSTRUCTIONS Manufactured by fiberondecking.com 800.573.
Symmetry Railing Installation Instructions - 6-ft. and 8-ft. Line Railing component list for 6-ft. section: Maximum length between post sleeves is 67 inches. Post Sleeve Cap Top Rail Top Rail Bracket Post Sleeve Top Rail H-Channel Square Balusters Post Sleeve Base Moulding Bottom Rail Bracket Crush Block Bottom Rail Railing component list for 8-ft. section: Maximum length between post sleeves is 91 inches.
Symmetry Railing Installation Instructions - 6-ft. and 8-ft. Line Required Tools and Supplies: Top Rail Profile • • • • • • Power Drill Protective Eye Wear Tape Measure Level Speed Square Miter Saw • • Pencil Adjustable Square Bottom Rail Profile Prior to installing railing: Please consult local zoning laws in regard to load requirements and bottom space requirements for rails. All supporting structures must be in accordance with applicable building codes.
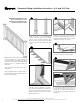
Symmetry Railing Installation Instructions - 6-ft. and 8-ft. Line 4 7 11 Aligning feature Yard Side Deck Side Note: Make sure that the bottom rail is positioned correctly prior to installation. The bottom rail has an aligning feature on the top, which should be on the yard side of the rail, opposite to the deck side. Slide the baluster guide to the opposite end of the balusters. Insert the top of the balusters fully into the channel of the aluminum H-bar rail.
Symmetry Railing Installation Instructions - 6-ft. and 8-ft. Line 14 16 Approximate center on a rail section with even balusters Carefully position the pre-assembled railing infill between the posts, then slowly lower over the bottom brackets until fully seated. 19 Position the top rail over the infill assembly, and carefully lower into place. 20 17 Approximate 1/3 and 2/3 with even baluster count Starting at one end of the rail, secure the top rail with supplied 1-7/8-in.
Symmetry Railing Installation Instructions - Angled Line 3 6 Secure with supplied #10 x 2-1/2-in. selfdrilling screws. Do not over tighten. Measure and cut all balusters to the required length. Remove the baluster guide from the rail box. Place on a flat surface and insert the balusters into the precut slots. 7 4 1 Aligning feature Yard Side Deck Side Yard Side For angled line installation, the line brackets will need to be installed with the angled edge on the deck side of the railing.
Symmetry Railing Installation Instructions - Angled Line 9 11 Assemble and attach the crush block following standard line railing instructions. Position the top of the balusters tightly against the inside of the top H-bar. Center the balusters under the side-mounting screw holes. Working from one end to the other, secure each baluster using the supplied #8 x 1-1/2-in. flat head screws. Do not over tighten.
Symmetry Railing Installation Instructions - 6-ft. and 8-ft. Stair Maximum length between post sleeves is 67 inches for even baluster spacing with 6-ft. rails and 91 inches for 8-ft. rails. 1 Install 4x4 posts in the pre-determined locations, cover with post sleeve and verify spacing. Posts should be plumb in both directions. Place post sleeve base moulding over post sleeve and slide it down to the deck surface.
Symmetry Railing Installation Instructions - 6-ft. and 8-ft. Stair 6 9 Transfer the length of the cut bottom rail to the H-bar. 7 Remove the baluster guide from the rail box. Place on a flat surface and insert the balusters into the precut slots. 12 Note: The screws should penetrate fully through the baluster. Secure the remaining balusters working to the other end. Do not over tighten. 10 13 Scribe the stair angle to the side of the H-bar at both ends.
Symmetry Railing Installation Instructions - 6-ft. and 8-ft. Stair 21 18 15 Approximate center on a rail section with even balusters Note: For best results, predrill bracket holes on post with a 1/8-in. - 5/32-in. bit to ensure accurate screw placement and full insertion, particularly as the stair angle increases. Carefully position the pre-assembled railing infill between the posts, then slowly lower over the bottom brackets until fully seated.
Symmetry Railing Installation Instructions - 6-ft. and 8-ft. Stair 24 Position the top rail over the infill assembly, and carefully lower into place. 25 Starting at one end of the rail, secure the top rail with supplied 1-7/8-in. screws between the post and first baluster (if there’s room), at the center of the top rail, and approximately between every second and third baluster in the infill. 26 Finally, position and glue the post cap over the post sleeve.
Symmetry Railing Installation Instructions - ClearVisionSystem 3 7 Position the crush block and holder inside the bottom rail at the approximate center point. Secure the CVS rail with a #10 flathead screw. Note: Prepare top rail, bottom rail and H-bar and attach bottom rail brackets to the posts following standard 6-ft. line railing installation instructions prior to CVS installation. 4 Predrill two holes with a 1/8-in. bit and secure with the supplied flat head screws. Do not over tighten.
Symmetry Railing Installation Instructions - ClearVisionSystem 11 14 Insert the acrylic sheet by angling it upwards from the deck side of the guardrail. Position the top rail over the H-bar, and carefully lower into place. Center the top CVS aluminum channel under the H-bar. 17 Predrill a 1/8-in. hole for a #10 x 1-1/2-in. screw. 15 18 12 Insert the top CVS rail into the H-bar. Tip: Use clamps to keep top Symmetry rail and CVS channels firmly together.
Symmetry Railing Installation Instructions - Line Aluminum Balusters 3 Secure remaining balusters into the bottom rail. Do not over tighten. 4 6 Fully insert top brackets into both ends of the aluminum H-bar with the arrow pointing upward. 7 Note: Prepare top rail, bottom rail and H-bar and attach bottom rail brackets to the posts following standard 6-ft. line railing installation instructions prior to aluminum baluster installation. Secure with self-drilling #10 x 5/8-in. screws. Do not over tighten.
Symmetry Railing Installation Instructions - Line Aluminum Balusters 9 11 14 Approximate center on a rail section with even balusters Position the assembled rails and balusters between the posts and over the previously secured bottom brackets. Carefully lower the assembly until the bottom rail is fully seated on the bottom brackets. Approximate 1/3 and 2/3 with even baluster count 12 Secure the top rail using the supplied #10 x 1-7/8-in.
Symmetry Railing Installation Instructions - Stair Aluminum Balusters Maximum length between post sleeves is 67 inches for even baluster spacing with 6-ft. rails and 91 inches for 8-ft. rails. 1 Install 4x4 posts in the pre-determined locations, cover with post sleeve and verify spacing. Posts should be plumb in both directions. Place post sleeve base moulding over post sleeve and slide it down to the deck surface.
Symmetry Railing Installation Instructions - Stair Aluminum Balusters 5 8 Transfer the length of the cut bottom rail to the H-bar. 6 Place cut bottom rail on a flat level surface. Align the cut-end of the round metal baluster with the top surface of the bottom rail. Note: If a custom angle is required, cut the factory angled end, leaving the square end as is. This will allow proper seating when securing the top of the balusters later in the installation. 11 Fully seat all balusters into the holders.
Symmetry Railing Installation Instructions - Stair Aluminum Balusters 14 19 17 Secure using the supplied #10 x 5/8-in. selfdrilling screws. Approximate center on a rail section with even balusters 15 Carefully position the pre-assembled railing infill between the posts, then slowly lower over the bottom brackets until fully seated. 20 Approximate 1/3 and 2/3 with even baluster count Secure the bottom stair brackets to the post using the supplied pan head screws at the desired height.
Symmetry Railing Installation Instructions - Stair Aluminum Balusters 22 Position the top rail over the H-bar, and carefully lower until fully seated. 23 Starting at one end of the rail, secure the top rail with supplied 1-7/8-in. screws between the post and first baluster (if there’s room), at the center of the top rail, and approximately between every second and third baluster in the infill. 24 Finally, position and glue the post cap over the post sleeve.
Design Grid fiberondecking.com 800.573.