
Installation Guide
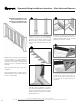
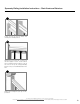

Note: Prepare top rail, bottom rail and H-bar
and attach bottom rail brackets to the posts
following standard 6-ft. line railing installation
instructions prior to aluminum baluster
installation.
1
2
3
4
5
7
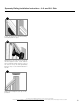
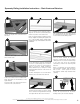
Place the bottom rail on a flat level surface with
the alignment feature down. Align baluster
with predrilled holes in bottom rail.
Insert supplied #10 x 1-1/2-in.screw through
hole and into the center (“X”) of the fins inside
of the baluster. Do not over tighten.
Secure remaining balusters into the bottom
rail. Do not over tighten.
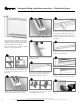
Place the aluminum H-bar in alignment with
the balusters with the side holes nearest the
top of the balusters facing upward.
Insert supplied #10 x 1-1/2-in. screw through
holes in the H-bar, and into the center (“X”)
of the fins inside of the baluster. Drive until
secure. Do not over tighten.
Note: Shim the H-bar with a 1/2-in. – 5/8-
in. spacer to help ensure balusters remain
perpendicular to the H-bar when securing.
Secure with self-drilling #10 x 5/8-in. screws.
Do not over tighten.
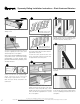
13
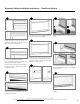
Fully insert top brackets into both ends of
the aluminum H-bar with the arrow pointing
upward.
6
The most recent installation instructions can be found on our website.
Please visit https://www.fiberondecking.com/resources/installation-instructions or call Consumer and Technical Support at 800-573-8841.
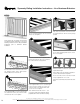
Measure and trim crush block if needed to the
required final length.
Note: When using the bracket template, a
3-3/4-in. tall crush block is required.
Secure crush block to the crush block holder
using a supplied #8 x 1-in. screw.
Note: The screw will be off-center in the crush
block.
8
Symmetry
Railing Installation Instructions - Line Aluminum Balusters