
Installation Guide

6
Wood Surface Installation (continued)
4
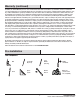
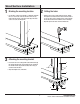
Securing the post
□ Use a bubble level to check for plumb and level of the
post. If adjustment is required, loosen the nuts to allow for
insertion of the leveling wedges (I) between the bottom of
the post and the top of the deck. Place the plastic wedge (I)
under the post on any side where the post is leaning.
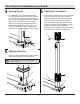
□ Tighten the four hex bolts (B) and recheck the post for
plumb. If further adjustment is required, loosen the nuts,
and move the leveling wedge inward or outward until
plumb and level is achieved. Re-tighten the nuts securely.
A
I
B
5
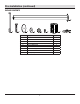
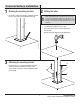
Installing the rail stabilizers
□ Slide one plastic rail stabilizer (H) onto the post mount (A).
The slotted opening can be positioned in any direction.
□ Determine the height of the bottom rail. The bottom rail
mounting screws will screw into the rail stabilizer (H).
□ Secure the rail stabilizer (H) to the post mount (A) using
one #10 x 1 in. Phillips pan head rail stabilizer screw (G)
through the slotted area of the rail stabilizer (H).
□ Repeat for the top rail stabilizer (H). The top rail mounting
screws will screw into the the top rail stabilizer (H).
A
G
G
H
H
6
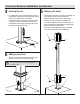
Adding a post sleeve
□ Slide the post sleeve (1) (not included) over the post mount
(A) until it contacts the base of the post mount (A).
NOTE: If using a post sleeve moulding (2), slide the post
sleeve (1) down into the post sleeve moulding (2) prior to
securing any railings.
A
1
2