Decking Installation Instructions Manufactured by fiberondecking.com 800.573.
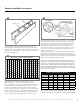
Decking installation instructions Getting started Follow local approved building codes. Careful planning of the finished deck layout will result in better looking finished projects. Failure to follow installation guidelines could void warranty. 1 Perpendicular decking boards Joists Diagonal decking boards Joists Deck Boards Deck Boards • Before starting, material should be stored on a flat surface, supported every 24 in. (61 cm) and covered if original packaging is removed.
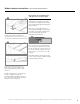
Decking installation instructions 2 4 Blocking End gapping Side-to-side spacing Stringers or Joists WALL LEDGER JOISTS/BLOCKING When installing blocking for more intricate decking patterns, remember that solid blocking (blocking laid on the flat) will inhibit water flow and result in buildup of organic materials over time, which will make cleaning more difficult. For best results when blocking is required, install ladder style.
Surface fastening and fascia instructions 5 6 Do not toe-nail Proper installation 1-1/2 in. (4 cm) from board end Dec 1-1/2 in. (4 cm) 90-Degrees kB oar d# 1 Deck Board Deck Board Deck Dec kB Deck Deck Joist Joist oar d# Deck Board Board Joist/ Blocking Joist/ Blocking 2 Always drive surface fasteners in at a 90˚ angle to the decking surface with two fasteners at every joist location. Do not toe-nail screws into the joist.
Cortex hidden face fastener instructions - square edge surface fastening system The Fiberon Cortex® hidden face fastening system is the fastest, easiest way to hide deck screw heads on stairs, perimeter boards or when replacing a deck board. The Cortex plugs come in a variety of colors that are complementary to Fiberon decking boards. Note: The use of non-Cortex screw or non-Cortex plug will nullify the warranty.
Hidden fastener instructions - grooved edge fastening systems Installing Paramount PVC decking Installing PE capped composite decking Check fiberondecking.com for the most up-to-date fastener recommendations, including specific instructions for grooved Paramount decking. PhantomEC end clip Fiberon recommends the Tiger Claw TC-G® hidden fastener in combination with Fiberon Cortex® fasteners as the only approved system for installing hidden fasteners in grooved Fiberon Paramount deck boards.
Hidden fastener instructions - grooved edge fastening systems How to finish the installation with end clips on the rim joist interior 3 Note: Prior to positioning the last deck board, place the end clips on the inside of the rim joist securing them with a single screw inserted perpendicular through each clip into the joist. 1 Phantom GT 2 Secure GT fasteners by driving the screw fully into joist.
Post sleeve installation Fiberon composite railing systems are designed to work with a number of different decking materials and surfaces. Before initiating any project, obtain a copy of your local building codes and understand them thoroughly. Local building code requirements will always supersede any and all suggested procedures and measurements in the following installation guideline.
Post sleeve installation to structural posts Attaching the railing using the structural posts supporting the joists can be done on new construction decks, where wood 4 in. x 4 in. (10 cm x 10 cm) deck support posts extend through the deck surface at planned intervals serving as rail posts, or in code compliant applications where existing 4 in. x 4 in. (10 cm x 10 cm) wooden posts are properly spaced and plumb.
Post sleeve surface mount installation Required tools and supplies (sold separately): Kit Includes: for wood installation: • 4 - galvanized 5/16 in. x 5 in. hex bolts • 4 - 5/16 in. galvanized nuts • 3 to 6- #8 x 1 in. flat-head screws • • • • 1 - surface mount bracket 1 - 4 in. x 4 in. wood post 4 - 1/4 in. x 3 in. Wedge-Bolt™ anchors 4 - 5/16 in. fender washers for concrete installation: • 3 to 6- #8 x 1 in. flat-head screws Wood installation 2 4 3.5 in. Deck Surface 3.5 in. 1 2 in. x 8 in.
Post sleeve surface mount installation Concrete installation 3 Note: Install on a 4 in. minimum concrete thickness underneath the mount unless otherwise specified by local building codes. 5 3.5 in. 3.5 in. 4 in. x 4 in. wood post 1 8.5 in. Trimmed end is inserted into the post mount 3.25 in. 3.25 in. Cut the post sleeve to desired length. The wood post is typically 1 in. to 2 in. shorter than the post sleeve length. Cut the length of the 4 in. x 4 in. wood post insert if required.
Design Grid fiberondecking.