
Installation Guide


6
The most recent installation instructions can be found on our website. Please visit berondecking.com or call Consumer and Technical Support at 800-573-8841.
Cortex hidden face-fastening instructions
- square edge surface fastening system
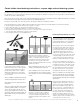
1
2
3
The Fiberon Cortex
®
hidden face fastening system is the fastest, easiest way to hide deck screw heads on stairs or perimeter boards. It is also
the ideal fastener to use when replacing a deck board. The Cortex plugs are available in a variety of colors to match Fiberon deck boards (not
avalable for Good Life or Relax Decking.
Note: The use of non-Cortex screw or non-Cortex plug will nullify the warranty. For a full written warranty, additional information, or technical
assistance please contact Fiberon at 800-573-8841 or visit berondecking.com.
The Fiberon Cortex hidden face-fastening system is designed for traditional elevated deck surfaces.
The following applications require a different fastening method or further instructions and will nullify the Cortex fastener warranty:
• Sleeper systems: Framing rests directly on the ground or roof deck
• Over solid wood surfaces (i.e. fascia boards, handrails, benches)
• Docks or decks with framing members in constant contact with water
• Restricted airspace where there is less than 1-1/2 in. of clearance on two sides of the deck
• “Tear-offs” that utilize old framing as support for new decking.
• Deck materials other than 1 in. standard thickness
Locate all fastener holes at least 1-1/2 in.
from board ends and 1 in. from board sides.
To prevent cracking at fastener locations,
pre-drill all holes with a 1/8 in. or 9/64 in.
drill bit perpendicular to the deck surface
to create the proper pilot hole and remove
excess material.
Note: Pre-drilling is required at board ends
and where temperatures are below 40° F.
Note: Double joists are required at end-to-
end seams.
Note: Use a high torque drill, either corded
or battery-powered, with a ½ in. chuck of
at least 18 volts for best results. Do not
use any speed higher than 1800 rpm. Turn
any torque setting to the innite setting. An
impact driver may also be used with PVC
decking only.
Using the Cortex setting tool, drive the
fastener to the preset level below the deck
surface , ensuring the fastener remains
perpendicular to the deck surface. Install
two fasteners at every joist and/or stair
stringer. Overtightening will induce cracking
at fastener locations.
Note: Periodically (at least every 125 screws)
change a worn driver bit for a fresh bit.
Note: If damage occurs to the screw while
it is being driven in, do not continue. Follow
the instructions on how to remove damaged
screws.
Ensure the cored hole is free of debris or
moisture. Place the Cortex plug into the
cored hole and gently tap with a smooth
hammer head until it is ush with the deck
surface.
Removing damaged plugs or screws
To prevent damage to the decking surface,
mask off around the screw or plug being
removed. Immediately clean off any debris
left behind after the work is completed.
Existing plugs can be removed by tapping
into the plug center with a trim screw (#7
or smaller) until it reaches the screw head
below the plug. Remove the plug. Using
a standard #1 driver bit (not the Cortex
setting tool), engage driver bit into screw
recess prior to backing out. On slow speed,
centering weight over the drill, reverse the
screw out of the deck. When removing a
fastener, an impact drill offers best results.
If the head of a damaged screw is above
the deck surface, remove the driver bit from
your drill and open the chuck wide enough
to capture the head of the screw. Tighten
the chuck rmly around the head and set
the drill in reverse. Then, on low speed,
slowly draw the fastener out of the deck.
Note: If you prefer to use Vise-Grips, grasp
the screw head but be sure to protect the
deck surface from tool marks by providing
enough clearance between the tool and the
deck surface.
If the head of the damaged screw is at or
slightly below the deck surface, use these
options in this order: (1) an impact driver
with a new standard #1 square drive. Set
the tool on reverse, centering weight over
the drill, and slowly remove the screw; (2)
use a #2 square drive bit and drive the
bit into the head of the screw with a few
rm hits of a hammer. Using a sleeve or
extension preinstalled on the drill, carefully
slide the open end onto the #2 bit. Then, on
low speed, reverse out the screw.