
Installation Guide


FIBERONFENCING.COM
Please contact 1-800-215-2740 for further assistance.
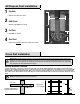
Gate Frame Kit Installation
Follow the Gate Frame Kit instructions in the box to install each gate. All hardware is included. Use 1 gate frame kit for a single gate; use 2
gate frame kits for a double drive gate. Gates are designed to “swing in.” Gate pickets need a minimum of 4 in. above the ground grade to
swing properly. Pickets should be installed in a single layer Tradition Picket Style row for gates only. Shadow Box and Board on Board Styles
add too much extra weight to the frame and hinges of the gate. In general, the shorter and lighter it is, the stronger the gate will be. Gates
that exceed 4 1/2 feet wide require a support wheel for weight distribution and stability. Attach the support wheels directly to the metal
gate frame kit only. Support wheels are sold separately.
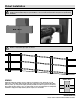
Helpful Tips for Face Mount
Fence Styles
1. The Board on Board is the only style that provides tight visual privacy and is relatively easy to install.
2. Shadow Box provides a similar look on either side of the fence, thus the name “Good Neighbor.” Some communities require a “same
look” on each side.
3. While we recommend 17 pickets per 6 ft. for the Shadow Box and/or the Board on Board, you can use more than that to achieve a
“tighter look,” reducing the spacing between the pickets. This especially changes the Shadow Box look.
4. The recommended gap of 1/8 in. (it can be more than 1/8 in. if you wish) between the pickets in the Traditional “one sided” is not
optional but necessary to accommodate possible thermal expansion.
5. In a typical fence run, it is common to have sections less than 6 ft. We recommend a symmetrical look when possible. E.G. a 20 ft.
run could be 6 ft. - 6 ft. - 6 ft. - 2 ft., however 4 ft. - 6 ft. - 6 ft. - 4ft. would look better. In a 10 ft. run, 2 each 5 ft. sections usually
looks better than a 6 ft. and a 4 ft.
6. Sometimes it becomes necessary to rip a picket to fill a space, at the end of the fence. If you see that you will need to rip a picket,
it always looks better to rip more than one. The material is easy to rip with a standard table saw. E.G. if a short section will require
a 2 inch filler strip to complete the infill, instead of making an ugly 2 in. filler, rip 1/2 in. off 4 pickets and scatter the slightly more
narrow ripped pickets throughout the section. The eye won’t notice and the fence will look great.
7. Use the recommended gravel and concrete quantities, don’t “cheat below the ground.” The gravel isn’t just for drainage, it also
provides a base for the fence foundation.
8. It looks best if all post tops hide 1-3 inches below the top line of the pickets. This means the maximum post heights should be 70
in. above grade as the fence top remains parallel to the ground - flat, upgrade, or down-grade. The goal is to hide all of the posts
behind the view of the pickets.
9. Your fence will settle a bit, keep the picket bottoms up off the ground or they will buckle. Recommended distance is 2 in.