
Installation Guide


The posts mounted at the bottom of the stairs will be on the inside
of the stringer and must line up directly with the posts at the top
of the stairs.
Note: For stairs longer than 6' (1.8 m), it will be necessary to use
multiple stair sections. The distance between posts, measured at an
angle should not exceed 70" (1.7 m). Ensure all posts are plumb prior
to nal mounting. Minimum distance from post to rst baluster slot on
top rail is 2
7
/
8
" (7 cm).
3. Mark angles on the bottom rail (Figure 8).
4. Cut the bottom rail to length.
Ensure that the rail fits tightly
between the posts.
5. Place the top rail next to the bottom
rail with the marked ends together.
Using the bottom rail as a guide,
center the routed holes in the top
rail with the routed holes in the
bottom rail. Mark the cut lines on
the top rail (Figure 9).
6. Cut the top rail to length.
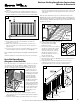
7. Ensure that the Post Sleeve Molding is in place at the bottom of
the posts (Figure 10).
8. Lay bottom rail on stair with marked end at lower post and
routed holes facing up. Place rail onto a 1/4" wood spacer
located between the posts. Center the rail between the
baluster.
20. Once all of the balusters are engaged, gently push down on
the top rail until the bottom end of the balusters contacts the
bottom rail (Figure 6). The top baluster insert should be tightly
secured between baluster and the underside of the top rail.
21. Ensure that the top rail is level and that the rail ends are
centered on each post.
22. Mark on the post the two top bracket hole locations. Pre-
drill 5/32" (4 mm) holes at the desired locations. Repeat for
opposite end.
23. Secure the top rail to the post using two #10 x 2" (5 cm) long
screws. Repeat for opposite end.
Do not over-tighten.
Note: A exible shaft bit holder (not included) is helpful during this
step.
24. Mount and glue Post Caps after all rail sections are installed.
Stair Rail Installation
(Requires Stair Rail Kit)
Note: The stair angle is a 32˚ angle which is equal to a 7" (18 cm)
rise and an 11" (28 cm) run. Baluster daggers included in stair
rail kit will allow only for 30-34˚ angles. Building codes are very
specific on allowable angles and widths. It is very important to
consult with your local
building code officials
and plan your stair layout
accordingly. Ensure that
you leave adequate
space for graspable
hand rail if applicable.
“Dry fitting” intermediate
post placement will
result in easier and better
looking installations and
may avoid placement of
post mounting brackets
in areas where screws
cannot attach to the
guardrail.
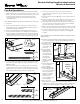
1. Position two line posts at top of stairway with the desired
spacing and secure each post with the appropriate installation
method (Figure 7).
2. Install the outside stringers just wider than the post’s location.
14
For the most up-to-date instructions, visit fiberondecking.com.
Horizon
®
Railing Installation Instructions
Mission & Provincial
Crush Block
Post Sleeve Molding
6
Stringers
Deck
Rim Joists
7
Rim Joists
Stringers
Deck
Rim Joists
Marked
End
Bottom Rail
8
Cut
Line
9
Top
Bottom
Crush Block
Post
Post Sleeve
Molding
1/4" (6 mm)
Wood Spacer
10
Bottom Rail