
Installation Guide
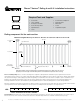

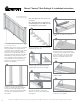
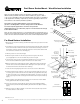

Place the bottom rail between the posts.
Using the bracket as a guide, mark the
location of the holes.
Press the top baluster inserts into the top
end of the balusters and press bottom
baluster inserts into the bottom end of the
balusters. Place two balusters onto the
bottom rail, one baluster on each end. Lower
the top rail onto the two balusters, making
sure to line up the baluster inserts with the
top rail routed holes, until top rail is fully
seated on balusters.
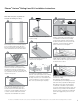
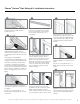
Once fully seated, mark the location of the
bracket holes. Remove the top rail and
pre-drill the holes with a 5/32 in. bit, angling
slightly upward and inward to allow for
clearance from the rail when it is repositioned
for securing (bracket outline shown for clarity).
Secure the top rail to the post at both ends
using the supplied 2 in. screws. Do not over
tighten.
Tip: The use of a long bit extension, or a
exible extension will help access the top
screws.
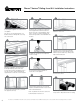
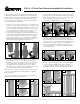
Mark the stair angle on the ends of each
baluster to be used and cut at an angle
on the top and bottom of each baluster.
Ensure that all of the balusters are of
equal length.
Place all balusters on bottom stair rail.
Working from one side to the other, slowly
lower the top rail in place aligning baluster
inserts with the top rail routed holes. Fully
engage all baluster inserts into balusters
and rails.
Complete the assembly by positioning and
gluing the post sleeve cap in place and a
crush block at the approximate mid-point
of the bottom rail using a quality exterior
adhesive.
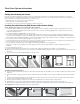
Pre-drill the holes with a 5/32 in. bit, angling
slightly upward and inward to allow for
clearance from the rail when it is repositioned
for securing (bracket and rail outline shown for
clarity).
Note: Using an extended drill bit is
recommended to prevent damage to the rail,
and allow a more perpendicular driving angle.
Note: When using surface mount brackets:
use titanium or cobalt bits only. Predrill the
post sleeve and steel bracket with a 1/4 in. bit
until the steel is penetrated. This will allow the
bracket screws to engage the wood 4x4 and
pull the rail snuggly to the post. Do not over
tighten.
Secure the bottom rail to the post at both
ends using the supplied 2 in. screws. Do not
over tighten.
Tip: The use of a long bit extension, or a
exible extension will help with accessing the
screw heads.
9
13
14
16
12
15
11
17
10
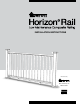
Fiberon
®
Horizon
®
Stair Railing 6 ft. Installation Instructions
6
The most recent installation instructions can be found on our website. Please visit berondecking.com or call Consumer and Technical Support at 800-573-8841.