
Installation Guide


8
FIB-0160-LIT 2/13
9
7 86
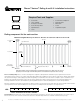
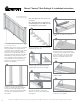
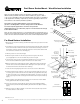
Top Channel
Bottom Channel
4
5
3
2
1
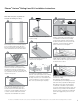
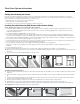
Cutting ClearVisionSystem Panels
Note: Leave polyethylene masking in place until after cutting to size (polyethylene masking acts as a lubricant). Sharp saw blade teeth are essential for
achieving good results. Carbide tipped saw blades are recommended for superior cuts. A 10 in. (25 cm) diameter, 80-tooth blade is recommended for all
purpose cutting. (For more detailed cutting information, see www.cyro.com.)
1. Mask off area to be cut using 1in. (3 cm) masking tape.
2. For best results, cut slowly and smoothly.
3. Cut the panel 7in. (18 cm) shorter than the distance between the posts.
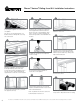
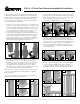
Installing ClearVisionSystem (CVS) Panels Inside Horizon Railing
(Code approved for decks no more than 30 in. above grade)
1. Cut top and bottom guardrails to proper length, making sure to center the existing routed hole pattern evenly. Allow 1/32 in.- 1/16
in. (1-2 mm) between vertical at leg of bracket and end of rail to ensure the rail will snug tightly when secured. Use the bracket as a
template and predrill all holes.
2. Secure bracket with three supplied #10 x 1 in. (3 cm) screws.
3. Locate the Crush Block Brackets on the underside of the bottom rail at 1/3 points. Secure using the supplied self-drilling #8 x 1 in. (3
cm) screw. Slide Crush Block over bracket. NOTE: It may be necessary to spread the bracket wider to properly hold the Crush Block.
TIP: Install Post Sleeve Molding at this time. Level bottom rail and pre-drill holes by using the bracket as a template, or mark with pencil.
4. Secure bottom rail to posts using supplied #10 x 2 in. (5 cm) screws.
5. Center aluminum CVS rail on bottom rail across the face and end-to-end. Allow a minimum of 3 in. (8 cm) from end of CVS rail to post,
but not more than 4 in. (10 cm), to allow for air/wind ow-through (Figure 1).
6. Secure aluminum CVS rail using six of the supplied self drilling screws #10 x 1 in. (3 cm) (Figure 2).
7. Allow 1/32 in.-1/16 in. (1-2 mm) from vertical leg of bracket to end of top rail, and predrill hole locations using the bracket as a
template.
8. Secure top bracket to top rail.
9. Center the top aluminum CVS rail, and secure using six of the supplied self drilling screws #10 x 1 in. (3 cm) (Figure 3).
10. Measure 30 in. (76 cm) up from the top of the bottom rail and mark a light line. Align the bottom of the top rail with the line, and pre-drill
the holes.
11. Secure top rail to post using supplied #10 x 2 in. (5 cm) screws.
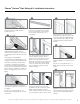
Top and Bottom Channel (Figure 4)
12. Insert the bottom CVS receiving channel into the bottom aluminum CVS rail. An audible “click” should be heard when properly inserted
(Figure 5).
13. Insert the top CVS receiving channel into the top aluminum CVS rail. An audible “click” should be heard when properly inserted (Figure
6).
14. Install the acrylic panel by starting at one end and fully inserting the panel into the pocket of the top receiving channel. Work towards
the other end inserting the panel fully end-to-end.
15. When properly inserted, the acrylic panel should hover just slightly above the bottom CVS receiving channel.
16. Starting from one end, pull the acrylic panel downward to fully insert into the bottom CVS receiving channel (Figure 7).
17. When properly seated in the bottom rail there should be roughly 3/8 in. (10 mm) space above the top of the acrylic panel (Figure 8).
18. Complete the installation by gluing on the Post Caps (Figure 9).
The most recent installation instructions can be found on our website. Please visit berondecking.com or call Consumer and Technical Support at 800-573-8841.
Clear Vision System Instructions