
Installation Guide


6
The most recent installation instructions can be found on our website.
Please visit https://www.berondecking.com/resources/installation-instructions or call Consumer and Technical Support at 800-573-8841.
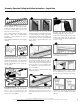
Square Composite Balusters: Measure and
trim all balusters to the required length.
Remove the baluster guide from the railing
box. Place on a at surface and insert the
balusters into the precut slots.
Note: Square composite baluster lengths
will very slightly due to manufacturing
processes. Insure balusters are cut to
uniform length.
Note: Round metal balusters do not require
trimming.
6
Square Composite Balusters: Align the bottom
rail with the balusters on the same end as the
baluster guide. Hold square balusters securely
against the aligning feature on the bottom rail
and secure the balusters to the bottom rail
with the supplied #10 x 1-1/2-in. screws. Do
not over-tighten
Round Metal Balusters: Align baluster with
predrilled holes in bottom rail. Insert supplied
#10 x 1-1/2-in. screw through hole and
into the center (“X”) of the ns inside of the
baluster. Do not over-tighten.
7
9
Square Composite Balusters: Position the top
of the balusters tightly against the inside of
the top H-bar. Center the balusters under the
side-mounting screw holes. Working from one
end to the other, secure each baluster using
the supplied #8 x 1-1/2-in. at head screws.
Do not over-tighten.
Note: The screws should penetrate fully
through the baluster.
8
Insert top brackets into the cavity of the
aluminum H-bar, ensuring that the top bracket
is located within the boundaries of the H-bar.
If the bracket is outside of the boundaries, the
top rail will not t over the H-bar and bracket.
Secure with the supplied #10 x 5/8-in. self-
drilling screws.
NO YES
Assemble and attach the crush block
following standard line railing instructions.
Position the assembled inll over the bottom
brackets and carefully lower into place and
secure the top brackets with the supplied #10
x 2-1/2-in. screws.
10
Position the top rail over the inll assembly,
and carefully lower into place.
11
Using supplied 1-7/8-in. screws, secure
the top rail starting as close to the post as
possible. Space the remaining screws evenly.
Complete the assembly by gluing the post
caps in place with a quality exterior-grade
adhesive.
12
Symmetry Signature Railing Installation Instructions - Angled Line
Round Metal Balusters: Insert supplied #10 x
1-1/2-in. screw through holes in the H-bar,
and into the center (“X”) of the ns inside of
the baluster. Drive until secure. Do not over-
tighten.
13