
Installation Guide


11 FIBERONDECKING.COM
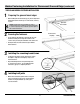
1
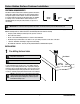
Preparing the grooved board edges
□ After installing the rst end boards (pg 9), insert the
Phantom universal clip into the grooved edge of the deck
board in alignment with the center of each joist. The screws
are pre-inserted for your convenience.
NOTE: Grooved boards are not intended to be used as
perimeter boards unless you are also installing fascia boards
appropriately to cover the exposed grooves, or when the groove
is against a wall or other hard structure.
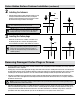
2
Securing the fasteners
□ Using the included T-15 Star drive bit, drive the screw
vertically down, not angled, until it is ush in the
countersunk hole. With some deck boards it may be
necessary to leave the screw loose until the next course
of decking is laid; then, tighten the screw completely. Be
careful not to over-tighten the screw to prevent breakage or
bowing of the clip. A screw gun with a clutch setting is very
effective for this application.
3
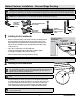
Installing the remaining boards/rows
□ Slide the second deck board into place and push or
tap forward to ensure the board is ush against the
Phantom Universal deck clip. If left loose, nish driving
the screw vertically down, not angled, until it is ush
in the countersunk hole. Install the remaining Phantom
clips where each joist intersects with the deck board.
□ Repeat installing fasteners and positioning boards to
cover the deck surface. See “Installing the nal end
boards” (pg 9) for completing the deck.
4
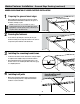
Installing butt joints
□ Where two boards butt together, allow for adequate end-
to-end board spacing and use a single Phantom Universal
hidden fastener to secure board ends.
Hidden Fastener Installation - Grooved Edge Decking (continued)
PHANTOM UNIVERSAL INSTALLATION
NOTE: The Phantom Universal fastener provides a 3/16 in. side-to-side gap between each deck board and is designed to be 1-1/2 in. wide to
completely cover the joist and further enhance the hidden fastener aesthetics.
Side view