
Installation Guide


6
Surface Fastening and Fascia Installation (continued)
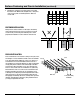
5. Straight rows of fasteners look cleaner and less noticeable
than uneven rows. White chalk, straight boards, or string lines
can be used as guides for installing fasteners. Never use
colored chalk
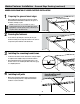
FASTENER INSTALLATION
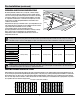
Always drive in surface fasteners at a 90˚ angle to the decking
surface with two fasteners at every joist location. Do not angle
screws into the joist. Instead, place additional joists to allow
perpendicular installation of surface fasteners at board ends.
90°
1-1/2 in.
(38.1 mm)
Joist
Deck board Deck boardDeck board Deck board
JoistJoist
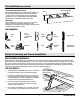
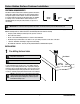
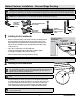
FASCIA INSTALLATION
Fascia is intended as a non-structural covering for rim joists, risers,
and stringers. For fascia installation, install screws at a maximum
12 in. (304.8 mm) interval, with three screws across the face at
each interval. Do not use Cortex hidden fasteners for fascia or
riser installation. For Paramount Decking, also apply a zigzag bead
of high quality exterior adhesive to the entire length of the back
(smooth side) of the board, within 2 in. (5 cm) of the edges and
ends. For risers, install screws at a maximum 12 in. (304.8 mm)
interval with two screws across the face at each interval. Install
fasteners ush with board surface Do not over-tighten screws
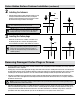
as buckling and cracking may result. In temperatures below 50°F
(10°C), leave 3/16 in. (4.8 mm) space between edges and ends.
Side-gapping should always be 3/16 in. (4.8 mm) unless specied
otherwise. In temperatures above 50°F (10°C), install with 1/8 in.
(3.2 mm) spacing between the sides.
Joist
Fascia
Fascia
12 in. (304.8 mm)
maximum
Rim Joist