
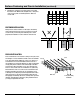
Installation Guide


8
Cortex Hidden Surface Fastener Installation (continued)
2
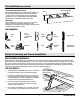
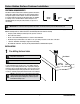
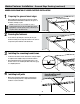
Installing the fasteners
□ Using the Cortex setting tool (bit), drive the fastener (screw)
to the preset level below the deck surface, ensuring the
fastener remains perpendicular to the deck surface. Install
two fasteners at every joist and/or stair stringer.
NOTE: Replace a worn driver bit with a fresh bit periodically.
We recommend replacement every 125 screws.
NOTE: If damage occurs to the screw while it is being driven
in, do not continue. Follow the instructions in the “Removing
Damaged Cortex Plugs or Screws” section of this manual.
Screw
Bit
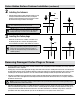
3
Inserting the Cortex plugs
□ Ensure the cored hole is free of debris or moisture. Place
the Cortex plug into the cored hole and gently tap with a
smooth hammer head until it is ush with the deck surface.
NOTE: Each box of Cortex fasteners comes with additional
plugs. It is recommended you keep these plugs in case any
boards need to be removed and replaced in the future, as
the plugs are destroyed when they are removed and are not
available separately.
Plug
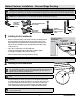
Removing Damaged Cortex Plugs or Screws
□ To prevent damage to the decking surface, mask off around the screw or plug being removed. Immediately clean off any debris left
behind after the work is completed.
□ Existing plugs can be removed by tapping into the plug center with a trim screw (#7 or smaller) until it reaches the screw head below
the plug. Remove the plug. Using a standard #1 driver bit (not the Cortex setting tool), engage the driver bit into the screw recess prior
to backing out. On slow speed, reverse the screw out of the deck. When removing a fastener, an impact drill offers best results.
□ If the head of a damaged screw is above the deck surface, remove the driver bit from your drill and open the chuck wide enough to
capture the head of the screw. Tighten the chuck rmly around the head and set the drill in reverse. Then, on low speed, slowly draw
the fastener out of the deck.
NOTE: If you prefer to use Vise-Grips, grasp the screw head, but be sure to protect the deck surface from tool marks by providing enough
clearance between the tool and the deck surface.
□ If the head of the damaged screw is at or slightly below the deck surface, use these options in this order: (1) use an impact driver
with a new standard #1 square drive; set the tool on reverse, centering weight over the drill, and slowly remove the screw; (2) use
a #2 square drive bit and drive the bit into the head of the screw with a few rm hits of a hammer; using a sleeve or extension
preinstalled on the drill, carefully slide the open end onto the #2 bit; then, on low speed, reverse out the screw.