
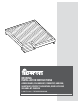
Installation Guide


9 FIBERONDECKING.COM
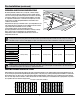
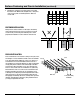
Hidden Fastener Installation - Grooved Edge Decking
NOTE: To reduce appearance of gapping at end-to-end seams and to limit the movement of the deck board along the joists, we recommend using
two Cortex screws or stainless steel composite deck screws placed into the deck at the joist location closest to the mid-point of each deck board.
This helps ensure that the deck boards stay positioned and maintain proper gapping as the boards expand and contract with temperature changes.
NOTE: The use of hidden fasteners is not recommended for installations at elevations above 6,500 feet.
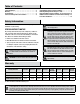
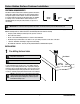
Cortex
Screw
Bit
ArmorGuard
start/stop
PhantomEC
end clip
ArmorGuard/PhantomGT
line fastener
ArmorGuard/
PhantomGT
butt joint fastener
Phantom
Universal Fastener
with pre-inserted
screw
Cortex
Plug
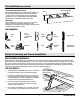
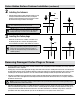
1
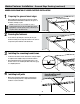
Installing the rst end boards
□ Fiberon recommends starting on the outside of the deck and working toward
the house/wall. This way, if any boards needs cut down to t, the cut side
will be against the house/wall. However, if starting at the house/wall, secure
Fiberon end clips a minimum of 1/4 in. (6.4 mm) from the wall with a single
screw into the joist.
□ Space clips no greater than 12 in. (304.8 mm) apart.
□ Position the deck board into the end clip fasteners. It may be helpful
to angle the board slightly to fully seat it into the clips.
□ Check to ensure that the board is fully inserted into the clips.
NOTE: Follow instructions for ArmorGuard/PhantomGT (pg. 10) or Phantom universal fasteners (pg. 11) to install the mid-deck area before the
end boards.
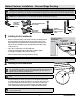
2
Installing the nal end boards
NOTE: Prior to positioning the last deck board, place the end clips on the inside of the rim
joist, securing them with a single screw inserted perpendicular through each clip into the joist.
Only applicable for installation of at bottom board. Start/stop/End clips fasteners are not
approved to secure boards with a scalloped bottom.
NOTE: Use a square edge board to create a smooth, nished look along the perimeter of the
deck.
□ After positioning the last deck board in place, secure the deck board by angling
a screw through the clip and into the board at a 30˚- 45˚ angle. Ensure the screw
inserts fully and pulls the board down. Space no more than 12 in. (304.8 mm)
apart. The last board can also be surface-fastened into place with composite
screws installed ush with the deck surface or with Cortex Hidden Fasteners.
NOTE: When thickness of rim joist exceeds 1-1/2 in. (38.1 mm), end clips should be secured to
the outer edge of the joist.
ArmorGuard start/stop
Phantom20EC
end clip
12 in. maximum
(304.8 mm)