
Installation Guide


Symmetry Railing Installation Instructions - 6-ft. and 8-ft. Line
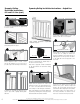
Square Composite Balusters: Measure and
trim all balusters to the required length.
Remove the baluster guide from the railing
box, place on a at surface, and insert the
balusters into the precut slots.
Note: Square composite baluster lengths
will very slightly due to manufacturing
processes. Insure balusters are cut to
uniform length.
Note: Round metal balusters do not
require trimming.
Ensure that the bottom rail is positioned
correctly prior to installation. The bottom
rail has an aligning feature on the top which
should be on the yard side of the rail opposite
to the deck side.
Aligning feature
Yard Side Deck Side
Square Composite Balusters: Align the bottom
rail with the balusters on the same end as the
baluster guide. Hold square balusters securely
against the aligning feature on the bottom rail
and secure the balusters to the bottom rail
with the supplied #10 x 1-1/2-in. screws. Do
not over tighten
Round Metal Balusters: Align baluster with
predrilled holes in bottom rail. Insert supplied
#10 x 1-1/2-in. screw through hole and
into the center (“X”) of the ns inside of the
baluster. Do not over tighten.
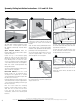
Align the aluminum H-bar with the balusters
with the side holes facing upward.
Square Composite Balusters: Slide the baluster
guide to the opposite end of the balusters.
Insert the top of the balusters fully into the
channel of the aluminum H-bar rail.
Note: When securing composite or metal
balusters, shim the H-bar with a 1/2-in. –
5/8-in. spacer to help ensure balusters
remain perpendicular to the H-bar.
Ensure that the brackets are positioned
correctly prior to installation. The brackets
indicate which side will be facing the decking.
Fully insert top brackets into both ends of
the aluminum H-bar with the arrow pointing
upward.
Using integrated screw template, secure with
self-drilling #10 x 5/8-in. screws. Do not over
tighten.
Bottom Rail Bracket
H-bar Bracket
5
4
6
9
8
7
3