Model # SEC17 RW U8 W/MTL KD SEC17 RWS U8 W/MT KD INSTALLATION MANUAL VERANDA REGENCY RAILING WITH METAL BALUSTERS Questions, problems, missing parts? Before returning to the store, call Veranda Customer Service 8 a.m. - 7 p.m., EST, Monday - Friday, 9 a.m. - 6 p.m., EST, Saturday 1-800-230-7547 HOMEDEPOT.COM/VERANDA THANK YOU We appreciate the trust and confidence you have placed in Veranda through the purchase of this railing.
Table of Contents Table of Contents. . . . . . . . . . . . . . . . . . . . . . . . . . . . . . . . . . . . 2 Safety Information. . . . . . . . . . . . . . . . . . . . . . . . . . . . . . . . . . . 2 Warranty. . . . . . . . . . . . . . . . . . . . . . . . . . . . . . . . . . . . . . . . . . . 3 Pre-Installation. . . . . . . . . . . . . . . . . . . . . . . . . . . . . . . . . . . . . . 4 Line Rail Installation. . . . . . . . . . . . . . . . . . . . . . . . . . . . . . . . . . 7 Stair Railing Installation. .
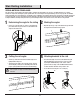
Warranty 20 YEAR PERFORMANCE LIMITED WARRANTY WHAT IS COVERED This railing product is covered under a Limited Residential Warranty to protect against checking, splitting, decay, rot and splintering.
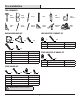
Pre-Installation TOOLS REQUIRED Claw hammer Safety goggles Pencil Level PVC adhesive Tape measure Power drill 1/8 in. drill bit 5/32 in. drill bit Speed square Adjustable square Miter saw RAILING HARDWARE KIT AA LINE BALUSTER EZ MOUNT KIT BB JJ CC Part DD EE Part Description AA Bottom bracket Quantity (per kit) 2 BB Top bracket 2 CC #10 x 1 in. screw 12 DD #10 x 2 in. screw 8 EE Driver bit 1 Part Description GG HH 12 GG #10 x 2 in.
Pre-Installation (continued) PRIOR TO INSTALLING THE RAILING IMPORTANT: Please read and follow the instructions in this section before you begin installation of your railing products. NOTE: Rail lengths will vary slightly due to manufacturing processes. Make sure rails and balusters are cut properly to correct length, and with hole pattern centered between posts before securing. NOTE: For best results, cut post sleeves with a carbide-tipped balde, minimum 32-tooth.
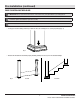
Pre-Installation (continued) □□ Determine length of top and bottom rails, and cut to length. Place the top and bottom rails side-by-side for accurate placement of the EZ Mounts (JJ). Center the pattern on the rails, spacing the EZ Mounts (JJ) no more than 4.5 in. apart. Fig. 3 □□ Pre-drill holes with a 1/8 in. bit, and fasten EZ Mounts (JJ) to the top and bottom rails using the screws (KK).
Line Rail Installation 1 2 Preparing the bottom rail □□ Position bottom brackets (AA) 1/32 in. – 1/16 in. from the ends of the bottom rail and mark the hole locations. Ensure the brackets (AA) are installed on the EZ Mount side. Attaching crush blocks □□ Use PVC adhesive to glue crush blocks (1) to the bottom of the bottom rail at mid-point of rail length to support the rail in a level position. □□ Predrill holes using a 5/32 in. bit and then attach the brackets (AA) to the bottom rail using 1 in.
Line Rail Installation (continued) 4 Preparing the top rail □□ Position top brackets (BB) 1/32 in. – 1/16 in. from the ends of the top rail and mark the hole locations. Ensure brackets are installed on the side of the top rail with the EZ Mounts (JJ). 5 Inserting balusters 7 Marking and drilling top rail holes □□ Insert a baluster into the first EZ Mount (JJ) at both ends of the bottom rail and one in the middle. □□ Predrill holes using a 5/32 in.
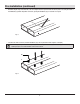
Line Rail Installation (continued) 8 9 Installing the balusters and top rail □□ Insert all balusters into the bottom rail. You do not need to remove the plugs at the ends of the balusters. Reposition the top rail over the balusters, and lower into place between the posts. After the top rail is fully seated, secure using 2 in. screws (DD). DO NOT OVERTIGHTEN. Installing the post caps □□ Complete the installation by installing the post cap in place.
Stair Railing Installation SPECIAL NOTES ON STAIR RAILING The stair systems are designed for the typical angles created by an approximate 7 in. rise/11 in. run with allowance for accepted variation in components. The Regency stair system allows for a 30-34 degree stair angle. Building codes are very specific on allowable angles and widths. It is very important to consult with your local building code officials and plan your stair layout accordingly.
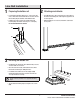
Stair Railing Installation (continued) 5 6 Preparing the bottom rail installation Installing the bottom rail □□ Place crush block on the stair tread surface midway between the posts and glue to bottom of bottom rail. □□ Secure the bottom rail to the post at both ends using the 2 in. screws (GG). DO NOT OVERTIGHTEN. □□ Place the bottom rail between the posts. Using the bracket as a guide, mark the location of the holes on the posts. Remove the rail before pre-drilling the holes.
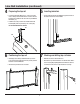
Stair Railing Installation (continued) 9 Installing the top rail □□ Set each baluster over the bottom EZ Mounts. Secure the top railing using the 2 in. screws (GG). You do not need to remove the plugs at the ends of the balusters. 10 Installing the caps □□ Complete the installation by installing the post cap in place. You can use a quality exterior adhesive in order to do this, but note that you will not be able to remove the cap at a later time once it is glued.
Questions, problems, missing parts? Before returning to the store, call Veranda Customer Service 8 a.m. - 7 p.m., EST, Monday - Friday, 9 a.m. - 6 p.m., EST, Saturday 1-800-230-7547 HOMEDEPOT.COM/VERANDA Retain this manual for future use.