
User Guide


Page 6
REPLACEMENT PROCEDURE
WARNING: Disconnect power to the transfomer before starting replacement procedure.
NOTE: Wear disposable, non-absorbent protective gloves prior to replacement
procedure in case of accidental breakage of glass.
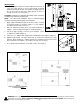
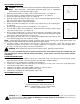
1. Rotate the UV-Aire ballast assembly counter-clockwise until it stops. (See Figure 9)
2. Remove the ballast assembly and lamp from the mounting base. (See Figure 7)
3. Remove the lamp from the lamp socket. (See Figure 6)
4. Install the replacement lamp into lamp socket. Do not handle the lamp with bare hands.
Oils on the hands tend to reduce lamp intensity.
5. Wipe off the glass with the supplied alcohol wipe.
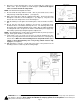
6. Position the ballast assembly power cord 90° to the viewport hole on the mounting base.
(See Figure 9)
7. Slide the lamp thought the hole in the mounting base. (See Figure 7)
8. Press the ballast against the mounting base. Rotate the ballast assembly clockwise until it
stops and is locked in place. (See Figure 10)
9. After assembly is firmly in place, reconnect power to transformer, and plug the power supply
cord back into the standard electrical outlet. Check lamp operation by looking through the
viewport hole. A blue glow should be seen in the duct.
10. After replacing the lamp, make sure to install the Lamp Replacement Label. Print the date
on the label and apply to the side of ballast assembly.
NOTE: If blue light leaks through any portion of plenum and/or around mounting plate, unplug power supply cord
immediately and seal affected areas and/or rotate ballast and repeat step #8.
11. UV lamps contain a small amount of mercury, like a typical fluorescent lamp. Check with your local waste
management authority for local disposal or recycling requirements. According to the EPA’s Universal Waste Rule,
these types of lamps may be disposed of into household waste.
WARNING: Never touch broken lamp or internal contents of lamp. The lamp contains mercury.
NOTE: In case of accidental exposure to internal contents of lamp, wash hands and any other affected skin area
with mild detergent. Remove affected clothing immediately. If skin surface is pierced, seek medical attention
immediately.
TROUBLESHOOTING GUIDE
1. Do not wire the unit into the appliance 24 volt fan or thermostat circuit. This will cause premature ballast or lamp
failure and void the warranty. For proper operation, the unit requires 24VAC at all times.
2. Check to make sure 24VAC power is available at the transformer.
3. If lamp does not light up, pull back metal washer on mounting base. If lamp comes on, the base needs tightening to
ensure that the safety switch is fully engaged
4. If lamp does not light up, rotate ballast slightly clockwise or counter-clockwise
5. If lamp does not light up after rotating ballast, replace lamp.
6. If unit still does not light up after replacing lamp, replace unit.
REPLACEMENT PARTS LIST
For replacement parts, contact Field Controls at:
Phone: 1-252-522-3031 • Fax: 1-252-522-0214
Email: sales@fieldcontrols.com
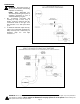
Figure 9
Fi
g
ure 10
LAMP Replacement Part Number
46511200
WARNING: Never expose eyes or skin to UVC light from any source. Looking directly at the UVC light may cause permanen
t
eye damage or blindness. Never operate the UV-Aire Air Purifying System out of the plenum. Avoid touching the
glass portion of the lamp with your hands.