
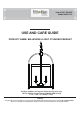
Instructions / Assembly


5
AA
4
Pre-Installation (continued)
PACKAGE CONTENTS
Part Description Quantity
A Flying ring 1
Installation
1
Attaching the cross bar to the
outlet box
Attaching the chain
□ Remove ring (DD) and screw collar loop (CC) from
preassembled threaded nipple on cross bar (AA).
□ Mount the cross bar (AA) to the outlet box using the two
outlet box screws (BB).
□ Attach screw collar loop (CC) to the threaded nipple of
cross bar (AA). Choose the desired length of chain (EE), using a
soft cloth and pliers (none included) to avoid damaging the nish
of chain (EE) if any links are being removed.
□ Open the top section of the chain (EE) and attach it to the screw
collar loop (CC). Pass the chain (EE) through canopy (FF) and
ring (DD).
□ Then weave the xture wire and the xture ground wire from
xture (B) through the chain (EE), ring (DD), canopy (FF), screw
collar loop (CC) and the threaded nipple on cross bar (AA).
□ Wrap the ground wire from the xture around the ground
screw (HH) on the cross bar (AA). Connect the ground wire
from the xture to the ground wire from the outlet box.
□ Connect the smooth wire (marked) from xture to the black
supply wire.
□ Connect the ridged wire (unmarked) from xture to the white
supply wire.
□ Cover the three connections using the three wire
connectors (GG). Wrap the three wire connections with
electrical tape for a more secure connection.
□ Position the wires back inside the outlet box.
2
3
Connecting the electrical wires
BB
AA
CC
FF
DD
EE
NOTE: The top and bottom section of chain (EE) are
required.
GG
HH
A
B
C
D
E
F
G
B Fixture 1
AA
C Top ring (Preassembled to Lamp shade (D)) 1
D Lamp shade (Preassembled to Bottom ring (E)) 1
E Bottom ring (Preassembled to Fixture (B)) 1
F Stem (preassembled to Fixture (B)) 4
G Knob (preassembled to Fixture (B)) 4