
User's Manual
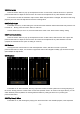
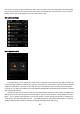

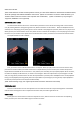
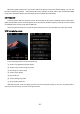
Table Of Contents
- 1 Overview
- 2 Buttons and Ports
- 2.1 Buttons/Ports Diagram:
- 2.2 Buttons and ports introduced
- 2.2.1 Power/lock button
- 2.2.2 Volume up
- 2.2.3 Volume down
- 2.2.4 Confirm button
- 2.2.5 Shortcuts button
- 2.2.6 Touch bar
- 2.2.7 Up/Prev.track/Rewind
- 2.2.8 Back
- 2.2.9 Down/Next track/Fast forward
- 2.2.10 USB transfer/Charging
- 2.2.11 Micro SD card slot
- 2.2.12 Headphone out jack
- 2.2.13 Microphone
- 3 Introduction of display
- 3.1 Power on/off and home page
- 3.2 Main screen
- 3.3 Lock screen clock
- 3.4 Status Bar
- 3.5 Browse Files
- 3.6 Recording
- 3.7 Category
- 3.7.1 All songs
- 3.7.2 Artist
- 3.7.3 Album
- 3.7.4 Genre
- 3.7.5 Favorites
- 3.7.6 Playlists
- 3.7.7 Recently added
- 3.8 Play settings
- 3.8.1 Play mode
- 3.8.2 Resume mode
- 3.8.3 Playback gap
- 3.8.4 Max volume
- 3.8.5 Default volume
- 3.8.6 Fixed volume setting
- 3.8.7 Balance
- 3.8.8 Equalizer
- 3.8.9 Play through folders
- 3.9 system settings
- 3.9.1 Update Media lib
- 3.9.2 Brightness
- 3.9.3 Screen timeout
- 3.9.4 Idle standby
- 3.9.5 Sleep
- 3.9.6 USB mode
- 3.9.7 Multifunction button
- 3.9.8 Button light
- 3.9.9 Theme
- 3.9.10 Recording quality
- 3.9.11 Lockscreen clock
- 3.9.12 Time setting
- 3.9.13 Date setting
- 3.9.14 Language
- 3.9.15 Storage formatting
- 3.9.16 Factory restore
- 3.9.17 About M3
- 3.10 Now playing screen
- 3.11 Shortcuts menu
- 4 Other operations
- 4.1 Songs added to favorites
- 4.2 Songs removed from Favorites
- 4.3 Songs added to the playlist
- 4.4 songs removed from the playlist
- 4.5 Delete playlist
- 4.6 Delete files of songs
- 4.7 External list
- 4.8 Shortcut operation
- 4.9 Song of preference
- 5 Firmware upgrade
- 6 Notes and precautions
- 7 FAQs
- 7.1 How may the M3 be charged?
- 7.2 What is the charging current of M3?
- 7.3 How long does it take to charge the M3?
- 7.4 Can I listen to songs on the M3 while charging
- 7.5 Can M3 be charged with other Micro USB cable?
- 7.6 Why does the M3 charge so slowly or not at all
- 7.7 How to judge the status of M3 charging?
- 7.8 Which operating systems does M3 support for co
- 7.9 What USB ports does the M3 support?
- 7.10 Does the M3 support file be directly dragged
- 7.11 Does the M3 online computer need to be instal
- 7.12 How to check whether my M3 has the latest fir
- 7.13 How to upgrade the M3 firmware?
- 7.14 What to do if the update fails? Would my M3
- 7.15 What cards do the M3 support?
- 7.16 Is the M3 picky about cards?
- 7.17 What size card does the M3 support?
- 7.18 How to format SD card into FAT32 format?
- 7.19 All files on the SD card cannot be displayed
- 7.20 Files on the SD card (FAT32) only show partia
- 7.21 How do I reset the database files in M3?
- 7.22 What formats of SD card does the M3 support f
- 7.23 M3 supports APE, why my APE can't play.
- 7.24 Does M3 support CUE sheets?
- 7.25 The SD card have CUE files. Why M3 can’t supp
- 7.26 Why can't I see the CUE file in the browse fi
- 7.27 How do you set it to play across different fo
- 7.28 Why do my lyrics not show?
- 7.29 Why is the cue playing screen displaying garb
- 7.30 Why do my new songs not appear under any cate
- 7.31 Why does the total number of files displayed
- 7.32 How to get longer battery life for the M3?

- 6 -
3.6 Recording
After clicking into the recording screen, the above picture will appear. At this moment, the recording does not
start. Press the confirm button shortly to start recording. As shown in the right figure above, the status bar
displays the recording icon.
The recording screen has two clocks . The left clock is displayed as the recording duration - that is, the time
that has been recorded. The right one shows the rest time of recording, based on the available capacity of the SD
card.
After the recording starts, you can pause the recording or continue recording by Shortly pressing the confirm
button (the screen on M3 will prompts).
If you don't need to record, press the back button shortly to pop up the recording stop prompt. Select “Yes”
and press OK to stop recording. Press the Back button again after recording stops, the recording save selection
will pop up, and you can save the recording file as needed. The recording file will be saved in the folder named
Record in the root directory of the SD card.
(Note: 1 Please insert the SD card before recording, and make sure that the SD card has enough available
capacity to save the recording file. If the SD card is not inserted, the recording cannot be started.
2 During the recording process, songs cannot be played at the same time, and the recording screen cannot
be exited before stopping record. When you need to play the song, please stop the recording first; if you play the
song first and then enter the recording, the playing will stop automatically after the recording is started.