
User Manual

2.
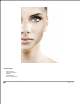
The Shadow Recovery filter inverts the black and white copy of the image as a mask on a brightening black and white
adjustment layer. This adjustment layer is, then, set to "overlay" blend with the original image to brighten the
shadow area.
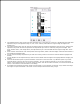
3.
The Smart Sharpen filter uses the value of the original image to create the adjustment layer and, then, sharpens the
adjustment layer with the amount specified. The adjustment layer mask is created by using the find edges, auto
level, and blur filters. (See image above.) The adjustment layer is then blended with the original image with "value"
blend.
4.
Local Contrast enhancement uses Unsharp Mask with large radius (wider of the two edges) and shows more details in
the shadow and highlight areas.
5.
Use the Contrast overlay adjustment layers that have overlay mode to increase the contrast between highlight and
shadow.
6.
Use the Brighten screen adjustment layer with the screen blend mode to brighten the highlight without changing the
shadow.
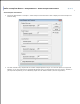
7.
Check off the Preview option to preview the effect of the filter on the active item. Try different options if you want,
and press Enter to see the result on the screen instantly. You can change the settings or you can also change the
opacity of each adjustment layer to get the image you want. Click OK to confirm the action, click Cancel to cancel the
action, or click Reset to reset the values in the dialog.
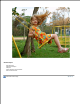
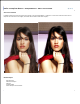
8.
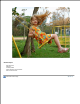
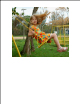
An example with the before and after images is shown below. In this example, the Overlay 2 layer makes the image
too bright. The processed below is the result of smart sharpen without the Overlay 2 layer.
9.