
User Manual


5
fillrite.com | tuthill.com
INSTALLATION AND OPERATION MANUAL
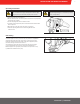
Figure 2
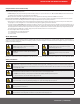
Tank Installation
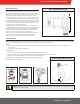
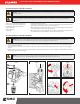
NX25‑120 and NX25‑240 pumps mount to the bung of a tank by way of the tank adapter that is bolted to the inlet flange. The suction tube threads into the bottom of the tank adapter,
and must be cut to a length that positions it at least 3" from the bottom of the tank. The tank must be equipped with a vent cap.
Materials
• 1‑1/4" steel pipe cut to a length at least 3" above of the bottom of the tank when screwed into the tank adapter, with the tank adapter screwed into the bung connection
ontopofthe tank.
• Thread pipe joint sealant appropriate for the application.
Installation Procedure
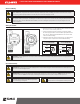
1. Thread the 1‑1/4" pipe into the tank adapter. Seal threads liquid tight with appropriate sealant (Figure 1).
2. Screw the tank adapter (with suction pipe) into the tank bung; seal threads liquid tight with appropriate thread sealant (Figure 2).
3. Mount the pump on the adapter; making sure the seal and screen are installed as shown (Figure 3).
Note: Tank adapters come in either NPT or BSP threads, depending on the model you purchase
(see page 11 for model specific information).
Figure 3
Figure 1
TYPICAL TANK INSTALLATION
3" Min.
IMPORTANT! Be certain the screen is properly seated in the indentation in the tank adapter before installing seal and tank adapter to the pump. Failure to properly
seat the screen can result in fluid leakage.
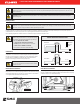
Anti-Siphon Device
NX25‑120 and NX25‑240 pumps comes from the factory ready to install an anti‑siphon
tube back to the tank. An anti‑siphon device (a.k.a. vacuum breaker) is important
because it will break a liquid siphon if there is an open nozzle or a leaking hose below the
fluid level in the tank when the pump is turned off. Fill‑Rite recommends anti‑siphon kit
#KIT321ASN be installed from the pump outlet back to the vapor space in the tank.
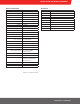
This illustration shows where to install the tube so that it terminates in the vapor space at
the top of the tank. The tube must terminate in the vapor space; if it terminates below the
fluid level in the tank, it will not prevent siphoning. It is very important there are no liquid
traps in the tubing; it must have a continuous slope from the pump down to the tank, and
can be connected into any opening in the top of the tank if the tank adapter is not used.
Use reducer bushings as required for proper fit and seal.
The ¼ NPT opening in the side of the tank adapter terminates in the vapor space of the
tank. Make liquid‑tight connections using the appropriate sealant from the adapter to the
anti‑siphon outlet using a minimum of ¼ metal tubing that is compatible with whatever
liquid is being pumped. If the anti‑siphon tank adapter is being used and the ¼ NPT
opening is not used for the tubing, leave the factory installed plug in place.
Fill‑Rite offers Anti‑Siphon kit #KIT321ASN (available through your Fill‑Rite distributor).
This kit contains the necessary fittings and tubing to complete the installation as
pictured in this section. NOTE: This kit ONLY works for tank top installations.
ANTI-SIPHON INSTALLATION
Figure 2
Anti‑Siphon Line