
Buying Guides

How to Install Your Chandelier
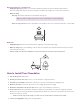
1. Turn o the power. Safety first!
2. Attach your electric box. Make sure it is secure and free of any frayed wires.
3. Assemble your chandelier. Follow the instructions in your user manual before hanging it up.
4. Measure the chain. Use the tips above to ensure it hangs at the perfect height.
5. Attach the chandelier to the electric box. Refer to your user manual for instructions.
6. Connect the wires. Most chandeliers will have a black wire and a white one. Twist the stripped end of the
black wire from the ceiling to the fixture. Repeat with the white wire. Place the wires back in the electric box
and secure it until it is closed.
7. Screw in your lightbulbs. Enjoy your new light fixture!
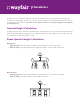
Bathroom
• Hanging Height: Mount it at least 8' above the highest point from the tub’s edge.
• Where to Hang: Due to strict building codes for wet environments, the chandelier must be at least 3' to the
side of the tub or shower.
• Caution: Make sure that the chandelier is enclosed or made for moisture-rich environments.
Entryway, Bedroom, or Living Room
• Hanging Height: Always have 7' of clearance between the bottom of the chandelier and the floor.
Note: For ceilings taller than 8', mount the chandelier an additional 3" higher for every extra foot above 8'.
• Where to Hang:
Entryway: Center the chandelier in the middle of the space.
Bedroom/Living Room: Place the chandelier in the middle of the room or above a bedside or coee table.
Tip: If you have a large foyer, place it over a round table for a bold statement!
• Please note this step can be tricky, so reach out to an electrician for assistance if needed.
7'
3'
8'