Contents Safety Precautions.................................................. 2 Environmental Information ..................................... 3 Accessories included............................................... 3 TV - Features ......................................................... 4 Viewing the TV ....................................................... 4 TV Control button & Operation................................ 5 Viewing remote control - TV....................................
PARTS INSIDE. REFER SERVICING TO RISK OF ELECTRIC SHOCK QUALIFIED SERVICE PERSONNEL. DO NOT OPEN Safety Precautions WARNING: Never let people (including CAUTION: TO REDUCE THE RISK OF ELECTRIC children) with reduced physical, sensory or SHOCK, DO NOT REMOVE COVER mental abilities or lack of experience and / or (OR BACK). NO USER-SERVICEABLE knowledge use electrical unsupervised. PARTS INSIDE. REFER SERVICINGdevices TO QUALIFIED PERSONNEL.
Moisture and Water • Do not use this TV in a humid or damp place (avoid using in the bathroom or near the kitchen sink). • Do not expose this TV to rain or water, as this may be dangerous. • Do not place objects filled with liquids, such as flower vases, on top of the TV. Avoid from dripping or splashing. • If any solid object or liquid falls into the cabinet, unplug the TV and have it checked by qualified personnel before operating it any further.
Viewing the TV TV - Features • Remote controlled colour LED TV. • F ully integrate d d igita l tuner. • HDMI Inputs are for connecting a device that has a HDMI socket. • USB input. • Programme recording. • Programme timeshifting. • 1000 programmes. • OSD menu system. • Scart socket for external devices (such as DVD Players, PVR, video games, etc.). • Teletext. • Headphone connection. • Manual tuning. • Automatic power down after up to six hours. • Sleep timer. • Child lock.
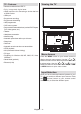
TV Control button & Operation The Control button allows you to control the Volume/ Programme/ Source and Standby-On functions of the TV. To change volume: Increase the volume by pushing the button up. Decrease the volume by pushing the button down. To change channel: Press the middle of the button, the channel information banner will appear on screen.
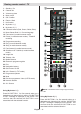
Viewing remote control - TV 1. Standby / On 2. Channel list 3. Volume up-down 4. Menu on/off 5. OK / Confirm 6. Return / Back 7. No function 8. My button 1 (*) 9. My button 2 (**) TV 10. Coloured buttons (Red, Green, Yellow, Blue) 11. Mono-Stereo Dual I-II / Current language 12. Fast rewind (in media browser mode) 13. Pause (in media browser mode) / Timeshift recording 14. Programme recording 15. Play (in media browser mode) 16. Stop (in media browser mode) 17.
Viewing the Connections Connector Type Cables Device Scart Connection (back) VGA Connection (back) SIDE AV PC/YPbPr Audio Connection (side) Side Audio/Video Connection Cable (Supplied) PC Audio Cable (Not supplied) HDMI Connection (back) SPDIFF Connection (back) SIDE AV Side AV Connection (side) HEADPHONE AV Connection Cable (supplied) Headphone Connection (side) YPbPr Video Connection (side) YPbPr Connection Cable (Not supplied) USB Connection (side) CI Connection CAM module (side) NOTE: W
Using a Conditional Access Module IMPORTANT: Insert or remove the CI module only when the TV is SWITCHED OFF. In order to watch certain digital channels, a conditional access module (CAM) can be necessary. This module must be inserted in the CI slot of your TV. Standby Notifications If the TV does not receive any input signal (e.g. from an aerial or HDMI source) for 5 minutes, the TV will go into standby. When you next switch-on, the following message will be displayed: 1.
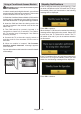
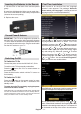
Inserting the Batteries to the Remote 1. Lift the cover on the back of the remote upward gently. 2. Install two AAA batteries. Make sure to match the + and - ends of the batteries in the battery compartment (observe the correct polarity.) First Time Installation When turned on for the first time, the “language selection” menu appears. The message “Welcome please select your language!” is displayed and all language options are listed alphabetically. 3. Replace the cover.
screen will be displayed after selecting the Store Mode. Select YES to proceed. If Home Mode is selected, Store mode will not be available after the First Time Installation. Press OK button on the remote control to continue and the following message will be displayed on the screen. Select Yes and the television will search for digital terrestrial TV broadcasts. Media Playback via USB Input You can connect a USB hard disk drive or USB memory stick to your TV by using the USB inputs of the TV.
Sorting Channel List the Settings menu. You can select which broadcasts will be listed in the channel list. To display specific types of broadcast, you should use the Active channel list setting. Select the Active channel list from the Channel list menu by using “ ” or “ ” button. Press the OK button to continue. You can select a network type option from the list by using “ ” or “ ” and OK buttons.
Menu Features and Functions Picture Menu Contents Mode You can change the picture mode to suit your preference or requirements. The Picture mode can be set to one of these options: Cinema,Game, Sports, Dynamic and Natural. Contrast Sets the lightness and darkness values of the screen. Brightness Sets the brightness value for the screen. Sharpness Sets the sharpness value for the objects displayed on the screen. Colour Sets the colour value, adjusting the colors.
Menu Features and Functions Sound Menu Contents Volume Adjusts the volume level. Equalizer: In the equalizer menu, the preset can be changed to Music, Movie, Speech, Flat, Classic and User. Press the MENU button to return to the previous menu. Equalizer menu settings can be changed manually only when the Equalizer Mode is in User. Balance This setting is used for emphasizing left or right speaker balance. Headphone Sets the headphone volume.
Menu Features and Functions Settings Menu Contents Conditional Access Controls conditional access modules when available. Language Configures language settings. Configures parental settings. Parental (Default PIN code can change depending on the selected country.If you are asked to enter a PIN code for viewing a menu option, use one of the following codes: 4725, 0000 or 1234.) Timers Sets timers for selected programmes. (USB Record) Recording Configuration Displays the recording configuration menu.
Electronic Programme Guide (EPG) Some, but not all channels send information about the current and next programmes. Press the GUIDE button to view the EPG menu. Set Timer / Delete Timer After you have selected a programme in the EPG menu, press the OK button and and the Options screen will be displayed. Select the “Set Timer on Event” option and press the OK button. You can set a timer for future programmes. To cancel an already set timer, highlight that programme and press the OK button.
Record, Play, Pause, Display (for PlayListDialog) keys can not be used when teletext is ON. If a recording starts from timer when teletext is ON, teletext is automatically turned off. Also teletext usage is disabled when there is an ongoing recording or playback. Timeshift Recording Press (PAUSE) button while watching a broadcast to activate timeshifting mode. In timeshifting mode, the programme is paused and simultaneously recorded to the connected USB disk.
Specifications TV BROADCASTING PAL/SECAM B/G D/K K’ I/I’ L/L’ DIGITAL RECEPTION DVB-T MPEG2 DVB-T MPEG4 HD DVB-T MHEG-5 Engine (for UK only) DVB-T2 MPEG2 DVB-T2 MPEG4 HD DVB-C MPEG2 DVB-C MPEG4 HD RECEIVING CHANNELS VHF (BAND I/III) UHF (BAND U) HYPERBAND NUMBER OF PRESET CHANNELS 1000 CHANNEL INDICATOR On Screen Display RF AERIAL INPUT 75 Ohm (unbalanced) OPERATING VOLTAGE 220-240V AC, 50 Hz. AUDIO German + Nicam Stereo AUDIO OUTPUT POWER (WRMS.
Recording Unavailable Software Upgrade Your TV is capable of finding and updating automatically via the Aerial signal or over the Internet. Background search and upgrade mode While the TV is connected to the Internet, if new software is found, it downloads the upgrades automatically when the TV next powers on from standby. 3.00am search and upgrade mode While the TV is connected to an aerial signal.
Appendix B: PC Input Typical Display Modes The display has a maximum resolution of 1920 x 1080. The following table is an illustration of some of the typical video display modes. Your TV may not support different resolutions. Supported resolution modes are listed below. If you switch your PC to an unsupported mode, a warning OSD will appear on the screen.
Appendix C: Supported File Formats for USB Media Browser Media Movie Extension Format Notes Video Audio dat, mpg, mpeg Mpeg1,2 MPEG1/2 Layer 1/2/3, AAC/HEAAC, AC3/EAC3, LPCM/ADPCM 1080P@ 30fps 50Mbit/ sec dat, mpg, mpeg MPEG2 ,H.264, VC1, AVS, MVC MPEG1/2 Layer 1/2/3, AAC/HEAAC, AC3/EAC3, LPCM/ADPCM H.264:1080Px2@25fps 1080P@ 50fps MVC: 1080P@ 24fps Other: 1080P@ 30fps” 50Mbit/ sec .vob MPEG2 MPEG1/2 Layer 1/2/3, AC3, LPCM 1080P@ 30fps 50Mbit/ sec .
Appendix D: Supported DVI Resolutions When connecting devices to your TV’s connectors by using DVI converter cables (not supplied), you can refer to the following resolution information.
Appendix F: AV and HDMI Signal Compatibility (Input Signal Types) Source EXT-1 (SCART1) EXT-1 (SCART2) Side AV Supported Signals Available PAL O NTSC 60 O RGB 50/60 O SECAM O PAL O NTSC 60 O SECAM O PAL 50/60 O NTSC 60 O SECAM 480I YPbPr HDMI1 HDMI2 60Hz O O 480P 60Hz O 576I 50Hz O 576P 50Hz O 720P 50Hz O 720P 60Hz O 1080I 50Hz O 1080I 60Hz O O 480I 60Hz 480P 60Hz O 576I 50Hz O 576P 50Hz O 720P 50Hz O 720P 60Hz O 1080I 50Hz O 1080I 60Hz
Important Instruction For your own safety read following instruction carefully before attempting to connect this unit to the mains supply.
Product Fiche Comercial Brand: FINLUX Product No. 10090576 Model No. 40FBD274B-T Energy efficiency class A Visible screen size (diagonal, approx.