colour television 42F701 Owner’s manual
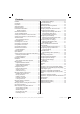
Contents Media Browser Settings .................................... 21 Features ................................................................. 2 Introduction ............................................................. 2 Timeshift Recording ............................................. 22 Preparation ............................................................. 2 Instant Recording ................................................. 22 Safety Precautions .................................................
Features • 3D Viewing: This product supports the 3D viewing function via an available broadcast or via HDMI, PC,YPBPR source. • Remote controlled colour LCD TV. • Fully integrated digital-cable TV (DVB-TC - MPEG2) (DVB-TC - MPEG4). • HDMI connectors for digital video and audio. This connection is also designed to accept high definition signals. purposes. We exclude liability in principle, if the device is not used as intended, or unauthorized modifications have been made.
please contact the local authority or the dealer where you purchased the product. Cleaning Before cleaning, unplug the TV set from the wall outlet. Do not use liquid or aerosol cleaners. Use a soft and dry cloth. Disconnecting the Device The mains plug is used to disconnect the TV set from the mains and therefore it must remain readily operable. Ventilation The slots and openings on the TV set are intended for ventilation and to ensure reliable operation.
• Do not drop objects onto the product or import force to the product. This may result in electric shock or fire. • Do not use your product near a humidifier or kitchen counter. This may result in electric shock or fire. • Do not disassemble, repair or modify the product or its parts. Failing to do so may result in damage to the product or a malfunction.
a coaxial cable, may in some circumstances create a fire hazard. Connection to a cable distribution system has therefore to be provided through a device providing electrical isolation below a certain frequency range (galvanic isolator, see EN 60728-11).
Environmental Information • This television is designed to consume less energy to save the environment. You not only help to save the environment but you can also save money by reducing electricity bills thanks to the energy efficiency features of this TV. To reduce energy consumption, you should take the following steps: • You can use the Power Save Mode setting, located in the Picture Settings menu.
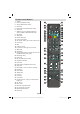
Remote Control Buttons 1. Standby 2. Pause / Timeshift recording 3. Stop (in Media Browser mode) 4. No function 5. Rapid advance (in Media Browser mode) 6. No function 7. Subtitle on-off / TXT subtitle (analogue TV mode) / Subtitle (in Media Browser mode) 8. Blue button SCREEN LANG SUBTITLE ZOOM REPEAT ROOT 9. Yellow buton 10. Numeric buttons(**) 11. Previous programme 12. OK / Select / Hold (in TXT mode) / Channel List 13. Cursor right 14. Mute 15.
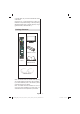
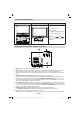
TV and Operating Buttons FRONT and REAR VIEW Control buttons VIEW Control Buttons 1. Standby/On button 2. TV/AV button 3. Programme Up/Down buttons 4. Volume Up/Down buttons Note: Press “ ” and buttons at the same time to view main menu. Viewing the Connections - Back Connectors HDMI 3 1. SCART 2 inputs or outputs for external devices. 2. SCART 1 input or output for external devices.
to the television with an appropriate antenna cable, as shown in the illustration in the following pages. 7. PC Input is for connecting a personal computer to the TV set. Connect the PC cable between the PC INPUT on the TV and the PC output on your PC 8. HDMI Inputs are for connecting a device that has an HDMI socket. Your LCD TV is capable of displaying High Definition pictures from devices such as a High Definition Satellite Receiver or DVD Player.
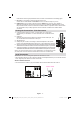
CAUTION ! Using USB Inputs USB Connection • You can connect a USB hard disk drive or USB memory stick to your TV by using the USB inputs of the TV. This feature allows you to play files stored in a USB drive or record programmes. • 2.5” and 3.5” inch (hdd with external power supply) external hard disk drives are supported. • To record a programme, you should first connect a USB disk to your TV while the TV is switched off. You should then switch on the TV to enable recording feature.
more than two partitions, crash may occur. First partition of the usb disk is used for PVR ready features. It also must be formatted as primary partition to be used for PVR ready features. • Some stream packets may not be recorded because of signal problems, so sometimes video may freezes during playback. • Record, Play, Pause, Display (for PlayListDialog) keys could not be used when teletext is ON. If a recording starts from timer when teletext is ON, teletext is automatically turned off.
Using Side AV Connectors Switching On/Off You can connect a range of optional equipment to your LCD TV. • For connecting a camcorder, connect to the VIDEO IN socket and the AUDIO SOCKETS. Do not connect the camcoder to VIDEO IN socket at the same time since it can cause noise in the picture. For selecting the related source, see the section “Input selection” in the following parts. • To listen the TV sound from headphones, connect to the HEADPHONE jack of theTV.
• Press “P+” button to select the next programme. Input Selection Once you have connected external systems to your TV, you can switch to different input sources. Press “SOURCE” button on your remote control consecutively for directly changing sources. Programme Selection (Direct Access) • Press the numeric buttons on the remote control to select programmes between 0 and 9. The TV will switch to the selected programme.
Red button (Prev Time Slice): Displays the programmes of previous time slice. Green button (Next Time Slice): Displays the programmes of the next time slice. Yellow button (Prev Day): Displays the programmes of previous day. Blue button (Next day): Displays the programmes of the next day. Numeric buttons (Jump): Jumps to the preferred channel directly via numeric buttons. OK (Options): views/records or sets timer for future programs.
Note: It is not possible to record or set timer for two or more individual events at the same time interval. First Time Installation IMPORTANT: Ensure that the aerial or cable is connected and a Common Interface module is not inserted before switching on the TV for the first time installation. • When the TV is operated for the first time, the installation wizard will guide you through the process.
Note: You can press “MENU” button to cancel. Analogue or Digital Aerial-Analogue tuning using “ ”/“ ” and OK buttons. Auto Channel Scan Menu Operation Digital Aerial: Searches and stores aerial DVB stations. Digital Cable: Searches and stores cable DVB stations. Analogue: Searches and stores analogue stations. Digital Aerial & Analogue: Searches and stores both analogue and aerial DVB stations.
Digital Cable Manual Search In cable manual scan, you can enter frequency, modulation, symbol rate and network channel scan options. After selecting search type as Digital Cable, you can set the desired options and press OK button to search. If you start Digital Aerial scan process, automatic scanning will start. You can press “MENU” button to cancel. If you start Digital Cable scan process, the following screen will be displayed.
• Press OK button to process. Selected channel is now moved. Deleting a Channel You can press GREEN button to tag/untag all channels; YELLOW button to tag/untag channel. Press OK to cancel. Select Yes by pressing “ ” or “ ” button and press OK to delete all of the channels. • Select the channel that you want to delete and select Delete option. Press OK button to continue. Managing Stations: Channel List • A warning screen will appear. Select YES to delete, select No to cancel.
Managing Stations: Favourites You can create a list of favourite programmes. • Press “MENU” button to view main menu. Select Channel List item by using “ ” or “ ” button. Press OK to view menu contents. On-Screen Information You can press “INFO” button to display on-screen information. Details of the station and current programme will be displayed on the information banner. • Select Favourites to manage favourite list. Use “ ”/“ ” and OK buttons to select Favourites.
3D: Press to view 3D Settings. Press RETURN button to switch back to previous menu. Viewing Photos via USB Select a device by using “ ” or “ ” button and press OK. When you select Photos from the main options, available image files will be filtered and listed on this screen. Viewing Videos via USB Jump (Numeric buttons): Jump to selected file using the numeric buttons. When you select Videos from the main options, available video files will be filtered and listed on this screen.
Playing Music via USB When you select Music from the main options, available audio files will be filtered and listed on this screen. Play ( button): Plays all media files starting with the selected one. Stop ( Pause ( button): Stops playback. button): Pauses the selected playback. RED: Sorts files by Title,Artist or Album. Loop/Shuffle (GREEN button): Press once to disable Loop. Press again to disable both Loop and Shuffle. Press once more to enable only Shuffle. Press again to enable all.
Slide Show Interval: Sets slide show interval time. Show Subtitle: Sets subtitle enabling preference. Subtitle Position: Sets subtitle position as up or down. Subtitle Font Size: Sets subtitle font size (max. 54pt). • Record OSD will then be displayed for a short time and the current event will be recorded. • You can press (RECORD) button on the remote control again to record the next event on the EPG. In this case, OSD will display the programmed events for recording.
3D Mode Available playback options: • Play from start: Plays the recording from the beginning. Press 3D button to view 3D Settings menu directly. • 3D feature enables you to view 3D content using the supplied 3D glasses. • To enable and customize 3D mode on the TV, perform the following: • Press MENU button on the remote control and select Picture by using “ ” or “ ” button. Press OK button to view Picture Settings. • Resume: Recommences the recordings. • Play from offset: Specifies a playing point.
Virtual 3D Subtitle Conversion from 2D to 3D. There are 3 different levels of depth: Low – Medium – High This zooms up the wide picture (16:9 aspect ratio) with subtitles to the full screen. Note: This item is available when TV is not in 3D mode. Note: If you select 3D modes, wear the supplied 3D glasses when this message is displayed on the screen: Note: You can shift to screen up or down by pressing “ ” / “ ” buttons while picture zoom is selected as panaromic, 14:9 Zoom, Cinema or Subtitle.
The top and bottom of the picture are slightly cut off. Cinema This zooms up the wide picture (16:9 aspect ratio) to the full screen. “Environmental Information” in this manual for further information on Power Save Mode. Note: The backlight function will be inactive if Power Save Mode is set to on. Backlight (optional): This setting controls the backlight level and it can be set to Auto, Maximum, Minimum, Medium and Eco Mode(optional).
PC Picture Settings Operation Configuring Sound Settings For adjusting PC picture items, do the following: Press “ ” or “ ” button to select Picture icon. Picture menu appears on the screen. Contrast, Brightness, Colour, Colour Temp and Picture Zoom, Reset settings in this menu are identical to settings defined in TV picture settings menu. Sound ,Settings and Source settings are identical to the settings explained in the main menu system.
AVL: Automatic Volume Limiting (AVL) function sets the sound to obtain fixed output level between programmes (For instance, volume level of advertisements tend to be louder than programmes). Dynamic Bass: Dynamic Bass is used to increase bass effect of the TV set. Surround Sound: Surround mode can be change as On or Off. Digital Out: Sets digital out audio type. Using a Conditional Access Module (not included) IMPORTANT: Insert or remove the CI module only when the TV is SWITCHED OFF.
Language Settings Configuring Language Preferences You can operate the TV’s language settings using this menu. Press “MENU” button and select the fifth icon by using “ ” or “ ” button. Press OK button to view Settings menu. Use “ ” or “ ” button to highlight Language and press OK to continue: In the configuration menu, highlight the Language Settings item by pressing “ ” or “ ” buttons.
Timers To view Timers menu, press “MENU” button and select Settings icon by using “ ” or “ ” button. Press OK button to view Settings menu. Use “ ” or “ ” button to highlight Timers and press OK to continue: Setting Sleep Timer This setting is used for setting the TV to turn off after a certain time. • Highlight Sleep Timer by using “ ” or “ ” button. Parental Settings Menu Operation (*) • Use “ ” or “ ” button to set an item. • Use “ ” or “ ” button to set. The timer can be programmed between Off and 2.
Recording Configuration Select Recording Configuration item in the Settings menu to configure recording settings. The following menu is displayed for recording configuration. To view the details about the USB disk, highlight Hard Disk Info by using “ ” or “ ” key and press OK. USB disk information will be displayed: Configuring Date/Time Settings Select Date/Time in the Settings menu to configure Date/Time settings. Press OK button.
• Select Sources in the Settings menu and press OK button. Application version: Displays the current application version. • Press“ ” or “ ” buttons to select a source. Hard of Hearing: If the broadcaster enables any special signal concerning the audio, you can set this setting as On to receive such signals. • Use “ ” or “ ” button to enable or disable the selected source. Changes are automatically stored.
Other Features Teletext Displaying TV Information: Programme Number, Programme Name, Sound Indicator, time, teletext, channel type and resolution information is displayed on the screen when a new programme is entered or “INFO” button is pressed. The Teletext system transmits information such as news, sports and weather on your TV. Note that if the signal degrades, for example in poor/adverse weather conditions, some text errors may occur or the teletext mode may be aborted.
Tips Screen Care: Clean the screen with a slightly damp, soft cloth. Do not use abrasive solvents as they may damage the coating layer of the TV screen. For your safety, unplug the mains plug when cleaning the set. When moving the TV, hold it properly from the bottom of the unit. Image Persistence: Please note that ghosting may occur while displaying a persistent image. On LCD TVs’ image persistence may disappear after a short time. Try turning the TV off for a while.
Appendix A: PC Input Typical Display Modes Appendix B: AV and HDMI Signal Compatibility (Input Signal Types) The display has a maximum resolution of 1920 x 1200. The following table is an illustration of some of the typical video display modes. Your TV may not support different resolutions. Supported resolution modes are listed below. If you switch your PC to an unsupported mode, a warning OSD will appear on the screen.
Appendix C: Supported DVI Resolutions When connecting devices to your TV’s connectors by using DVI converter cables (not supplied), you can refer to the following resolution information.
Appendix D: Supported File Formats for USB Mode Media File Extension Audio .mpg, .mpeg MPEG1, 2 MPEG Layer 1/2/3 .dat MPEG1, 2 .vob MPEG2 .mkv Movie Music Photo Subtitle Remarks Format Video (Maximum resolution/Bit rate etc.) MPEG2 H.264, MPEG1,2,4 EAC3 / AC3 MAX 1920x1080 @ 30P 20Mbit/sec MPEG4, Xvid 1.00, .mp4 Xvid 1.01, Xvid 1.02, Xvid 1.03, Xvid 1.10-beta1/2 H.264 PCM/MP3 MPEG2, MPEG4 PCM/MP3 .avi Xvid 1.00, Xvid 1.01, Xvid 1.02, Xvid 1.03, Xvid 1.10-beta1/2 H.264 PCM .
Appendix F: Supported 3D Content Resolutions HDMI MBV MBP DTV ATV OTHER 1080p@24 FP Supported Not Supported Not Supported Not Supported Not Supported Not Supported 720p@50 FP Supported Not Supported Not Supported Not Supported Not Supported Not Supported 720p@60 FP Supported Not Supported Not Supported Not Supported Not Supported Not Supported 1080p FC SBS, TB SBS, TB SBS, TB SBS, TB Not Supported SBS, TB 720p FC SBS, TB SBS, TB SBS, TB SBS, TB Not Supported SBS, TB
Vertical Viewing Angle Specifications 15° Vertical TV BROADCASTING Horizontal Viewing Angle PAL/SECAM B/G D/K K’ I/I’ L/L’ RECEIVING CHANNELS VHF (BAND I/III) UHF (BAND U) HYPERBAND Digital Reception (DVB-T) NUMBER OF PRESET CHANNELS Transmission Standards: 1000 DVB-T, MPEG2, DVB-T, MPEG4 HD CHANNEL INDICATOR I. DEMODULATION On Screen Display • Symbol rate: COFDM with 2K/8K FFT mode.
Important Instruction For your own safety read following instruction carefully before attempting to connect this unit to the mains supply.
50209400 www.finluxdirect.