happy Finnish 24in LED TV 24H6071-D Owner’s manual
50240001 www.finluxdirect.
Contents Safety Information...................................................1 Getting Started........................................................2 Notifications & Features & Accessories...................2 Control Buttons on the TV.......................................2 Connect Power .......................................................3 Remote Control ......................................................4 Connections............................................................
Getting Started • AVL (Automatic Volume Limiting). Notifications & Features & Accessories • PLL (Frequency Search). Environmental Information This television is designed to consume less energy to help save the environment. To reduce energy consumption, you should take the following steps: • PC input. If you set the Power Save Mode as Eco, the TV will switch to energy-saving mode. The Power Save Mode settings can be found In the ‘Picture’ section of the Main Menu.
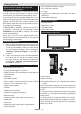
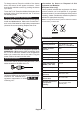
To change source: Press the middle of the button twice, the source list will appear on screen. Scroll through the available sources by pushing the button up or down. To turn the TV off: Press the middle of the button down and hold it down for a few seconds, the TV will turn into standby mode. Inserting the Batteries into the Remote Lift the cover on the back of the remote upward gently. Install two AAA batteries.
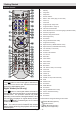
Getting Started Remote Control INFO SLEEP SCREEN SOURCE PRESETS 1. Standby 2. Image size 3. Sleep timer 4. Numeric buttons 5. Return / Exit / Index page (in TXT mode) 6. Cursor up 7. Cursor left 8. Programme Up -Page down 9. Programme Down - Page up 10. Favourite mode selection 11. Mono-Stereo Dual I-II / Current language (in DVB channels) 12. Previous programme MENU RETURN 13. Electronic Programme Guide 14. Recordings Library 15. No function 16.
Getting Started Connections Connector Type Cables Device Scart Connection (back) VGA Connection (back) SIDE AV PC/YPbPr Audio Connection (side) Side Audio YPbPr or PC Connection Cable (Not supplied) HDMI Connection (back) SPDIFF Connection (back) SIDE AV Side AV (Audio/Video) Connection (side) HEADPHONE (Not supplied) Headphone Connection (side) YPbPr Video Connection (back) PC to YPbPr Connection Cable (Not supplied) USB Connection (side) CI Connection CAM module (side) NOTE: When connectin
Getting Started First Time Installation - USB Connections Switching On/Off Media Playback via USB Input To Switch the TV On Connect the power cord to the 220-240V AC, 50 Hz. To switch on the TV from standby mode either: Press the “ ” button, P+ / P- or a numeric button on the remote control. Press the side function switch until the TV comes on from standby. To Switch the TV Off Press the “ “ button on the remote control or press the side function switch until the TV switches into standby mode.
Multipartition support is available. The maximum of two different partitions are supported. The first partition of the USB disk is used for PVR ready features. It also must be formatted as the primary partition to be used for the PVR ready features. Some stream packets may not be recorded because of signal problems, so sometimes video may freezes during playback. Record, Play, Pause, Display (for PlayListDialog) keys can not be used when teletext is ON.
TV Menu Features and Functions Picture Menu Contents Mode You can change the picture mode to suit your preference or requirements. Picture mode can be set to one of these options: Cinema, Game, Sport, Dynamic and Natural. Contrast Sets the lightness and darkness values of the screen. Brightness Sets the brightness value for the screen. Sharpness Sets the sharpness value for the objects displayed on the screen. Colour Sets the colour value, adjusting the colors.
TV Menu Features and Functions Sound Menu Contents Volume Adjusts the volume level. Equalizer Selects the equalizer mode. Custom settings can be made only when in user mode. Balance This setting is used for emphasizing left or right speaker balance. Headphone Sets headphone volume. Sound Mode You can select a sound mode. (If the selected channel supports). AVL (Automatic Volume Limiting) Function sets the sound to obtain fixed output level between programmes.
TV Menu Features and Functions Store Mode (Optional) Power Up Mode If you are displaying the TV in a store, you can activate this mode. Whilst Store Mode is enabled, some items in the TV menu may not be available. This setting configures the power up mode preference. Install and Retune Menu Contents Automatic Channel Scan (Retune) (If available) Displays automatic tuning options. Digital Aerial: Searches and stores aerial DVB stations. Analogue: Searches and stores analogue stations.
P+P- : More event info IMPORTANT: Connect a USB disk to your TV while the TV is switched off. You should then switch on the TV to enable the recording feature. Troubleshooting & Tips Tv will not turn on Note: Switching to a different broadcast or source is not available during a recording. Make sure the power cord is plugged in securely to wall outlet. The batteries in the remote control may be exhausted. Press the Power button on the TV.
PC Input Typical Display Modes AV and HDMI Signal Compatibility The following table is an illustration of some of the typical video display modes. Your TV may not support all resolutions. Your TV supports up to 1920x1080.
DVD Mode On cleaning • Before playing, clean the disc with a cleaning cloth. Wipe the disc from the center out. Safety Information CAUTION DVD Player is a class 1 laser product. However this product uses a visible laser beam which could cause hazardous radiation exposure. Be sure to operate the player correctly as instructed.
DVD Control Panel Buttons A. Disc loader B. Play / Pause Plays/pauses the disc. When DVD menu (root menu) is active, this button functions as “button select” (selects the highlighted item in menu) if this is not prohibited by the disc. C. Stop / Eject Stop playing disc / Eject or Load the disc Note: • You cannot eject the disc via the remote control. • While playing a file, you should press STOP button three times to eject. Overview of the Remote Control 1. Standby 2. Numeric buttons INFO 3.
General Operation You can operate DVD, movie CD, music or picture CD’s content by using the proper buttons on your remote control. Below are main functions of commonly used remote control buttons.
General Playback Basic Play 1. Press on the power button 2. Please insert a disc to the loader. The disc will be automatically loaded and play commences if the disc does not have any menus recorded on it. A menu may appear on the TV screen after a few moments or the film may start immediately after the introduction of the Film Company. This behaviour depends on the disc content and may change. Note: Step 3 and 4 is available only when a menu is recorded on the disc. 3.
Disc Types Compatible with This Unit Disc Types (Logos) DVD Recording Disc Types Size Max. Playing Characteristics Time Single- Audio + sided; 240 min. 12 cm Double- Video sided; 480 min. AUDIO-CD Audio MP3-CD Audio (xxxx.mp3) PICTURE-CD Video (still picture) 12 cm 74 min. It depends 12 cm on MP3 quality. It depends 12 cm on JPEG quality. • DVD contains excellent sound and video due to Dolby Digital and MPEG-2 System.
Important Instruction For your own safety read following instruction carefully before attempting to connect this unit to the mains supply.