
User guide

36 Distributed Audio Panel Manual — P/N 52265:B1 6/8/2010
Installation Backbox Installation
3.2.1 Transformer Installation
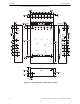
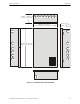
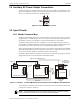
1. Locate four threaded mounting studs in the bottom left corner of the backbox (refer to backbox
illustration below).
2. Position the Transformer Assembly with the top and bottom mounting brackets on the
mounting studs, with cable assembly oriented to the top as illustrated below.
3. Secure the Transformer to the studs with the four supplied nuts. Do not tighten one of the nuts
until the next step.
4. Connect a wire from a solid earth ground to one of the Transformer mounting studs and tighten
the nut. This connection is necessary in order to provide proper lightning and transient
protection for the panel.
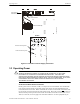
5. Plug Transformer cable assembly into connector P10 which is located in the lower left side of
the main circuit board. Note that the Transformer cable connector is keyed to prevent incorrect
connection.
6. Complete the installation by connecting the AC power wires to Hot, Neutral and Earth
terminals of TB10 on the main circuit board.
7. If batteries are being used, connect the batteries (18 AH maximum) to connector P11 located to
the bottom left of the main circuit board.
8. Apply power to the panel.
!
CAUTION: DISCONNECT POWER
BEFORE INSTALLING ANY MODULES OR CABLES, MAKE CERTAIN ALL POWER (AC AND DC)
HAS BEEN REMOVED.