
User guide


52 Distributed Audio Panel Manual — P/N 52265:B1 6/8/2010
Section 4: Operating Instructions
4.1 Message Recording
4.1.1 Record Push Button (on optional FC-MGM Module)
The switch labeled Record is used for recording a customized message.
Recording Instructions
Recording a custom message into the distributed audio panel requires that the voice message be
input via a microphone (P/N: FC-MICROPHONE) connected to P1 on the FC-MGM, PC micro-
phone, PC audio out connected to J1 on the FC-MGM or another audio source connected to RCA
jack J2. Switch settings in this section are for the FC-MGM module SW1 DIP switch. After
recording a new voice message, wait approximately one minute for internal supervision to take
place before broadcasting the new message over the building speakers.
1. Confirm the Message Control Settings On S1 DIP switches 7 and 8 located on the Distributed
Audio Panel motherboard. These settings will determine the number of messages that can be
recorded and the duration of each. Table 2.2 on page 27. Note that every time these switch
settings are changed, the message(s) must be rerecorded.
2. Enable recording by setting SW1 switch 3 on the FC-MGM module to the ON position. The
Record button is now ready to be used in record operation.
3. Select the record input source by setting SW1 switch 1 on the FC-MGM module to the OFF
position if recording via the RCA jack, or to the ON position if recording via other sources.
4. Configure the mini audio jack, if being used, by setting SW1 switch 2 on the FC-MGM
module to the ON position if recording via PC line out or to the OFF position if recording via
PC microphone.
5. Slide the Record Bypass switch SW2 on the FC-MGM module to the UP position to enable the
message storage device.
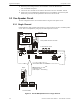
FC-LPS
for local playback
For Recording, select from one of three sources
Personal Computer
Tape Deck
Microphone
FC-MGM
DIP Switch SW1, switches 2 & 3
Record Bypass Switch SW2 in UP position
fcmgmrecrd.wmf
Figure 4.1 FC-MGM Recording Options