
Manual

4) maintain the jumper short circuited during the first A-D LEDs burst (the LEDs
turn on and off) and undo the short circuit during the second burst.
If the process has executed successfully, the IPDACT-2(UD) will display a third burst
indicating the default configuration has been activated.
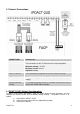
5. Serial Port Programming
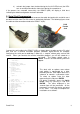
In order to use the serial port, you need to connect the cable designed to this end which must
be obtained either from Fire-Lite or from an authorized distributor. The following figures show
the cable and the connection mode to the IPDACT-2(UD).
RJ45
Female
Jack
Connect the serial cable to the IPDACT-2(UD) as shown above, the other end to a PC serial
port and use a terminal emulation program (Windows HyperTerminal for example)
configuring the serial port to 9600 bps, 8 data bits, 1 stop bit, without parity and no flow
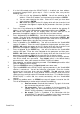
control. When you connect the terminal emulation program, you will be asked for a
password. The factory default value is
24680. Enter this and the following menu will
appear.
Password Accepted
- Main Menu -
Configuration
a) Generic MIP config
b) Transmission Parameters
c) Quick Install
Monitoring
d) General Info
e) Remote Monitor
f) Events
g) IP Connectivity
z) Exit
option: c
OK
-- Quick Install --
a) DHCP client: ON
b) IP addr: 192.168.0.100 mask: 255.255.255.0
c) Gateway IP: 192.168.0.200
d) Account Number: 0
e) Supervisory Main:
f) Supervisory Backup:
g) Maintenance:
h) Port: 80
i) Register MIP
j) Reset
k) AutoRegister MIP:
z) Exit
This deals with an options menu where
each option is represented by a letter
preceding the title. Each option accesses a
submenu or contains a parameter value.
To select an option, enter the letter
representing this and press ENTER.
For device installation, access the Quick
Install menu by pressing c and then
ENTER. The menu displayed in the
second figure will be presented. All the
parameters to install the device are found
in this menu. The steps to complete the
installation are as follows:
Dm387-Iv3 3