
Installation and Operating Instructions


12
CHECKING AND CONVERTING GAS TYPE
This power burner comes from the factory
confi gured for one type of gas, as marked on the
label behind the power burner control panel.
Converting this power burner to burn a
different type of gas requires a conversion kit
from the factory. The professional installer who
converts this power burner to burn a different
gas must perform the following functions:
1. Change brass gas orifices (included at original
shipping) on each burner to match the new gas type
(see PRODUCT DATA TABLE, Table 1).
2. Switch the convertible gas regulator (included
at original shipping) to match the new gas type
(see below).
3. Plumb the unit to the new gas supply.
4. Apply a new label behind the control panel,
indicating the new gas the power burner will
burn (included with conversion kit).
HAZARDOUS OVERHEATING WILL OCCUR
IF A NATURAL-GAS ORIFICE IS USED WITH
PROPANE GAS. IF YOU ARE NOT SURE IF THE
CORRECT ORIFICES ARE INSTALLED, OR IF AN
ORIFICE CHANGE IS NECESSARY, REFER TO
THE FOLLOWING INSTRUCTIONS.
CAUTION: Make sure the power burner is at a
safe temperature and isolated from
gas and electrical supplies before
beginning the tasks outlined below.
Note: The cooler the power burner, the greater
the tolerances between the stainless-
steel parts, and therefore the easier to
disassemble and reassemble parts of the
power burner.
CAUTION: For your safety, exercise caution and
use adequate hand protection (such
as gloves) when handling potentially
sharp sheet-metal parts.
THIS APPLIANCE REGULATOR IS RATED FOR
1
/
2
PSI MAXIMUM. IF YOUR GAS SUPPLY IS
GREATER THAN
1
/
2
PSI, AN ADDITIONAL REGULATOR MUST BE INSTALLED TO REDUCE
THE INPUT PRESSURE TO THE POWER BURNER to
1
/
2
PSI OR LESS. SEE GAS-SUPPLY
REQUIREMENTS SECTION FOR PROPER GAS-SUPPLY PRESSURE.
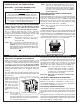
CHECKING AND CONVERTING THE REGULATOR
Note: Each end of the plastic converter is engraved with either the letters “NAT”
or “L.P.” (propane) for the respective gasses. When the converter is in the
cap and the cap is held uppermost, the letters seen indicate the gas that
the regulator is set up for.
To convert the regulator from one gas to another, follow steps 1-4.
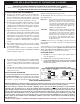
STEP 2:
Remove the converter (the
plastic stalk) by carefully
pulling it away from the center
of the cap (it will snap out of
its seating).
STEP 1:
Unscrew and remove the cap from the
regulator, extracting the converter.
Unit regulator: note the
cap on top
STEP 3:
Turn the converter around and
replace it carefully, into the
center of the cap (it will snap
into place). Check that you can
read the type of gas the unit is
set for.
STEP 4:
Replace the unit into the
regulator and screw down
until snug.
Read gas
type here
WARNING
WARNING