
Instruction Manual


REV 1 - 1105090755
L-C2-351
10
OPERATION GUIDELINES (cont.)
over, carefully pour it down into the charcoal chamber. Add
additional charcoal to the chamber for a total of 2-5 pounds.
Then refer back to steps # 7 and #8.
PRE-HEATING, SMOKING START-UP & LOADING
1. Once the charcoal is glowing red, pour approximately
1 pound of wood chips into the wood chip chamber.
(The wood chips may be pre-soaked in water if desired.)
Note: If using wood pellets, the wood pellet screen must
fi rst be installed over the wood chip grid (see
assembly section and Fig. 7-4 for details). The
screen prevents the pellets from falling down into
the ash tray.
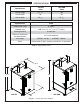
2. Close and latch both the fi rebox door and the ash
compartment door. Completely open the two air shutters
on the ash door (see Fig. 10-1).
3. Unlatch and open the front smoker door.
4. Carefully fi ll the drip tray with water or a liquid fl avoring
of your choice. (Hot water is recommended.)
Note: Although not required; it is recommended that an
additional pan fi lled with liquid be placed on the
rear of the bottom rack. The pan MUST be oven
safe. A
1
/
2
gallon of water is suffi cient.
5. Using (dry) protective gloves or oven mitts and long
handled BBQ tools; load the food to be cooked. Slightly
pulling out the grids (with gloves) will allow for easier
loading. Proper spacing between the food will allow for
adequate air fl ow and an optimal smoke. See Fig. 10-2.
6. Close and latch the smoker door. Be sure the air shutters
on the front door are closed (see Fig. 10-3).
7. Allow the smoker to pre-heat until the desired cooking
temperature is reached. Smoking temperatures range
between 175°F & 250°F. Turn the thermometer on to
view the current smoker internal temperature (see Fig.
10-4). (See the DIGITAL THERMOMETER section for
complete use.)
BE PATIENT AS THE AMOUNT OF TIME REQUIRED
BEFORE YOUR SMOKER IS UP TO TEMPERATURE
WILL BE AFFECTED BY MANY VARIABLES (WEATHER
CONDITIONS, AMOUNT OF FOOD LOADED, CHARCOAL
TYPE AND AMOUNT USED, ETC.)
Fig. 10-3
Fig. 10-1
Air shutters
fully open
Fig. 10-2
Designed for
easy loading
Grids
removable to
accommodate
food
Fig. 10-4
ON/OFF button