
Instruction Manual


REV 1 - 1105090755
L-C2-351
6
ASSEMBLY
This smoker comes shipped with accessories and
components packaged inside of it. Remove these items
and discard all packaging.
PRIOR TO ASSEMBLING; use a damp cloth to completely
wipe down all of the items, and the interior compartments
of the smoker. This will remove any loose debris that
may have built up during the manufacturing process.
REFER TO THE PARTS LIST WHEN FOLLOWING THESE
INSTRUCTIONS.
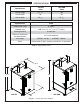
CHIMNEYS
1. Locate a chimney assembly.
2. Orient it over one of the large holes found on the top
of the smoker. Line up all screw holes of the chimney
over the screw holes found on the smoker.
3. Hand tighten 5 of the supplied screws in place, being
sure that the chimney is properly aligned. Then use a
Phillips screwdriver to completely fasten. See Fig. 6-1.
4. Repeat for the second chimney assembly.
DRIP COLLECTOR & TRAY
1. Locate the drip collector and drip tray.
2. Unlatch and open the smoker door.
3. Place the drip tray inside the unit, at the very bottom.
Slide it into place as shown in Fig. 6-2. Be sure it
completely slides in.
4. Slide the drip collector into place, just above the drip
tray. See Fig. 6-3. Be sure it completely slides in.
Fig. 6-1
Align chimney
over smoker and
fasten
Fig. 6-2
Slide in drip tray
Fig. 6-3
Slide in drip collector